
Making your own epoxy resin table with wood
In this article we feature a tutorial on how to create a stunning epoxy resin river table from resin-expert.com
21/01/2020
Learn how to create a fascinating epoxy table
Important for this is the choice of the right casting resin. In the hobby sector, epoxy resin is usually used, but here too there are many different types, depending on whether the casting is to be thick or thin.
Epoxy resin is well suited for processing wood and synthetic resin in one object: Unlike polyester resin, it adheres well to wood or metal. However, such a bond can be prevented by the resin and grease in the wood. This not only weakens the bond to the synthetic resin, but also impairs its hardening and stability.
If you also work with a particularly greasy type of wood such as pine, larch or acacia, you must also clean the surface well with acetone. For closed surfaces, a simple wipe is sufficient. Holes and cracks, on the other hand, must be washed and dried thoroughly.
When epoxy resin hardens, there is a chemical reaction with heat development. The thicker the casting layer, the faster the resin reacts and becomes hotter. This can lead to stress cracks and boiling bubbles. Therefore, for thick castings, resins are used that react slowly and thus generate less heat, but also cure more slowly than resins for thin layers.
Check also the tutorial on how to create a stunning Epoxy resin river table from resin-expert.com
Mix epoxy resin
Weigh the resin and hardener in two containers according to the manufacturer's instructions or measure according to volume. Pour the hardener into the resin and mix both components thoroughly. Then let it rest so that air bubbles can rise.
Colouring epoxy resin
Casting resin is coloured with colour concentrates. The liquid concentrates are mixed into the finished casting resin in a ratio of 2 to 10 % of the total quantity, depending on the colour intensity. Besides liquid concentrates, effect pigments can also be used. These should be dissolved with appropriate thinners, as dry pigments do not always mix well with resin.
Pouring epoxy resin
Slowly pour the liquid into the sealed mould. Pay attention to the maximum layer thickness (see manufacturer's instructions). Thick layers harden and heat faster - stress cracks and boiling bubbles may form. This can be avoided by building up thick moulds with several layers. Before you apply the next layer, the layer below must already have hardened and cooled down completely.
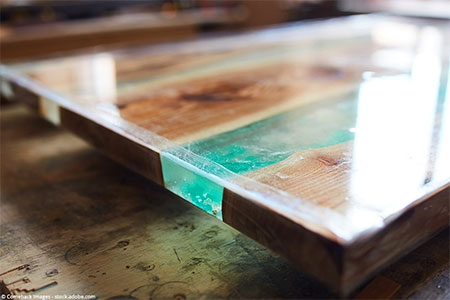
Step-by-step Tutorial for your Epoxy Table
1. Cutting the wooden disc
Use a dry tree disc that has been stored for at least two to three years and a wood with little resin. Any cracks can be removed when cutting. Tip: place a 3 cm thick polystyrene board (EPS) underneath.
2. Create a mould
The synthetic resin is placed in a specially prepared mould. The casting frame is made of 22 mm thick, smooth coated chipboard.
Tip: Be very careful when sealing the casting mould, because the low-viscosity casting resin "finds" every leak.
3. Screw the frame boards together
Screw the frame boards butt together. The boards should not be warped, otherwise there will be slight leaks.
4. Mix epoxy resin
How much casting resin you need depends on the volume of the table top and the dimensions of its tree disc.
Tip: It is better to plan a little more, because the wood "absorbs" the resin.
5. Mixing resin and hardener
Mix the required amount of resin and hardener exactly in the ratio specified by the manufacturer.
6. Pouring the table top
Make sure that the room temperature does not fall below 20° C (not even during curing). Pour the resin slowly and avoid splashes and air bubbles.
7. Rework the table top
At the earliest after 72 hours, or better after the final curing of a total of seven days, you can remove the table top from the mould and continue working on it.
8. Remove frame
Remove the frame. Use a hardwood chisel and wedge to separate the base plate from the table top.