Basic Macramé Plant Hanger
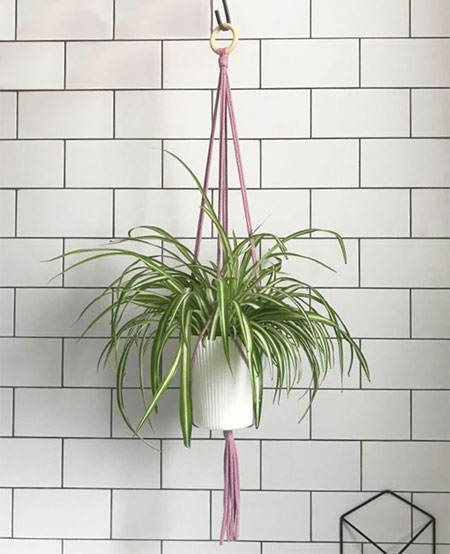
Macramé plant hangers are great for hanging plants and this basic macramé plant hanger is very easy to make.
05/05/2020
hello magazine | by-me
Macramé is a fun way to make your own plant hangers and you can make a basic plant hanger, as shown here, or ones that are a little more detailed and intricate as you learn the basic macramé knots. You will find a selection of ropes, braids and cords at your local Builders store that is ideal for making macramé plant hangers, or you can just use wool or yarn to craft your macramé plant hangers. I like to use sash cord to make my macramé accessories. It's quite thick and gives a chunky look without using too much cord.
Macramé has become popular once again and continues to pop up on trending craft sites. What's fun about macramé is that you can use this technique to make a variety of decor accessories for the home, so why not discover how easy it is and start with this simple design.
YOU WILL NEED:
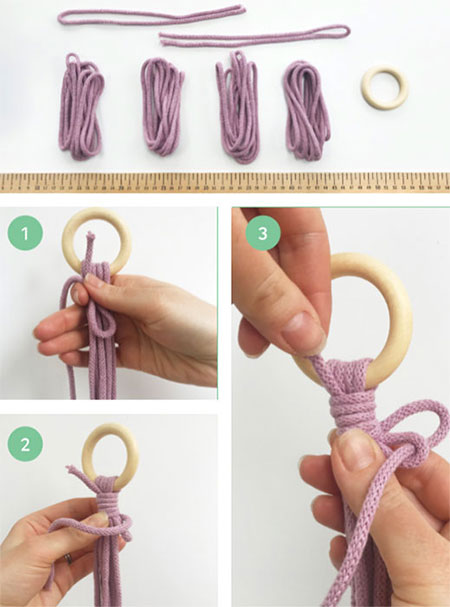
4 of 2 metre long cords in your choice of material
2 of 500mm cords
1 steel or wooden ring
Hook to hang on while you work
HERE'S HOW:
- Attaching to the ring
To start, fold the [4] long cords in half. Thread these through the steel or wood ring so they are equally placed with both ends the same length.
1. Take one of the 500mm lengths of cord to make a loop at one end. Now place the loop against those threaded through the ring, as shown below. Make sure that the loop is facing down.
2. Wrap the longest end over and around the group of cords, beginning at the top and working down.
3. Make [5] full turns
before threading the end through
the loop as can be seen in the image below. Pull the other end back
through from the top to lock the cords in place.
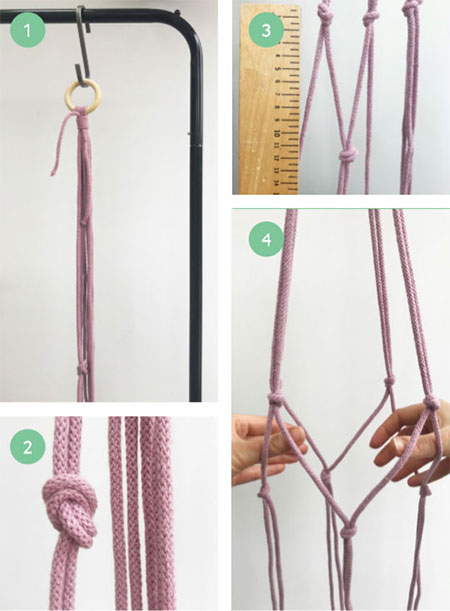
- Knot the basket section
1. To make it easy to work, hang the ring from a hook that is conveniently placed and where it will be easy for you to work.
2. With [2] outer cords, knot about halfway down from the ring knot. Repeat this with each [2] lengths of adjacent cords.
3. Time to add another row of knots that are placed about 120mm away from the first set of knots. Don't repeat the first knots - alternate the knots as can be seen in image 3 below.
4. Now you can see that the basket section of the planter is starting to take shape.
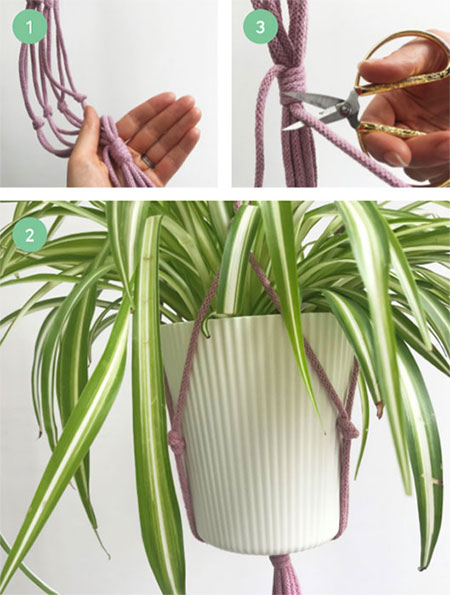
- Finish off the planter
1. Repeat step 3 above to add another row of knots and then add the remaining 500mm length of cord
2. Test fit your plant pot to make sure that it fits straight or adjust the placement of knots until it does.
3. Neatly trim to cut away excess cords at the bottom of the hanger and YOU'RE DONE!