
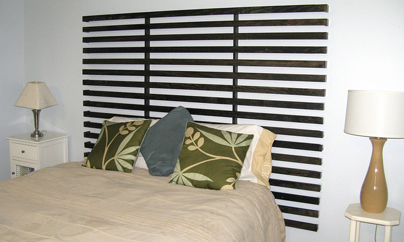
Quick Project: Easy DIY slatted headboard
A headboard can add sophistication to any plain bedroom. This simple slatted design took less than half a day to complete and cost less than R100.
YOU WILL NEED:
16 clear pine 25 x 100mm
Woodoc 10 and Imbuia stain concentrate
Paintbrush
Woodoc Steelwool
Drill/Driver and wood screws
Hammer Drill, fischer wall plugs and screw
HERE'S HOW:
1. Decide how large you would like your headboard to be. Typically the headboard is as wide as the bed, but it can look nice extra long or extra short, depending on the design and style of your room. Cut the desired amount of slats to the appropriate length.
2. Cut two extra slats for the vertical pieces that will be used to hold all the slats together.
3. Use 180-grit sandpaper to sand all the pieces until smooth. Chamfer the edges to a rounded finish. Wipe clean.
4. Pour the stain concentrate in the Woodoc 10 and stir gently. Apply to all surfaces with a paintbrush, ensuring liberal absorption at the ends. Leave to dry completely
5. Wipe down with Woodoc Steelwool to remove excess build up on the surface of the wood and apply two further coats of Woodoc 10, allowing each coat to dry completely before applying the next coat.
6. Line up all of the pieces of the headboard. Use uniform-size scrap blocks of wood in between each slat to make sure they are spaced evenly apart.
7. Lay the two vertical pieces across the slats making sure they are also evenly spaced. Screw the two vertical pieces to each slat with wood screws, connecting the entire structure. Make sure the screws are not too long, you don’t want them poking through the front of the headboard.
8. To mount the headboard to the wall, drill a hole at the top of each vertical section. Place the headboard against the wall at the right height and push a small drill bit through the hole to mark the wall. Use a hammer drill to drill holes at these marks; insert a fischer wall plug and put the screw through the headboard and fasten to the wall.