
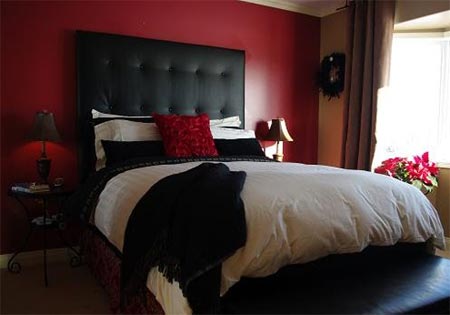
Make a Quilted Faux Leather Headboard
We haven't had a headboard in our room for a few years - just two picture frames above our bed. Not so pretty.
I decided a large, tall upholstered headboard would be perfect! And I could make it myself. Making an upholstered headboard is really quite easy. Trust me, anyone can do this!
YOU WILL NEED:
Plywood cut to the size of the headboard you desire
5cm thick sheet of foam
Medium thickness batting
Faux leather fabric
Upholstery buttons (with a ring at the back)
Scrap wood for the support bracket
Staple gun
Drill-Driver* and assorted drill and screw bits
Nylon line
Long sewing needle
Thimble
Tape measure
Pencil
*If you're in the market for a new drill-driver, the Bosch PSR 14,4 LI is fantastic. I have been using mine now for the past four months - even at workshops - and it hasn't let me down yet!
HERE'S HOW:

1. Attach one section of the timber bracket to the wall and the other side to the back of the plywood sheet. This has to be the easiest way to mount a headboard onto the wall!
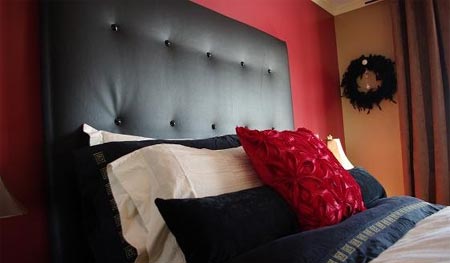
Important: If you plan on tufting your headboard, use a tape measure and pencil to mark the locations of each button on the back side and drill a hole at each mark. Make your hole larger rather than smaller. It will make the tufting easier. Take note of the measurements for the drilled holes as these need to be transferred to the fabric-covered front later on.
2. Cut the foam sheet to the size of the plywood. An electric carving knife works great but I just used scissors. I wasn't too concerned about it being perfect because the batting will cover a multitude of sins!
3. Lay the batting over the foam and wrap it around the wood to the back side. Staple it in place, making sure it is nice and tight and smooth.

4. Faux leather is very affordable but you can choose any fabric you want to cover the headboard. When attaching the fabric, make sure it is straight and centered then put one staple in the centre of each side, on the back. Work on one side at a time, stapling from that centre staple out to the corners. The corners will be the most difficult part of the whole thing. Pretend it is a present and take it from there.

5. With a piece of chalk, mark the front of your headboard with the same marks.
6. Thread your needle with nylon line. Going from back to front, push the needle through the hole you drilled and try to find the mark you made on the front of the headboard. Make sure to leave some of the line at the back of the headboard.
7. Push the needle all the way through - a thimble helps to give more impetus! Thread it through the shank of the button and back through the same hole.
8. Pull the line out of the needle and tie a knot with the length of thread that was left. Open the line to force the knot closer to the back of the board and then tie another knot.
the diy showoff