
Make a Platform Bed
With only a little DIY savvy you can quite easily make your own bed, and in this project you'll find out how to make a platform bed that offers storage and style at a very affordable price - in three-quarter, double or queen bed size.
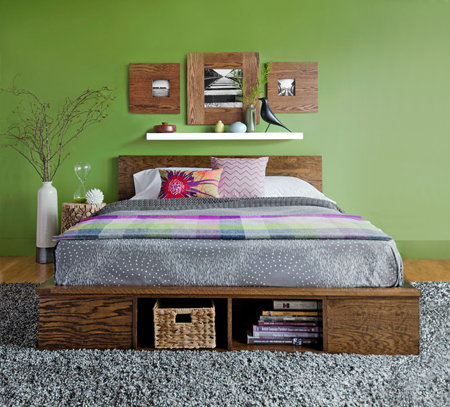
Finding a bed that you like these days is not an easy task. Design, finish and price all determine your final selection and you may end up with a bed that you don't really like. With only a little DIY savvy you can quite easily make your own bed, and in this project you'll find out how to make a platform bed that offers storage and style at a very affordable price - in three-quarter, double or queen bed size.
This bed, made from mostly plywood, is affordable and something you can build in a weekend. You can build the bed using pine or plywood with edging strips for all of the plywood parts. Or, stain it to coordinate with your bedroom colours. To add a modern twist, use SupaWood and apply a clear polyurethane or painted finish.
YOU WILL NEED:
| CUTTING LIST ¾ BED | |||||||
A |
4 x |
19 |
400 |
1956 |
plywood |
side top/bottom | |
B |
12 x |
19 |
`216 |
400 |
plywood |
dividers | |
C |
2 x |
19 |
254 |
1537 |
plywood |
side backs | |
D |
2 x |
19 |
400 |
290 |
plywood |
end top/bottom | |
E |
1 x |
19 |
254 |
290 |
plywood |
end back | |
F |
1 x |
19 |
813 |
1143 |
plywood |
headboard | |
G |
2 x |
19 |
90 |
813 |
plywood |
head stiles | |
H |
1 x |
19 |
90 |
965 |
plywood |
head rail | |
I |
2 x |
19 |
64 |
1970 |
pine |
side rails | |
J |
1 x |
19 |
64 |
990 |
pine |
end rail | |
K |
2 x |
38 |
90 |
1537 |
pine |
side supports | |
L |
0 |
slats | |||||
M |
1 |
19 |
250 |
1530 |
plywood |
platform | |
| CUTTING LIST DOUBLE BED | |||||||
A |
4 x |
19 |
400 |
1956 |
plywood |
side top/bottom | |
B |
12 x |
19 |
`216 |
400 |
plywood |
dividers | |
C |
2 x |
19 |
254 |
1537 |
plywood |
side backs | |
D |
2 x |
19 |
400 |
670 |
plywood |
end top/bottom | |
E |
1 x |
19 |
254 |
670 |
plywood |
end back | |
F |
1 x |
19 |
813 |
1524 |
plywood |
headboard | |
G |
2 x |
19 |
90 |
813 |
plywood |
head stiles | |
H |
1 x |
19 |
90 |
1346 |
plywood |
head rail | |
I |
2 x |
19 |
64 |
1970 |
pine |
side rails | |
J |
1 x |
19 |
64 |
1370 |
pine |
end rail | |
K |
2 x |
38 |
90 |
1537 |
pine |
side supports | |
L |
5 x |
19 |
90 |
630 |
pine |
slats | |
M |
1 |
19 |
630 |
1530 |
plywood |
platform | |
| CUTTING LIST QUEEN BED | |||||||
A |
4 x |
19 |
400 |
2080 |
plywood |
side top/bottom | |
B |
13 x |
19 |
216 |
400 |
plywood |
dividers | |
C |
2 x |
19 |
254 |
1664 |
plywood |
side backs | |
D |
2 x |
19 |
400 |
826 |
plywood |
end top/bottom | |
E |
1 x |
19 |
254 |
826 |
plywood |
end back | |
F |
1 x |
19 |
813 |
1680 |
plywood |
headboard | |
G |
2 x |
19 |
90 |
813 |
plywood |
head stiles | |
H |
1 x |
19 |
90 |
1450 |
plywood |
head rail | |
I |
2 x |
19 |
64 |
2010 |
pine |
side rails | |
J |
1 x |
19 |
64 |
1524 |
pine |
end rail | |
K |
2 x |
38 |
90 |
1664 |
pine |
side supports | |
L |
5 x |
19 |
90 |
780 |
pine |
slats | |
M |
1 |
19 |
780 |
1660 |
plywood |
platform | |
You can have all your timber and board cut to size at your local Builders Warehouse.
Edging strip
3,5 x 35mm wood screws
Wood glue
Painter's tape
Wood stain, paint or varnish
TOOLS
Drill/Driver plus assorted bits
Jigsaw, circular saw optional if cutting own wood
Craft knife
Steel rule or Carpenter's square
Orbital sander plus 180-grit sanding pads
Sanding block
Quick clamps
Tape measure and pencil
Iron
HERE'S HOW:
Build the base
Step 1
Cut the 19mm plywood into smaller sections to create the side case bottoms/tops (A), dividers (B), side backs (C), end case top/bottom (D), and the end case back (E) - see diagrams below.
If you are building the queen- or king-size bed, there is one extra divider and it’s used in the end case.
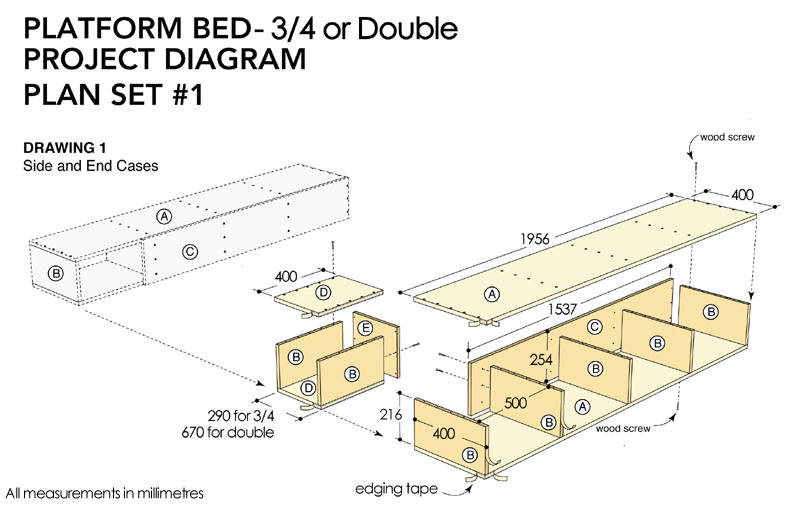
Good to Know:
Each size bed has a different Cutting List and Cutting Diagram, so before cutting any wood, grab the cutting list that matches your bed size. There are two sets of drawings for the four major mattress sizes. One plan is for a three- quarter or double, and another for a queen. The main difference, aside from the width of the mattress is the length of the mattress.
Step 2
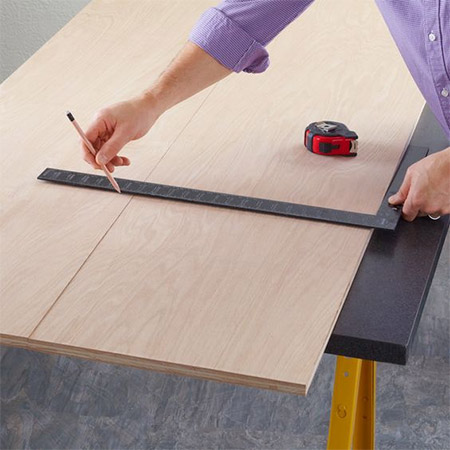
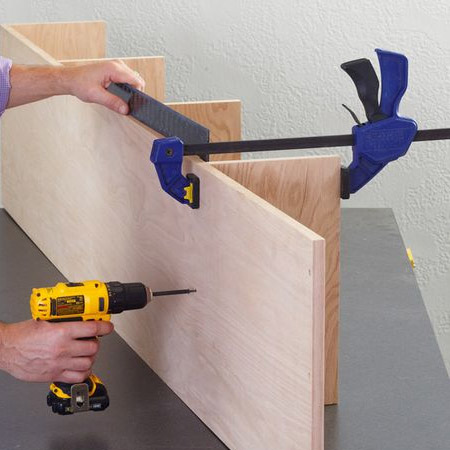
Align the ends of the tops and the bottoms of the side cases and lay out the divider locations (Photo 1). A framing square will help transfer the marks onto both sheets to ensure proper alignment during assembly.
Step 3
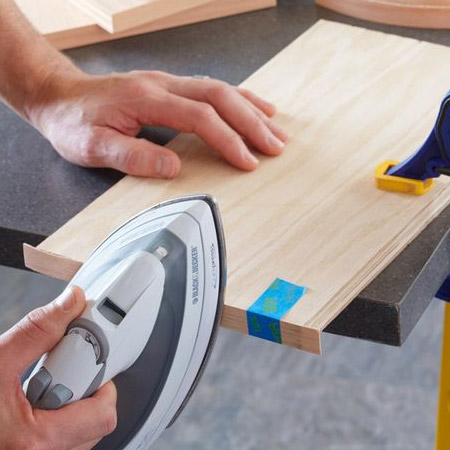
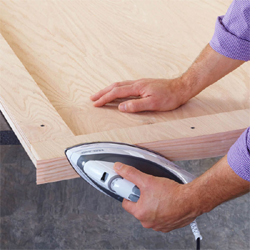
Several plywood edges on the tops, bottoms, and dividers will be exposed in the final project and need to be covered with edging strip to create a finished look. After marking the edges that need to be covered, cut edging strip pieces 10mm longer than those edges. Use a household iron to activate the glue, and press the strip into position on the edges of the panels. A piece of masking tape can secure the edging strip until you activate its adhesive.
Step 4
Allow the strip tape to cool for a few minutes, trim the edges with a craft knife, and sand the panels and edging.A sanding sponge creates a softened edge on the strip to reduce any sharp edges. A random-orbit sander with 180-grit sandpaper smoothes the plywood panels.
Step 5
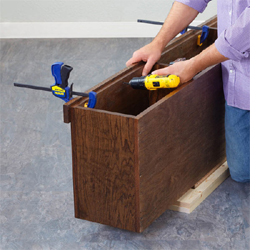
Apply glue to a divider, position it against the bottom, and clamp in position. Drill a countersunk pilot hole and drive a screw 20mm from the front edge. Use a square to ensure the dividers are 90 degrees to the front edge and secure with the remaining screws. Repeat for the other dividers.
Step 6
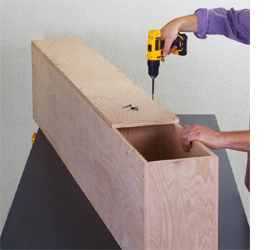
Glue and screw the top to the case. Secure the back using screws but no glue (when finishing the case it will be easier to remove the back to access the inside of the case). The case back attaches flush to the headboard end of the case, and the remaining opening near the foot of the bed is covered by the end case. When the first case is complete, assemble the second side case and the end case.
Headboard and Mattress Support
Step 1
Cut the headboard panel (F), stiles (G), and rail (H) to size and assemble using glue and screws. Cut a 50mm-wide edging strip (or double up two thinner strips) and iron in place on the headboard. Trim and sand away the excess. Trim with a craft knife and sand the headboard smooth.
Step 2
Cut the side rails (I) and end rail (J) to length and sand smooth.
Step 3
Cut the side supports (K) from 50 x 100mm PAR pine, the slats (L) from 25 x 100mm PAR pine, and the platform (M) from 19mm-thick plywood. The plywood needs no edging and the parts do not require a finish.
Good to Know:
For a three-quarter-size bed, no slats are needed under the platform.
Finish and Assembly
1. Apply the stain of your choice to the base cabinets, headboard assembly, and the rails. After the stain dries, apply three coats of Plascon Ultra Varnish according to the instructions. When the final coat cures, reinstall the case backs.
Step 2
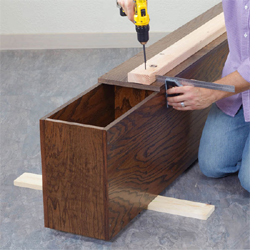
Apply the side supports (K) to the back of the side cases -- the top edge of the 50 x 100mm PAR pine should be 40mm below the top of the cases and flush with each end of the case side backs (C). For the twin-size bed, the slats will not be used; position the side supports 19mm below the top edge of the case.
Step 3
Add the side rails (I) to the side cases. The rails should be flush on the headboard end of the cases and overhang the side and footboard end of the cases by 12mm.
Step 4
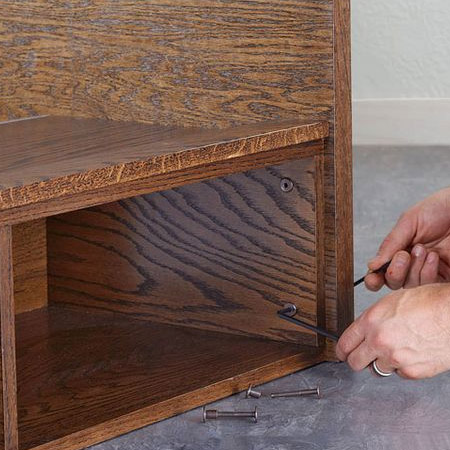
Move the piece into the bedroom and position the cases into the bed location away from the wall. Slip the headboard into position so it extends approximately 25mm beyond the side cases and 12mm beyond the side rails (I). Drill two 3mm holes through the side case dividers (B) and the headboard assembly. Connect the headboard using 6mm bolts and nuts. Tightening the bolts will square the bed assembly.
Step 5
Install the end rail across the foot of the bed between the side rails so it overhangs the end of the bed by 12mm.
Step 6
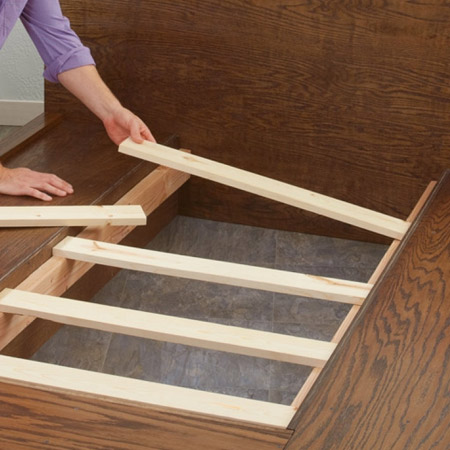
est evenly spaced slats (L) on the side supports and place the platform (M) on the slats.
Step 7
Slide the bed against the wall and add a mattress and linens.