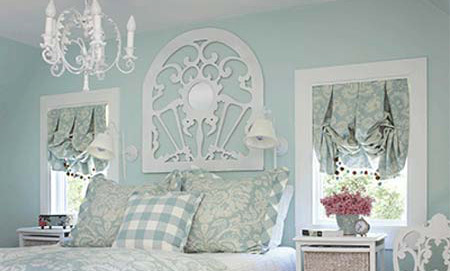
Make a decorative panel headboard
A jigsaw is the only power tool you need for this project, but it does require some skill. If you've never used a jigsaw before, sign up for our DIY Divas scroll saw & jigsaw workshop and realise how many wonderful accents and accessories you can create.
After attending a DIY-Divas.co.za workshop you will start to look around home decor shops differently. The first thing that pops into your mind is ... "I can make that myself!" It's a wonderful feeling to know that you have the skills to be able to tackle almost anything, and all it takes is confidence and knowing the tricks and techniques.
YOU WILL NEED:
Piece of chipboard - as large as you would like to make your panel
Length of chain
Pencil
Steel rule or tape measure
Drill/driver and 10mm wood bit
Jigsaw and thin blade
Prominent Paints matt - cloud white
Paintbrush
80- and 120-grit sandpaper
Optional: Silver or gold Guilder's paste
Brown paper
Picture hook
Small round mirror - cut to size
HERE'S HOW:
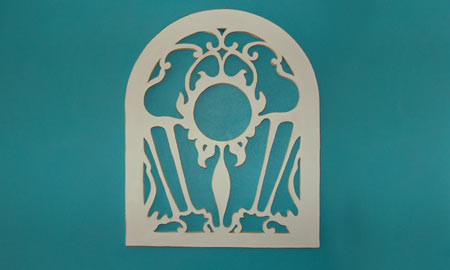
1. Measure out the shape and use a length of chain to draw the curved top. Hammer a panel pin into the centre, slip the chain over the pin and insert the pencil into one of the links for a perfect shape.
2. Draw your design onto the board. You can draw freehand or trace your design onto the board. Search the Internet for nice designs that you can have enlarged on a photocopier.
3. Use the drill/driver and 10mm wood bit to make holes in all those sections that need to be cut out. This allows you to insert the jigsaw blade into the board for cutting out. Make sure that you put holes in any tight corners for easy access.
4. Use the thin blade in the jigsaw, as this makes cutting curves and tight corners much easier. If you find that the wood starts to burn around very tight curves, come in again from a different angle until you cut out all the sections to be removed.
5. Sand with 120-grit sandpaper to remove any roughness from the chipboard. I have used chipboard for this project as I want to create a panel that is old and worn. The design is very reminiscent of Art Nouveau style, so I wanted it to look like it had been around, banged up and scratched as it would be if found in a secondhand shop.
6. Use Prominent Paints matt - Cloud White - to paint the panel. I used this paint because of its consistency. It's nice and thick and will fill in any small holes and chips nicely. The colour, although white, is not a bright white and also adds to the aged look. I applied 3 to 4 coats of paint, allowing each coat enough time to dry before applying the next coat.
7. Once dry, I scuffed up all the edges with 80-grit sandpaper. Here you can do as little or a much as you want depending upon the look that you want to create. I've gone Shabby Chic and really roughed it up.
8. Finally - and optionally - I added a bit of gold Guilder's paste over the roughed up edges to make it look as though there was originally a gold border around that has worn away - looks perfect although you can't really see it in the image below.