
DIY new bathroom - installation
While to most homeowners the thought of doing a bathroom renovation may seem daunting, the best way to view this task is as individual projects. Remove and replace a toilet, remove and replace a basin, remove and replace a bathtub, etc. When viewed in this way the projects already seem more manageable.
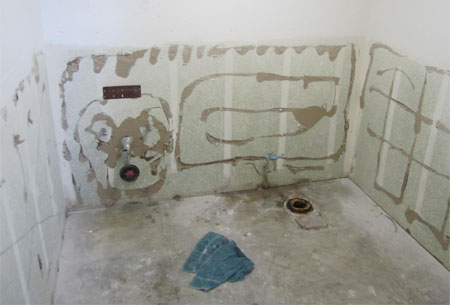
If you are fortunate enough to have modern copper pipe work installed in your home, disruption to the household will be far less than if you have to remove old lead pipes, as new fittings can be plumbed in quite rapidly - even if they are in a new position.
Remove existing fittings
It would be wise to have some cloths handy to mop up any water which escapes from within the system as the work progresses.
With the water cut off and with taps opened to drain out as much residual water as possible, you can disconnect the fittings and cap the pipes temporarily. This can be done with service valves and check valves which can later be part of the system used to isolate fitments - ideal for tap washer changing for example. The main water supply could then be restored to other parts of the house so that the kitchen sink supply and second bath supply could be operated normally.
The next step is to remove the first item to be replaced. This may be the old bath, basin, toilet, or all of them, but we do recommend that the toilet is dealt with first.
The old bath will be heavy and you may need assistance to get it out of the bathroom, and indeed out of the house, in one piece.
The basin will be easier to deal with since this will probably be supported on a pedestal.
When removing the toilet, start with the cistern, then disconnect the base. Try not to damage the waste pipe and cover the end of the pipe with cloths or polythene to prevent debris getting into the waste system.
With everything removed the next step is to make good any defects which have been uncovered, such as rotten floorboards or damaged plaster work. Spend a bit of time to complete any dirty work and prepare the room for the new fittings and decorations. This preparation work should include channelling the walls for electric wiring conduit for items such as a heated towel rail, extractor fan or additional lighting.
Remember that no plug and socket fittings are allowed in a bathroom.
Fitting your new bathroom suite
Where applicable, fitting instructions should be read and understood before any installation commences. However, in the absence of any written instructions, you must understand what is required before proceeding. If in any doubt, rather let a professional do the installation for you.
The worst part of the job is now over (phew!) and you should have an empty, clean room into which to fit your new pieces of equipment. Start with the toilet pan, using a special plastic and rubber pan trap connector to link the pan outlet to the old waste pipe. (Diagram B). Only when the pan outlet is linked in accordance with the instructions included with the connector should you secure the pan to the floor and ensure the correct level positioning. Fit the cistern and connect the overflow pipe valve and water supply pipe. The water supply pipe should be fitted with an isolating valve for simple future maintenance.
The bath and basin can be fitted next. You will find it easier to fit the combined waste outlet and overflows, and the taps, before actually putting the bath and basin in place.
Finishing off
Once all the new main bathroom items are in place and fully operational you can proceed at leisure with the decorative work.
Design Tip:
When installation a new bathroom it is well worth making good use of service/isolating and check valves in your supply pipes to each and every outlet so that at any time in the future that outlet can be isolated very easily. Valves and existing stopcocks must be accessible and labelled to indicate their purpose.