
DIY Make a Wood Bathroom Vanity
With its simple lines and easy construction, this DIY wooden bathroom vanity can be stained in your choice of wood tint to provide an elegant storage solution for any bathroom.
04/11/2019
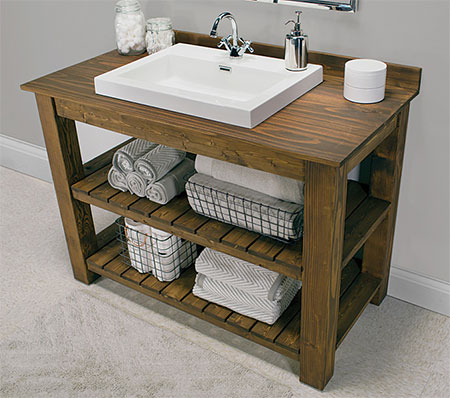
This DIY wood bathroom vanity is an easy project to assemble, and even easier if you have all your PAR pine cut to the required lengths in-store at Builders Warehouse. The wooden bathroom vanity would look great in a rustic or country bathroom, and just as sophisticated in a modern contemporary setting where the warmth of wood will add to an otherwise sterile bathroom setting.
Because you are making your own wood bathroom vanity, you have the option to choose your wood tint sealer or varnish to finish off or add a lime wax or whitewashed effect to complement a coastal or cottage bathroom design.
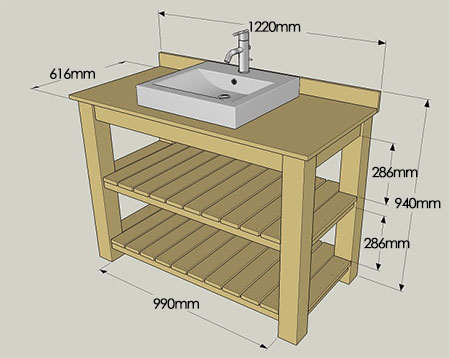
No matter the size of the space, you can simply adjust the measurements below to ensure a perfect fit in any bathroom. The wood vanity is designed for a drop-in or top-mounted basin, making it easier for you to assemble and put to use.
YOU WILL NEED:
4 of 89 x 89 x 850mm PAR pine - legs
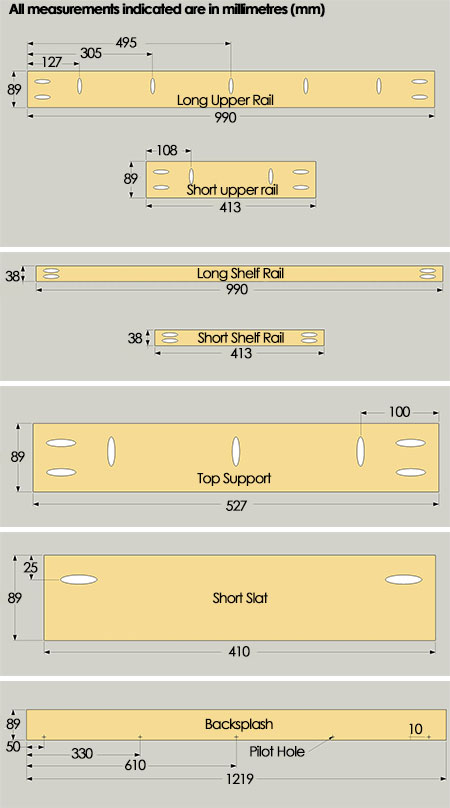
2 of 19 x 89 x 990mm PAR pine - upper rail, long
2 of 19 x 89 x 413mm PAR pine - upper rail, short
4 of 19 x 38 x 990mm PAR pine - shelf rail, long
4 of 19 x 38 x 406mm PAR pine - shelf rail, short
4 of 19 x 89 x 203mm PAR pine - corner brace
2 of 19 x 89 x 527mm PAR pine - top support
20 of 19 x 89 x 572mm PAR pine - slat, long
4 of 19 x 89 x 410mm PAR pine - slat, short
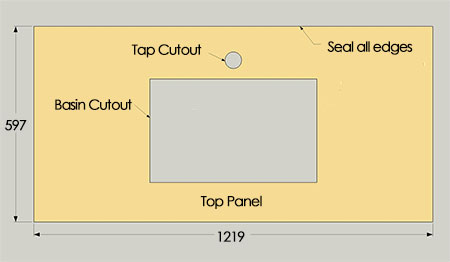
1 of 19 x 597 x 1219mm PAR pine - top panel
1 of 19 x 89 x 1219mm PAR pine - backsplash
6, 9 and 12mm dowels as spacers
32mm Coarse-thread pocket-hole screws
Not responsible for errors or omissions
*Modify all the above measurements to accommodate PAR pine materials in store.
TOOLS:
Drill / Driver plus assorted accessories
Kreg pocket-hole jig
Jigsaw and mitre saw
Nail gun or hammer and panel pins
Orbital sander plus 120- and 180-grit sanding pads
Carpenter's square
Clamps
Tape measure and pencil
HERE'S HOW:
Preparation
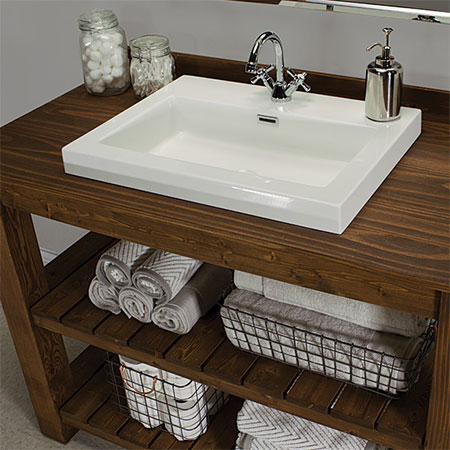
- Before starting the assembly process, select the basin that you want for the vanity so that you have the measurements on hand when cutting out the top to fit.
- Using the diagrams above, pre-drill pilot and pocket-holes as indicated. Sand smooth once finished.
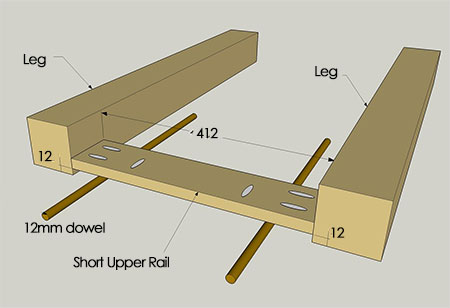
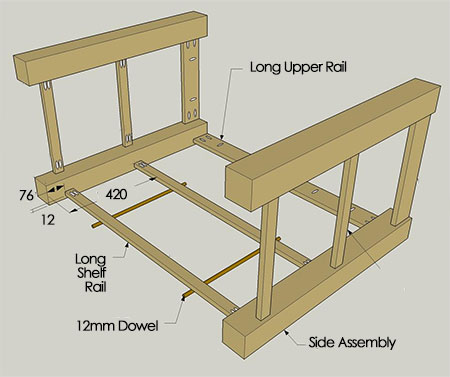
1. Place the dowel spacers underneath the Short Upper Rail - on a flat work surface. check that the Legs and top of the Short Upper Rail are flush. Clamp and secure with screws.
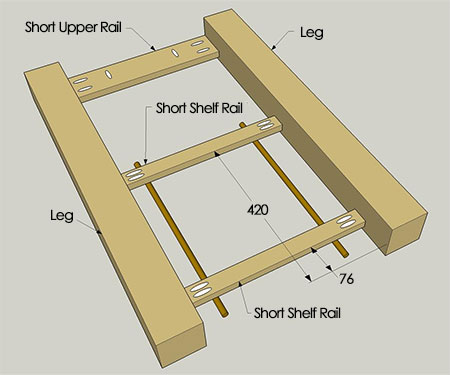
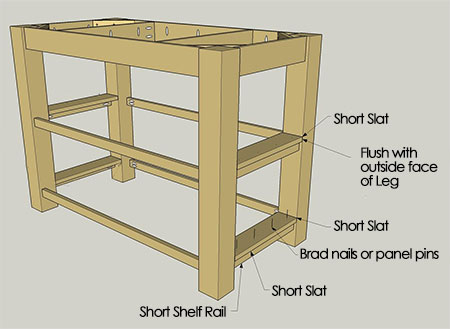
2. Re-position the dowel spacers and position the [2] Short Shelf Rails as shown below. Clamp and secure the Rails to the Legs with pocket-hole screws. Repeat these two steps for the other side assembly.
3. To complete the base section, place the [2] Side assemblies on edge. Place the Long Upper Rail in place on the dowel spacers. Secure with pocket-hole screws.
4. Now you can place and attach the [2] Long Shelf Rails as per Step 3 above. Flip the partly assembled base over and repeat to attach the final [2] Shelf Rails and the remaining Long Upper Rail. The base is now complete and can be sanded smooth.
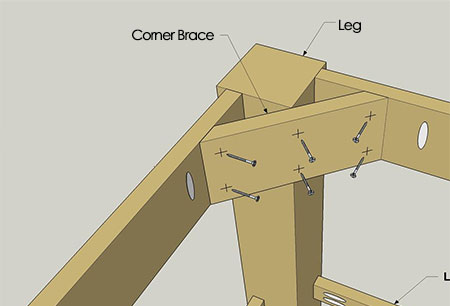
5. Take the [4] Corner Braces and cut 45-degrees angle at both ends. Pre-drill pilot holes as shown below.
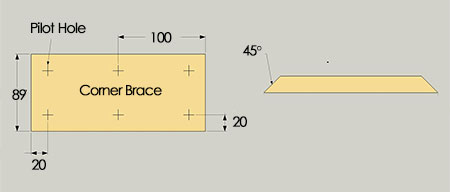
6. Make sure the Corner Braces are flush with the upper edge of the Rails. Secure to the leg with pocket-hole screws. Repeat for the other [3] Corner Braces.
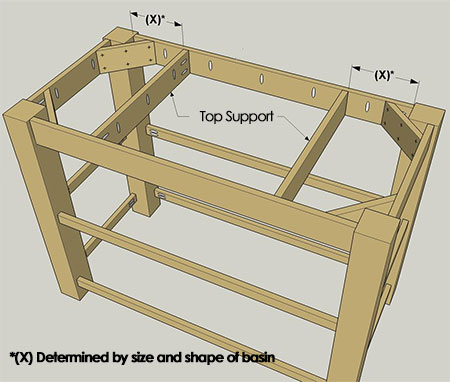
7. Secure the [2] Top Supports to the Long Upper Rails with pocket-hole screws. Note that the location of the Top Supports will depend on the size and position of the basin you select for your project.
8. When placing the Short Slats on the Short Shelf Rails, make sure that the outside edge of each Slat is flush with the outside edge of the Legs. Secure the Slats to the Legs with pocket-hole screws. Nail the Short Slats to the Short Shelf Rails using [4]brad nails or panel pins in each Slat.
GOOD TO KNOW: A Nail Gun is excellent for this type of project, or you can use a hammer and panel pins.
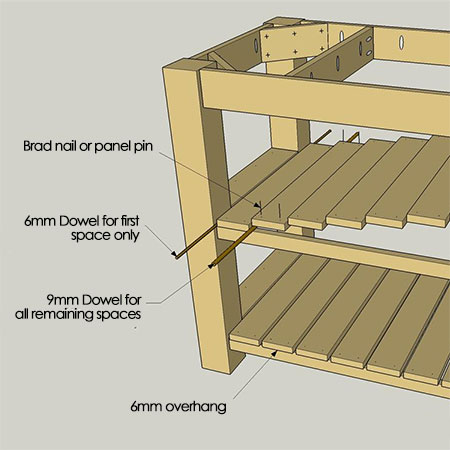
9. To start adding the slats, place a 6mm dowel against the first Short Slat and then position the first Long Slat next to the Short Slat. Check that the Slat has a 6mm overhang at the front and is flush at the back Shelf Rail. Use brad nails or panel pins to secure at each end.
10. Place the remaining Long Slats with equal spaces between them. A 9mm dowel comes in handy for setting this spacing. Adjust the overhang to match the first Long Slat and nail in place. Continue with this to secure the rest of the Long Slats.
11. On the Top Panel, the size and location of the drilled holes may vary but do be sure to carefully lay out the sink and tap locations before you cut the openings. Use a jigsaw to cut out the openings.
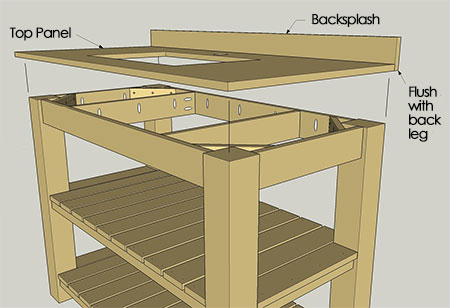
12. Place a bead of glue on the back edge of the Top Panel and secure the Backsplash in place. Clamp before joining with pocket-hole screws.
https://www.buildsomething.com
Finishing
Give the finished assembly a good sanding and wipe clean. Apply the wood stain or finish of your choice. It is important to bear in mind that the top of the vanity is wood and is susceptible to water damage. For that reason, you pay extra attention to sealing the ends and edges, including the cutouts and the upper and lower faces. Use an exterior polyurethane and seal on these areas.