
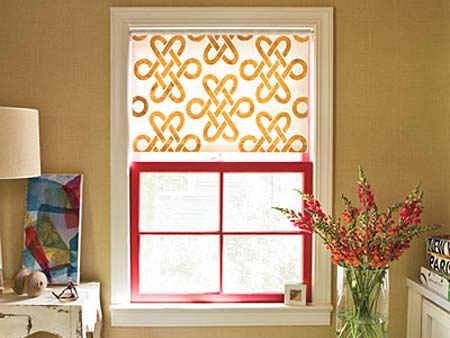
Decorated shade
Stencils have come a long way; today’s options are sophisticated, easy to use, and offer you endless design possibilities. Combine your favourite pattern and paint colour for a shade that makes a personal statement in a bedroom, bath, home office, or anywhere you want to add privacy.
talesandtrials
Completing your project is easy once you prep your shade and get the hang of applying the paint. Don’t worry about achieving perfection. If you’ve never stencilled before, try a few practice designs on poster board. Hang your finished shade alone for a clean, tailored look, or layer it with simple curtains for softness.
YOU WILL NEED:
Roller shade and brackets, or use a
Roman blind design
Stencil
Paint:
Prominent Paints matt works well.
Natural sea sponge
Spray adhesive to secure and remove the stencil as needed.
Masking tape
Tape measure and pencil
Heavy paper or newspaper
HERE'S HOW:
1. Choose a work surface you can access from all four sides and protect it with heavy paper. Unroll the shade to a length that will cover the full height of your window and tape down the edges with masking tape. Find the middle of your shade with a tape measure, and mark it lightly with a pencil. Repeat every few centimetres up and down the shade, creating guidelines for the stencil.
2. Place your stencil in the middle of the shade just above the bottom hem. Faintly mark all four edges with a pencil. Remove the stencil, lightly apply spray adhesive to the back, and place the stencil back on the shade at your marks. Pour a small amount of paint in a saucer. Dab a damp sponge in the paint, and then lightly and slowly dapple it over the stencil until covered.
DIY Tip:
Start with a little bit of paint. You can always add more.
3. Peel off the stencil, and repeat Step 2. Work up the middle row first, creating a road map for your design. Then do the next row, centring the stencil between two designs on the adjacent row. Complete all the full designs first, and then fill in open space along the edges with partial designs. Leave unrolled to let dry. Spray-paint the brackets to match your window trim, and install. Keep the installed shade rolled down for three days to let the paint cure.