
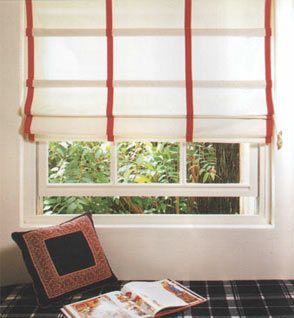
Easy Roman Blind
With their clean, sophisticated lines, Roman blinds, or Roman shades as they are sometimes known, are one of the most stylish ways to dress up a window. They can be used as a standalone window treatment fitted outside the window or fitted inside the window recess and combined with curtains and top treatments for a layered look.
Roman blinds are best made from light to medium weight fabrics and are usually lined. The instructions below are for a lined plain Roman blind fitted onto a wooden batten.
Measuring and Estimating Fabric Quantities:
Fix the blind track or wooden batten in the chosen position. If the blind is to hang inside the window recess, fix it to the underside of the window frame. If the blind is to hang outside of the recess, fix it to the top of the window frame or above it.
Attach the adhesive side of the Velcro to the front edge of the wooden batten.
To calculate the length of fabric required, measure from the top of the track or batten to the chosen length. Add the relevant hem allowances for the style of blind to be made. Allow extra length for pattern matching where necessary.
The length of lining required will be the same as the fabric requirements minus any extra for pattern matching.
To calculate the width of the fabric required, measure the length of the track or batten and add the relevant amount of seam allowance for the style of Roman blind to be made. Divide this number by the width of the fabric to be used and round up to the next whole number. This will be the number of widths of fabric required.
Allow an extra 2.5 cm for each seam when joining widths together and make sure a full width is positioned in the centre with equal part widths added at each side. The number of widths of lining required will be the same as the number of widths of fabric.
YOU WILL NEED:
Fabric
Lining
Strips of wooden or plastic dowelling 3 cm less than the blind width
Small plastic rings, approximately 12mm in diameter
Wooden or brass acorn
Nylon cord, 3 x (twice the length of the blind + the width of blind)
Wall cleat
Stick and sew Velcro enough for the width of the blind
Wooden Batten approx 2.5cm x 2.5 cms x the width of the finished blind
4 screw eyelets
Making a Roman blind:
1. Cut the fabric to the required size adding 5 cm to the width for side seam allowances and 5 cm to the length for hem allowances. If more than 1 width of fabric is required, join widths together with a flat seam. Make sure there is a full width in the centre with equal part widths added at each side. If patterned fabric is used, match the pattern across all the widths.
2. Cut out the lining to exactly the same measurements as the top fabric, omitting any extra allowance for pattern matching. Lay fabric on a flat surface, right side up. Lay the lining on top, wrong side up, matching the raw edges. Smooth out all the wrinkles and creases from the two fabrics and pin them together. Pin and stitch down both sides and along the bottom edges, 2.5cm in from the raw edges.
3. Trim the 2 bottom corners and make a second row of stitches across the bottom, 6 mm in from the raw edge. Insert a dowel into the channel between the 2 rows of stitches. Remove all the pins and turn the blind the right side out. Press the blind, taking care to press out and flatten the seams.
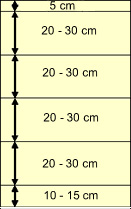
4. Lay the blind on a flat surface, lining side up, and pin the two layers together all over. Draw a pencil line across the width of the blind, 5 cm down from the top raw edge. Divide the rest of the length into equal sections of between 20 and 30cm with a half section at the bottom edge and mark.
5. Draw pencil lines across the blind at these marks. All these lines should be parallel to the top edge and at right angles to the sides. These will be the sewing lines for the pockets.
6. To make up the pockets to hold the dowels, cut strips of lining fabric 7.5 cm wide and as long as the blind is wide. If possible, cut these strips from the length of the fabric rather than across the width as the weave is tighter and the pockets will wear better. Cut 1 strip for each whole pleat. Fold each strip in half width ways, right sides together. Machine stitch across 1 end and down the length 12mm in from the raw edges. Turn right side out and press.
7. Pin the folded side of the pockets to the pencil lines, 12 mm above the marked lines with the ends of the pockets 12mm in from each side of the blind. Sew the pockets to the blind along the marked lines. The machine stitching should be as unobtrusive as possible on the front of the blind.
8. Slide a length of wooden dowelling into each pocket and oversew the open ends.
9. Hand sew the plastic rings to the outer edges of the pockets. These should be positioned in rows down the length of the blind, 5 cm in from each side edge and between 20 to 40cm intervals evenly across the blind.
10. Turn down 2.5 cm to the wrong side, at the top edge and press. Pin and stitch the 'sew' side of the Velcro across the top of the blind, on the wrong side, close to the fold. Stitch both sides in the same direction to avoid puckering.
11. Hang the blind by pressing the 2 sides of the Velcro together.
12. Screw an eyelet into the underside of the batten directly above each line of rings on the blind and 1 at the end of the batten to the side that the blind will be operated from.
13. Cut the nylon cord into 3 and knot 1 length to each bottom ring. Thread the cords up through the line of rings and through the eyes on the batten taking all 3 cords to 1 side of the window. Trim the ends of the cords level, thread them through the acorn and knot to secure. Position a cleat at a convenient height at the side of the window and fix in place. Pull up the blind, winding the cords round the cleat in a figure of 8 to hold it in place.
alternative windows