
Paint a melamine bookshelf
Andrea Vogel, one of our readers, shows you how easy it is to transform a dated melamine bookshelf into a stylish and modern shelf display unit with paint.
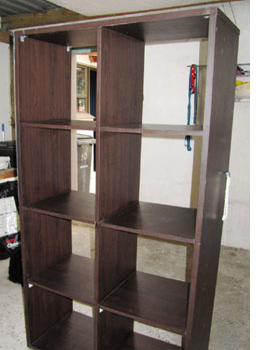
Painting laminate or melamine is an easy project - as long as you take the same to prepare the surface before painting.
YOU WILL NEED:
Piece of hardboard cut to size for the back
Orbital sander and 180- or 220-grit sanding pads
Clean, lint-free cloths
Pencil
Ruler
Foam paint roller and tray
Small paintbrush
36mm thick masking tape
Prominent Paints Acrylic Sheen - brilliant white and black
HERE'S HOW:
1. Measure the bookshelf and have a piece of hardboard cut to size for the backing board.
2. Lightly sand the bookshelf and hardboard with 180- or 220-grit sandpaper to help the paint stick to the surface and then wipe clean to remove all traces of dust.
3. Start painting the bookshelf by painting along the tricky corners with a paintbrush and then use the foam roller to paint the solid surfaces - as close to the edge as you can.
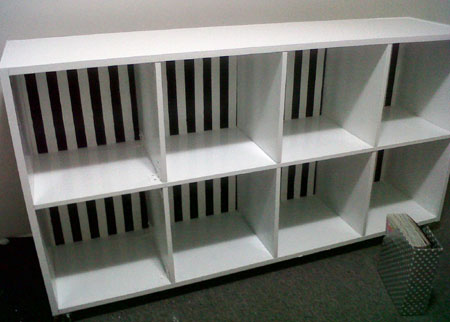
4. While the bookshelf is drying, place the hardboard onto a flat surface and apply the first coat of white paint with a roller, making sure you cover the edge of the hardboard as well, as this might be visible later on. Leave the paint to dry.
5. Once both the hardboard and the shelf are dry, apply the second coat of paint and allow this to dry completely.
6. To paint the black stripes on to the hardboard, place the first stripe of 36mm masking tape against the edge of the board, ensure that is taped down properly without air bubbles.
7. Use a ruler to measure 36mm from the edge of the masking tape – this is where the next piece of masking tape will go. I marked of 4 points, all 36mm from the first strip of tape, two at the edge of the board and the other two in the middle. Use the masking tape to line up the edge to the marked points, and tape it down.
DIY Tip:
Remember to make sure that the masking tape is parallel to each row otherwise your stripes will be skew. Repeat until the hardboard is covered in masking tape strips.
9. Using the foam roller, lightly paint the space in between the masking tape with black paint - it might need 2 coats to cover the white completely.
10. Once the paint is completely dry, gently remove the masking tape, some of the white paint might come off with the masking paint depending on how well the hardboard has been primed. If this happens, just touch up the spots with a small paintbrush and some white paint.
11. Position the hardboard behind the bookshelf and use a pencil to mark off where the screws will go. Position your screws and use your drill to screw them in.