
Install DIY concrete countertops
When most people think of DIY concrete countertops, the first reaction is that making a concrete countertop is not easy. Well, there is a fair amount of work involved, but at the end of the day you could save yourself thousands of Rands with do-it-yourself concrete countertops.

If you are not particularly impressed with all the available countertop options. Unless you're getting
Formica, they all cost about the same as granite or marble, look just like granite or marble, and are as typically typical as granite or marble.
The one material that I found was much more customisable than the other solid surfaces was concrete. The colours and textures are endless, you can mould it into just about any shape you can imagine, and it retains the advantages of solid surfaces. But it's concrete, so it must be cheaper than milled stone, right?
If you have a professional do it for you, it can actually cost more than other solid surfaces, so... do it yourself, and you can save a bundle. I priced granite countertops in my kitchen and they came out at around R8,000. My custom concrete counter tops ended up coming in at below R2,500, including the rental of the concrete mixer.
Now before you get ramped up and ready to pour, I will preface all of this with the drawbacks to doing your own concrete countertops.
- This is not a project that can be completed in a weekend. No matter how small the countertop is there's at least a 10 day curing process which you will need to do your grinding and polishing in.
- Concrete needs to be properly sealed at the beginning.
- The final outcome might not be exactly what you expected, especially if you're doing it for the first time. The good news is that there's ways to remedy many outcomes that you may not like.
You'll Need (Good) Help
As you'll see in this project I've got the assistance of Mr. P - an evil genius who lends his raw power and expertise to the project. There are many steps that can be accomplished solo, however, concrete is heavy and expect to need anywhere from 2 to 4 people to help move around your countertops on more than one occasion. You'll need at least 3 people involved in your pour. It's best to cure the countertops inside a garage, however grinding and polishing them is very wet and messy, so you'll want to do that outside. Then you'll need to install them in place, so prepare to have people available to help at different times.
With all due sincerity wear a mask, gloves and safety glasses when mixing concrete or using adhesives and solvents.
Make a template
Templates are a necessity, especially in an old house like mine where settling has caused the walls to be out of square. It also takes a lot of guesswork out of the process and believe me - the last thing you want is to spend lots of money and time on your countertops to find that they won't fit because you were off by 2mm.
I had plenty of cardboard boxes left over from my cabinets, so I recycled them into templates. I made sure to use the factory cut edges of the cardboard around the perimeters of the and inside the sink cutout to make sure it was all perfect. A glue gun works great for putting the template together. While forming the templates, I allowed for a 4cm overhang from the cabinet face and a 5mm overhang around the sink cutout.
You'll notice that I reinforced my cabinets with 19mm plywood and also did a plywood top to add support to the concrete. This is a necessity for anything as heavy has concrete and I wouldn't recommend skipping that step.
Make sure to label your templates so you'll know which sides are what. This can be a huge time saver since edges of the countertop that aren't exposed, don't need to be ground and polished.
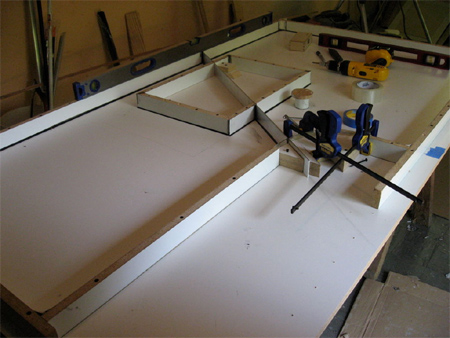
Building the mould
The mould is the most important part of the whole process, however it's also one of the only parts of the process that you can take your time with and rework if it isn't right. Make sure that every detail is thought through before you start pouring.
The best material to use to build your mould is 19mm-thick melamine, since it is perfectly smooth and straight and, if properly built, will hold water without swelling up. You'll need to use a
table saw with a fine tooth blade so that it will rip down the melamine without chipping or splitting it.
The minimum recommended depth of a concrete countertop is 5cm if you're going to add some sort of metal support for it. Since I don't have any significant overhangs, I'm just using standard concrete wire mesh. If your countertop is less than 5cm thick, you risk having problems with 'ghosting' from your supports - lighter areas in the concrete that are patterns of whatever metal you used.
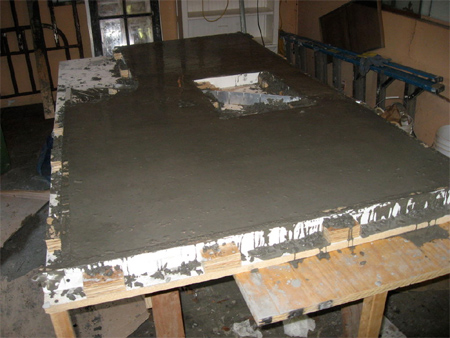
We cut several long strips of melamine down to 5cm for depth and then used a mitre saw to make our cuts to length. Then lay the template on the mould.
This is because you're pouring the countertop upside down. The top of your countertops will be the bottom of the mould. If you forget this step, as I did, your countertops will most likely not fit and might become a pretty little mini-patio in your backyard. Thankfully, I caught my mistake before the pour and was able to rework the mould.
We assembled the sides of the mould by predrilling holes every 6cm or so, then used a countersink bit so our screws would be flush with the top. The top of the mould needs to be perfectly flush so you'll be able to screed the concrete during the pour. Drywall screws are the easiest to use, but be very careful drilling them in. If you drill them too hard, they will split the melamine and ruin that side piece. This is especially so when you drill too close to the end of the piece. We reinforced the corners with blocks of scrap melamine since they would be under
a lot of pressure.
Due to the size of the island countertop I opted to do it in 2 pieces instead of one big one. There are a couple of reasons for this - one being that it makes it much easier to handle without an army of people. The other reason is that large spans of concrete are sensitive to shifting of weight over time and need intentional "stress fractures" (Go outside and take a look at your sidewalks). By separating it, you're ensuring that if there's any stress on the countertop, it will crack in the seam, which can be easily repaired and ground back down.
Instead of having a seam go straight through the middle of the countertop, I wanted to do it an angle and highlight it with an aluminum strip. That way I could refer to it as a "decorative feature" instead of a "stress fracture".
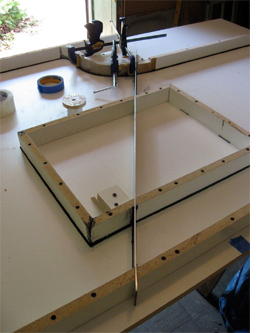
I bought a countertop strip of aluminum and propped up on the mould to decide what would look good, then marked it on the sides and template. We then used an angle guide to transfer the proper angles to the mitre saw, where the sides and sink cutout were cut and then screwed in the mold with a 3mm gap to allow for the aluminum strip to slide into the mould.
Another challenge was a big curve that I wanted to put in the countertop for a little barstool nook. To accomplish this, we cut the desired curve with a
band saw (or jigsaw) out of two pieces of melamine that were screwed together. We then took the two side pieces of melamine that connected to the curve and used a table saw to cut a 3mm by 5cm notch in each of them. We cut a piece of 3mm plexiglass down to 5cm, then prepared to glue the plexi into the notches we cut in the 2 side pieces. Before you try gluing plexi to anything, it needs to be sanded so the glue will stick. We used 5-minute epoxy to glue the plexi in the notches and clamped them. After that set, we had 2 side pieces with a flexible piece in the middle that would conform to the curve we needed to make. We screwed in the curved melamine into place and spread epoxy over the back side of the plexi. We then bent the plexi around the melamine, clamped it into place, and then screwed the 2 side pieces into place.
I wanted to have curved corners on the island so you wouldn't impale your gut if you walked a little too close. To do this, we took 5cm PVC pipe and cut it into quarters with a saw. By using a sander, we were able to sand down the edge till they were paper thin on either side. We then used epoxy and taped them down in the corners.
Preparing the mould for a pour
Preparing the mould properly for a pour is essential for many reasons:
1. It needs to be watertight so that it will hold the wet concrete without leaking.
2. Every detail in the mould will transfer to the countertop. Even the slight texture on the melamine will be the same texture on the countertop when you first break the mould.
3. It must be supported well and level. You will be pouring hundreds of kilos of concrete into the mould, so you must make sure it doesn't buckle or bend under the weight. Also, you're going to need to vibrate the concrete, so it needs to be screwed to its support.
4. The concrete will start setting in 30 minutes. You'll need to work fast once the concrete is mixed so you'll want to make sure the mould is fully prepared.
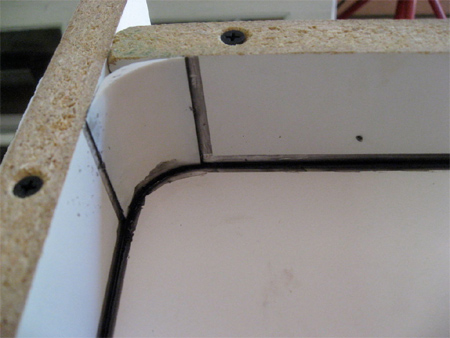
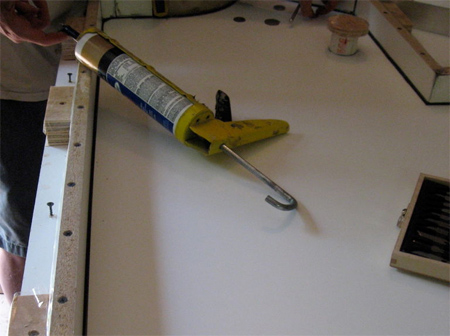
I don't have any pictures of this, but you'll need to properly seal the mould using silicone sealer. I used black silicone sealer so you could see it against the white melamine. You want the sealer to have extra clean edges, so I used blue masking tape on either side of the seams, backed off about by 3mm. After you apply the silicone, carefully remove the tape before it dries and you'll have super clean edges that will require minimum grinding. You'll want to let the silicone dry overnight.
You also need to make sure that any cut sides of melamine that will be exposed to wet concrete are sealed so they won't swell up with moisture. To do this, I sprayed spray adhesive on the exposed edges, then put down clear packing tape on it. I trimmed the excess tape with a stanley knife. To avoid getting excess spray adhesive in the mould, I used a straight piece of cardboard to shield the overspray.
The tape covered up most of the screw heads in the mould, however there were some that were still exposed. Since you need to remove the screws to break the mould, make sure that any exposed screw heads are filled with some type of clay or putty (plumbers putty, plasticine clay, etc.). This will avoid the concrete getting into the screw heads, making it next to impossible to unscrew them.
To support the mould, I used 2 very stout sawhorses with 2 sheets of 19mm plywood stacked on top of each other and then drilled into the sawhorses. I then laid the mould on top and screwed the edges of the mould into the plywood. For added support, I took some scrap pieces of wood, cut them to size, and screwed them in around the edges of the mold.
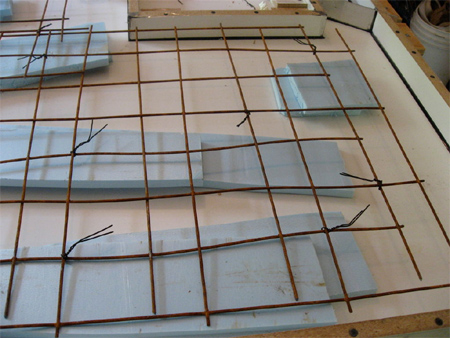
I didn't have any significant overhangs with my countertop, so I didn't use rebar to support it, however I wanted more support, so I used 2 flat sheets of concrete wire mesh. I cut them to size then stacked and offset them, tying them with wire. You'll also notice I stacked two pieces of styrofoam to make 2cm spacers off the bottom of the mould.
Remember that if the wire mesh gets too close to the bottom or sides of the mould (which is the top of your finished countertop, you will have problems with Ghosting. By using spacers, we're ensuring that the mesh will be halfway in the middle of the countertop. Also make sure the mesh is 2cm away from all edges of the mould.
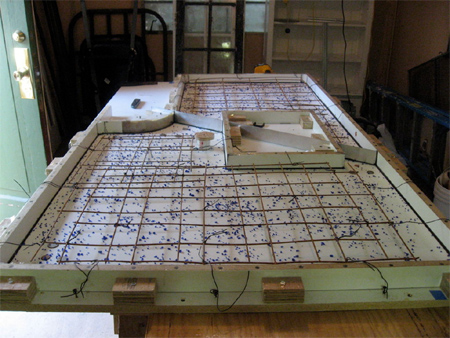
Now that I had the support cage made I lifted it out for final preparation. First off, I vacuumed the mould and cleaned it thoroughly with rubbing alcohol. To add further personalisation to the countertops, I wanted to embed coins from places that my wife and I had travelled to. This was easily accomplished by rubbing a bit of silicone on the side of the coin I wanted exposed and arranging them face down on the mould.
The silicone gives just enough adhesion to keep the coin in place during the pour and I didn't have to wait for it to dry. Remember the side of the coin that is facing down will be exposed when the countertop is finished - in other words the side you put the silicone on will be exposed.
The next step was to put the styrofoam spacers back in the mould, lay the cage down, and then tie wire to support the cage once the spacers were removed. I put screws around the outside edges of the mould so I could tie the wire around
the heads and then wrap them around the edge of the cage. Once all tied off, I slid the spacers out from under the cage which wall now suspended off the bottom of the mould.
The other addition to my countertop was to have crushed blue glass in it which matched my blue glass mosaic tile in the kitchen. I purchased the glass, however you could crush your own glass if you like. The directions suggested spraying spray adhesive on the mould so it will be tacky before putting down the glass. I did this and even though it doesn't stick the glass very hard, it makes it tacky enough so the glass won't pool together when the concrete is poured. Also, make sure the tip on your can of spray adhesive is clean. Mine wasn't and it put little bubbles on the mould which transferred to the countertop. I then dispersed the glass as evenly as possible.
Pouring the concrete
The day of the pour has finally arrived and to top it all off, our friendly neighbourhood tool hire rented us a beautiful, brand new virgin concrete mixer for the day.
You'll want to make sure to have gloves and masks while your mixing concrete since it is very dusty and messy. It's also a good idea to have 3 people during the pour so one person can be cleaning up the mixer and tools while the others are pouring it.
You must vibrate the concrete if you want to avoid air bubbles that will create voids in the countertop. There are commercial concrete vibrators, however, I found that rapping rubber mallets along the bottom and all around the mould seems to work best. It really wears you out using the mallets, but you'll soon see air bubbles popping out along the surface, so you'll know it's working.
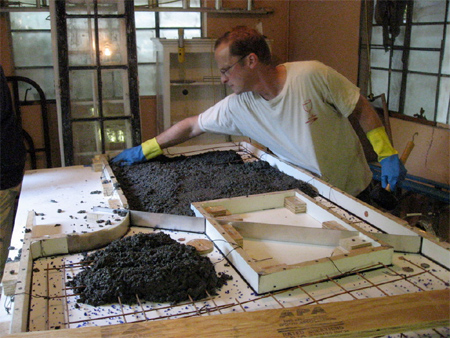
Now go ahead and fill the mould with the rest of the concrete making sure to add a bit more than the mould can hold. Use a straight piece of timber or melamine that is long enough to span the mould to screed the concrete.
Start on one side and push the screed back and forth along the sides till you go all the way across the mould for a level finish. Make sure you fill any holes where the concrete might have been low and re-screed it.
Now you wait...and watching it doesn't make it dry any faster.
Curing and finishing
There's a window of time that is ideal to take advantage of if you're going to be grinding and polishing your countertop. After 4 days, the concrete is stiff enough to break the mould. After 10 days, the concrete has reached 95% strength and will be more difficult to grind. Concrete reaches full strength after 28 days. I made sure that all my grinding and polishing was done within that 6 day period which made my job easier.
After 4 days of curing, I started unscrewing all of the screws in the mould. Make sure that you get all of them and it should go fairly smooth. Don't put any pressure on the concrete by prying against it, as you will risk chipping or cracking. Once you get all the sides off, you'll need at least one other person to lift it off the bottom of the mould. It should pop of the bottom fairly easily, then prop it up on it's edge. I then laid down strip of the styrofoam and laid the countertop right side up on top of it. This props the countertop off the bottom so you can get your fingers under it and it also makes it easier to grind the edges.
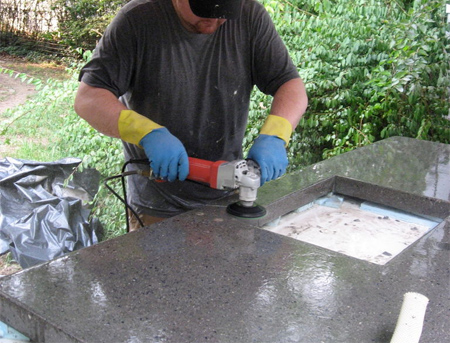
If you want your countertop to be a solid colour, you can skip the grinding process and move right on to polishing. Both processes require using diamond-coated grinding pads with a wet grinder, however there's less time involved in polishing.
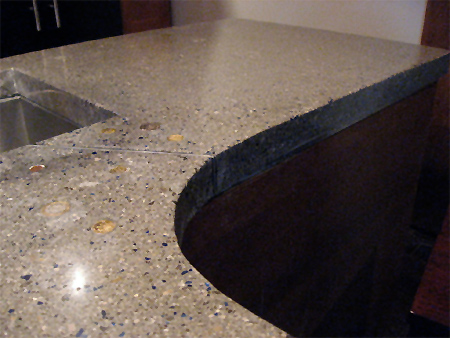
I wanted to expose the aggregate and glass in my countertop, so I chose to grind first. There's ways to get around using a wet grinder, like using a regular grinder/sander with the diamond pads and having someone else use a hose, or poking a hole in a 5 litre watering can and letting the water run out as you grind. If you choose to take shortcuts, PLEASE make sure you are on a properly grounded electrical circuit. This is an extremely wet process - you will be soaked from head to toe - and as we all know, water and power tools don't mix.
Again, this is an extremely wet process. Water mixed with ground concrete dust flies everywhere, so I chose to move the countertops outside. You'll want to wear rubber gloves and rubber boots to give added protection from shock.
I started grinding with a 50-grit pad. I slowly moved it forward and backward, then from side to side. Almost as soon as you grind, you'll start seeing aggregate being exposed. The first pad is the most difficult because your grinding down the most with it. Continue grinding until you have the desired aggregate exposed. One thing that is important is to keep your grinder as flat as possible on the surface, especially with the rougher grit pads. You can get some deep marks in the countertop if you don't keep it level.
I then went with the 100-grit, then 200-grit, then 400-grit. 400-grit is considered to be the last pad that is considered "grinding". Finer pads start adding more of a sheen to the countertop. I then used a concrete slurry to fill any holes or tiny gaps that were in the countertop. I just mixed it up with a bit of water and used a putty knife to apply it on the countertop, wiping off any excess with a damp sponge. After it dried, I then went back over it with a 400-grit pad.
I finished out the last 2 pads, which were the 800- and 1500-grit pads.
Installation and final finish
I can't mention enough that concrete is heavy and you'll need people to help you with the final installation. I was able to move all of my
countertops with 3 people, however that's because I did my biggest piece in 2 pieces. Make sure you have a battle plan of how you'll move it and set it down.
The weight of the countertops will keep it in place if you just apply a generous amount of silicone on your plywood top.
I also wanted to hide the 19mm plywood top that supported the countertop, so I bought 19mm strips of galvanized steel. I just cut them down to size and glued them onto the plywood edges using No More Nails. It adds another decorative touch and looks great!
If you remember, I had that aluminum strip that I wanted to be an accent where the 2 island pieces came together. To do this, I cut the aluminum down to the proper length allowing it to stick up (and out) just slightly from being flush. I applied silicone to both sides of the aluminum and pressed the countertop together, sandwiching the aluminum and hold it in place. I then used 2-part concrete epoxy, which I spread over the aluminum and onto the concrete. After it dried, I ground it down with the wet polisher until it was perfectly flush with the 50-grit, then worked back up to 1500-grit to match the finish.
Finish off with a penetrating sealer, which I applied according to the directions which were simple. I chose to add extra shine and protection by using polishing them with carnuba wax. The wax is heat resistant, so you can still put hot pans on the countertop without it burning, and gives added stain protection from acidic foods like wine and citrus. The wax needs to be re- applied about once a month in order to keep up the shine and protection.
So now I've got beautiful new countertops that I made myself! It was a lot of work and a fair amount of expense, however it was so much cheaper than granite and I was able to add details that you can't find in any other solid surface countertops. I'm going to enjoy my fruits of labour for now, but eventually I'd like to do an outdoor kitchen which will need countertops as well. I'll document that process as well when I get around to doing.