DIY Bamboo bathroom cabinet
In the August issue of Easy DIY magazine I show you how to do a bathroom revamp by replacing a basin and toilet, and also transforming a bath into a shower cubicle. For the project I'm using bamboo board for the bathroom vanity and bamboo laminate flooring. I thought it would be nice to add a bamboo storage cabinet for bathroom essentials. Here's how...

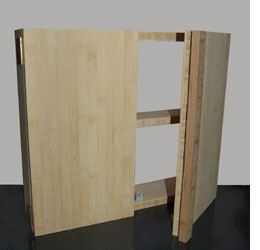
ABOVE and BELOW: Front and back of bathroom cabinet. The beauty of using bamboo board is that, once cut to size, it requires very little finishing. Bamboo is already beautiful and I just love the chunkiness and edge design.
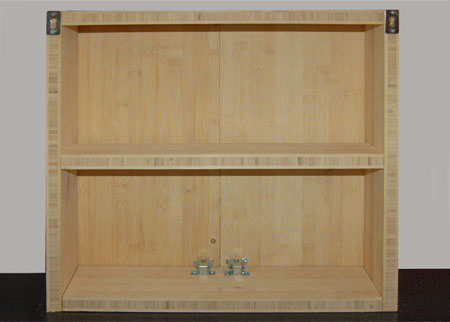
This is a great project for all our beginner DIY-ers as the design in a simple box with a shelf and doors. So get out your new drill/driver and start on that first project!
YOU WILL NEED:
20mm bamboo board* cut to sizes...
- 3 of 150 x 500mm - top, bottom and shelf
- 2 of 150 x 400mm - sides
- 2 of 270 x 400mm - doors
- 1 of 40 x 400mm - handle
8mm dowels
Dowel centres
4 medium brass hinges
2 keyhole brackets
2 door catches
Masking tape
Drill/driver and assorted drill and screw bits
Tape measure and pencil
Rubber mallet
HERE'S HOW:
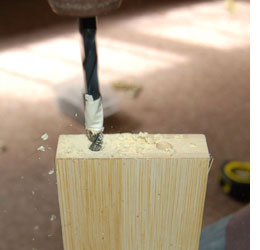
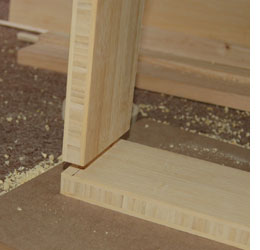
1. So that we don't have any visible screws, we are joining the sections together with 8mm dowels. Measure in 10mm from each edge on the top, bottom and shelf sections (see image). Drill 8mm holes with a wood bit to a depth of half that of the dowel. You can use a piece of masking tape to mark how deep you need to drill.
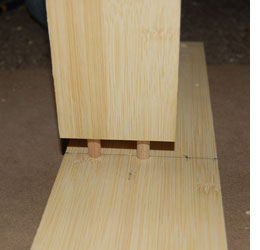
2. Before assembling the frame we are adding the shelf. Measure up 200mm on both sides and draw a line. Place dowel centres in drilled holes and then position one side of the shelf over each side - flush with the back - and press down to mark. Drill the marks out to half the depth of the 8mm dowels.
Place a small amount of wood glue in the drilled holes, insert the dowels into the sides and then tap the top edge until tightly fitted to the top.
Repeat for the other side of the shelf.
3. You will use the same method to attach the top and bottom to the sides. Place a small amount of wood glue in the drilled holes, insert the dowels into the sides and then tap the top edge until tightly fitted to the top.
Repeat for the bottom, turn upside down and do the same to attach to the other side.
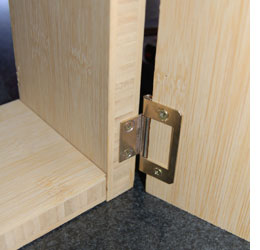
4. Measure and mark the position for the hinges on the frame and the door. The hinge pin of the bracket protrudes over the edge of the frame and door so that it does not affect how the doors sits flush on the cabinet frame. It's easier to place the cabinet on a flat, level surface - attach one side of the hinge to the door and then stand the door close to the frame to attach the other side of the hinge to the frame.
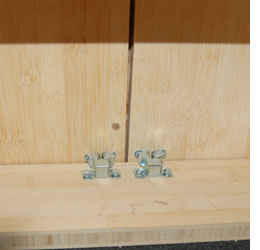
5. We have added door catches to the cabinet so that children cannot easily get in, but you can leave these off if you wish. To mount the catches position them on the shelf where they will be mounted, flush against the back of the door and mark the holes with a pencil. Remove the front of the catch and screw onto the back of the door. Screw the main assembly onto the shelf.
6. To finish off the bamboo cabinet I glued on a handle that is positioned centrally on the front so that it overlaps the other door when closed. Use 5-minute epoxy glue so that you don't have to wait for glue to dry!
7. Attach the keyhole brackets to the back of the cabinet for mounting onto the wall.
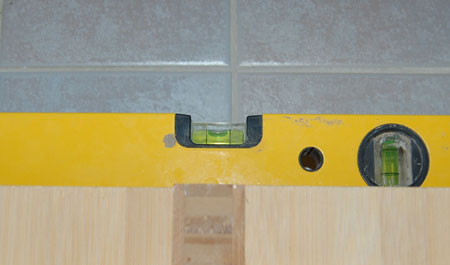
8. Transfer the width between the keyhole brackets on the cabinet back onto the wall, at the desired height. Use a spirit level to ensure that your markings are perfectly level.
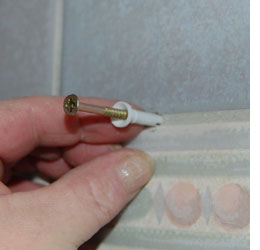
9. Before drilling into walls, use an electronic detector to ensure that there are no pipes or conduits in the walls. Drill two holes for the wall plugs - bearing in mind that the holes should be slightly longer than the wall plugs. Push in the wall plugs and insert the screw, which you can tighten and leave a 3 to 4mm portion of the head sticking out so that you can slip the keyhole brackets on the back of the cabinet over this.