Make a Modern Outdoor Patio Set
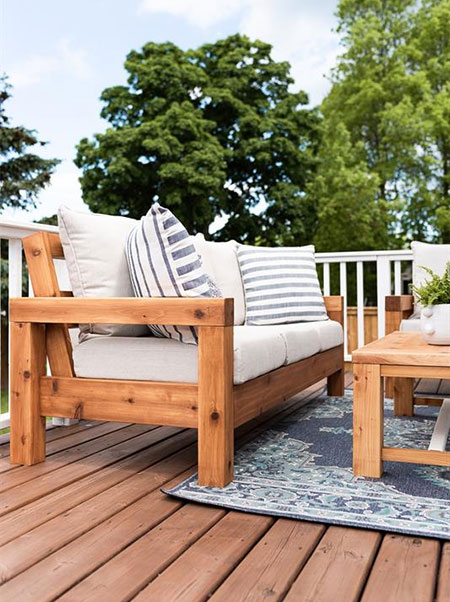
Garden furniture doesn't come cheap these days, in fact, you can expect to pay thousands for a decent patio set, which is why it makes a lot of sense to make your own outdoor sofa or patio set.
04/07/2020
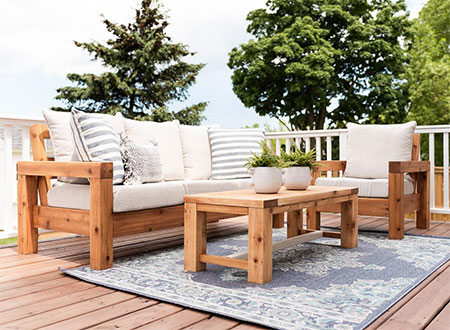
Having made an outdoor sofa for my patio a few years back, and having saved myself almost R24,000 in costs to buy a similar sofa in the store, I realized that making your own often provides savings - if you do the job well. Just looking at the prices of garden furniture these days will make you wonder if you could ever afford to have a decent set of furniture. But by making your garden furniture - and with only basic skills and power tools - you can have a beautiful, solid wood patio set at a fraction of what it would cost to buy ready-made.
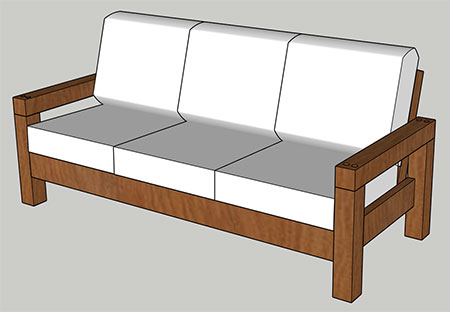
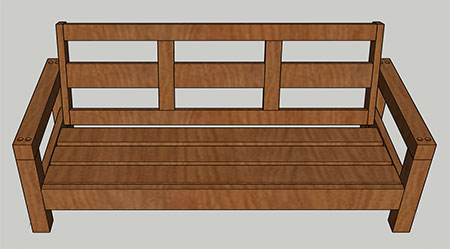
The outdoor sofa shown here is to view on BuildSomething and designed and made by NickandAlicia.com. Since all the measurements provided are Imperial and the materials not available locally, I have taken the liberty of converting the project to metric measurements using local materials that you should be able to buy at any Builders Warehouse, hardware store or timber merchant.
The wood used to make the outdoor sofa is cedar, but this can quite easily be substituted with PAR pine. The two types of timber are similar in that they are an affordable option for outdoor furniture, but when using pine you need to regularly apply an exterior sealer or wood preservative for protection.
If you like the finished look of this outdoor patio set, select a wood stain that you like and apply this before applying the exterior sealer or oil.
The steps involved in making the outdoor sofa are surprisingly simple, and if you have all the pieces cut to size at your local hardware store or timber merchant, it makes the task even easier.
GOOD TO KNOW:
I would recommend that you sand and stain all the pieces beforehand so that you don't have any areas of overlapping stain that might occur if you only after the stain after assembly. The same applies if you are using a tinted exterior sealer.
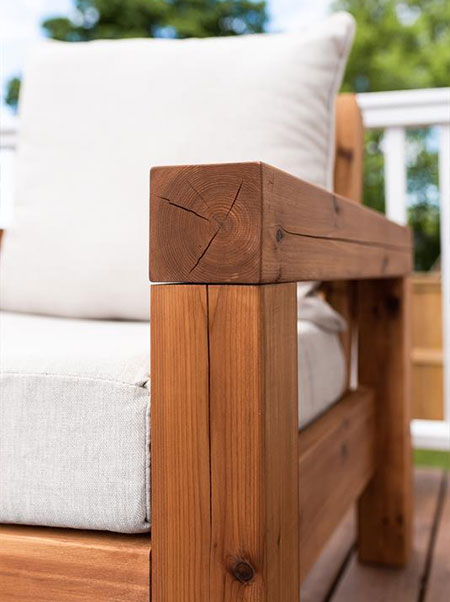
The project designers commented on the cracking on the posts and while, this is expected if you pre-drill pilot holes you should not have any cracking. Additionally, sealing the piece for outdoor use is essential, as this will also protect against cracking or warping of the timber.
YOU WILL NEED:
2 of 69 x 69 x 813mm - Arms
4 of 69mm x 69mm x 495mm - Legs
2 of 38mm x 140mm x 635mm - Bottom Sides
1 of 38mm x 140mm x 1810mm - Bottom Front
1 of 38mm x 69mm x 1810mm - Bottom Back
6 of 38mm x 69mm x 495mm (with 2° angles on each end) - Bottom Seat Supports
2 of 38mm x 69mm x 584mm - Back Side Ends
2 of 38mm x 69mm x 1734mm - Back Top and Bottom
2 of 38mm x 69mm x 406mm - Back Vertical Slats
2 of 38mm x 140mm x 521mm - Back Left and Right Mid-Supports
1 of 38mm x 140mm x 514mm - Back Centre Mid-Support
3 of 22 x 140mm x 1810mm - Seat Slats
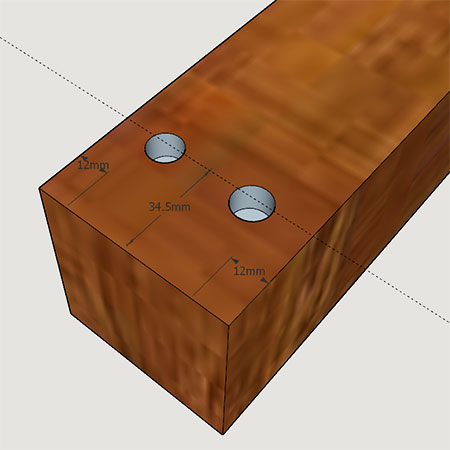
8 of 12mm dia. x 50mm - Wood Plugs
Waterproof wood glue
6 x 75mm cut screws
64mm pocket-hole screws
Exterior sealer or oil to finish
TOOLS:
Drill / Driver plus assorted bits
Kreg pocket-hole jig
12mm spade or MAD bit
Rubber mallet
Orbital sander plus 120- and 180-grit sanding pads
Clamps
Tape measure and pencil
Not responsible for errors or omissions
HERE'S HOW:
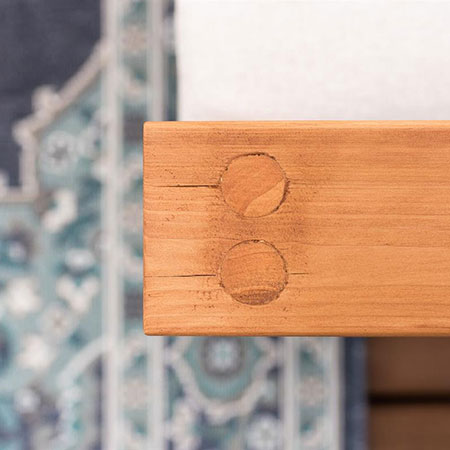
1. On both Arms, use a 12mm spade bit to drill to a depth of 30mm. In the centre of the hole continue to drill a pilot hole using a 4mm drill bit.
2. Firmly clamp each arm on top of the legs and secure with wood glue and Clamp arm and legs together and secure with waterproof wood glue and 75mm screws.
3. To plug the top holes, squeeze wood glue into the holes in the arms and use a rubber mallet to tap a piece of dowel to fill the hole. Cut off any excess with a saw and sand smooth.
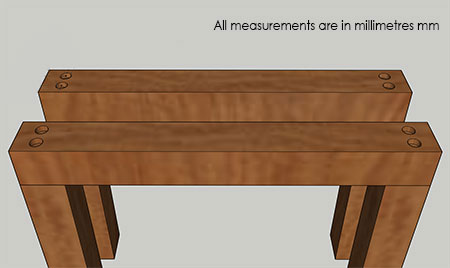
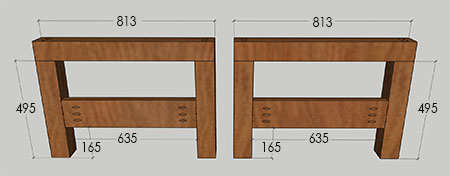
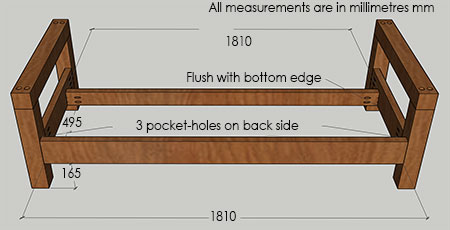
4. Set your pocket-hole jig for the correct depth and drill pocket-holes as shown on each piece in the diagram below. Measure and mark 165mm up from the bottom of the leg and secure the Bottom Sides in place with wood glue and 64mm screws.
5. Drill [3] pocket-holes at both ends of the Bottom Front section. Note that the pocket-holes must be at the back. Also, drill [2] pocket-holes at both ends of the Bottom Back, again with pocket-holes on the inside of the frame.
6. Measure and mark 165mm up from the bottom of the legs to attach the Bottom Front - with the pocket-holes on the inside of the frame. Measure and mark 495mm to secure the Bottom Front flush with the bottom of the side arm - see diagram below. Secure both Front and Back sections to the arms using wood glue and 64mm screws.
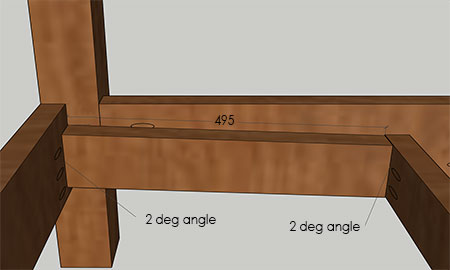
7. All the Bottom Seat Supports have a 2° angle, as shown in the diagram below. Measure and mark at 35mm from the top edge of the Bottom Front as a guide for mounting the first Bottom Seat Support - it must be flush with the Bottom Back.
GOOD TO KNOW: The original instructions specify that the Left and Right Bottom Seat Supports be screwed to the Front Leg and arm crosspiece with 64mm screws, as shown below. However, it is also recommended that you pre-drill [2] pocket-holes at both ends for all the Seat Supports and to secure these to the Bottom Front and Bottom Back with wood glue and 32mm screws.
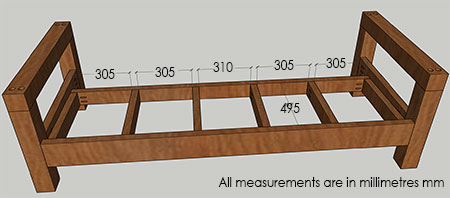
8. Continue to add Seat Supports as shown in the diagram below.
9. To assemble the back section, ensure that all pocket-holes are at the back. These can be filled later on with wood plugs if required. Start with the Back Side Ends and place the Back Top and Back Bottom flush with the front of the Back Side Ends. Secure with wood glue and 64mm screws.
10. Now you can add the Back Vertical pieces with the correct spacing as shown in the diagram below, before adding the Back Left and Right Mid- and Centre-Supports in the same way as the previous step.

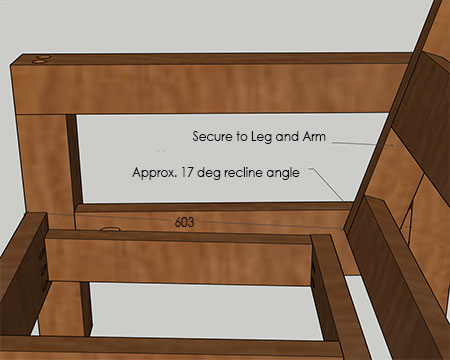
11. Have someone on hand to assist with this step to secure to Back to the Frame. The exact positioning is up to you and how much width you need on the seat section for your cushions. However, do allow an approx. 17-deg recline for the back. Secure the Back to the Leg and Arm sections with wood glue and [4] 64mm screws at each end. Clamp in place to assist with the assembly.
12. Finish off by securing the Seat Slats onto the Seat Supports with 64mm screws into the supports.
Finishing
Give the piece a final sanding before applying your choice of finish. A quality exterior sealer product is recommended and this should be re-applied every 18 to 24 months, or as required.
For making your cushions for the outdoor sofa you will find details in this post.