Make a Modern Mantel Clock
Show off your woodworking skills with this surprisingly simple mantel clock.
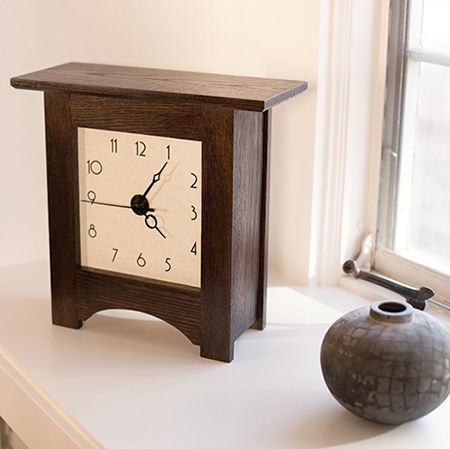
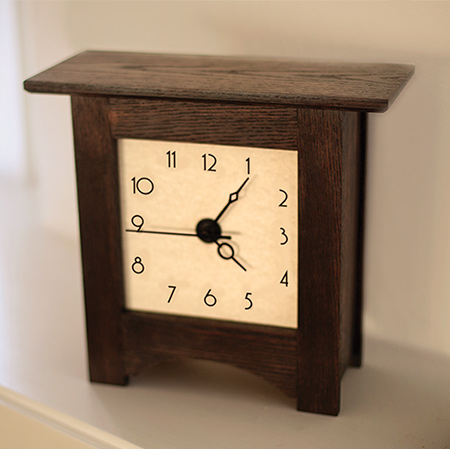
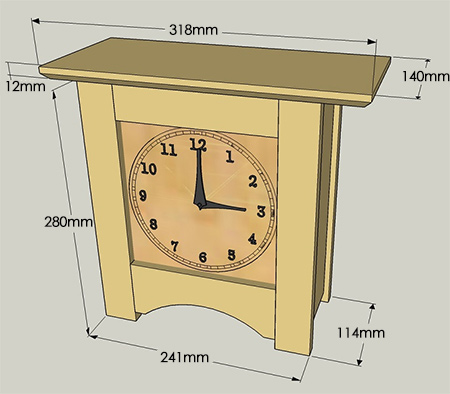
This modern take on a grandmother clock looks wonderful on a mantel or shelf, and you can stain the finished project to match your decor. There are various suppliers around the country that offer a selection of clock movements and hands that you can choose from. We normally buy ours from BJ Oberholzer.
Browse the Internet to find a local supplier of hardwoods that you can use for this project, or substitute with readily available materials such as pine or plywood. The project is assembled using a Kreg Pockethole Jig. Find more details on this project at buildsomething.com.
You will need 12mm-thick stock for this project, or adjust the dimensions to accommodate for thicker wood stock.
YOU WILL NEED:
4 of 12 x 38 x 280mm - legs
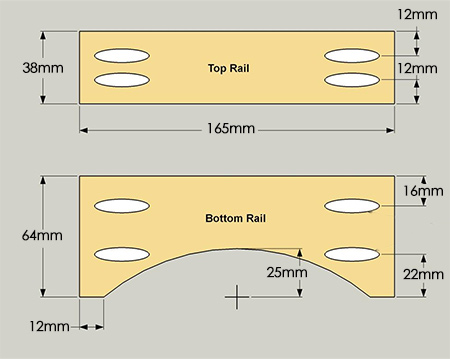
2 of 12 x 38 x 165mm - top rail
2 of 12 x 64 x 165mm - bottom rail
2 of 12 x 89 x 267mm - side
2 of 19 x 89 x 203mm - brace
1 of 12 x 140 x 318mm - top
1 of 3 x 203 x 203mm - backer board
25mm fine-thread pockethole screws [30]
25mm flathead screws [2]
12mm panhead screws [4]
Chamfer router bit, 45-degree
A4 craft paper or cardstock
Clock movement and hands
Bostik spray adhesive
Wood glue
TOOLS:
Drill / Driver plus assorted bits
Kreg pockethole jig
IXO cordless screwdriver with right-angle drill attachment
Compass
Jigsaw
Mitre saw or table saw
Orbital sander plus 120- and 240-grit sanding pads
Tape measure and pencil
HERE'S HOW:
1. Cut [4] Legs and [2] Top Rails. Cut [2] Bottom Rails to length.
2. Mark out the arch on one of the Bottom Rails, and cut with a Jigsaw. Sand the cut edge smooth. Use this Rail as a template for the second one, and repeat. Now you can drill pocket holes. With the jig set up for 12mm-thick material, drill pocket holes in the ends of the Top and Bottom Rails as shown. Sand the parts smooth.
GOOD TO KNOW
We used a Kreg Micro-Pocket drill guide for this project, as it makes a smaller hole than a standard Kreg Jig, making it perfect for 12mm-thick material. If you don’t have the Micro-Pocket guide, a standard Kreg Jig Drill Guide will work.
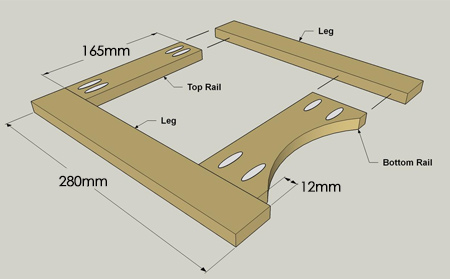
3. Assemble [2] Legs, [1] Top Rail and [1] Bottom Rail with wood glue and 25mm fine-thread pockethole screws to create a frame assembly. Repeat this for the second frame. Sand faces of the frames as needed to make sure all of the joints are flush.

4. Cut [2] sides to length. Drill pocketholes where shown above. Note that the pocketholes are oriented so there is a left Side and a right Side. Sand the parts smooth.
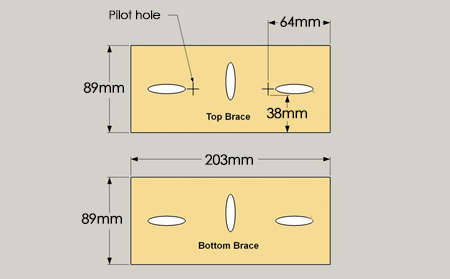
5. Cut [2] Braces. Drill pocketholes at the locations shown above. On the Top Brace, drill [2] 3mm pilot holes on the same side as the pocketholes. These will be for attaching the Top of the Clock to the body on a later step. Also drill [2] pilot holes, as shown above, in just one Brace. This one will be positioned at the top during assembly, and the holes will be used for screws that attach the Top later. Sand the Braces smooth.
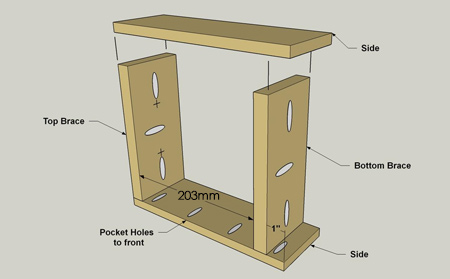
6. Position the Top Brace between the sides, as shown above. Make sure the centre pockethole on the Top Brace faces the same direction as the pocket holes in the Sides. Attach the Top Brace to this Side using wood glue and 25mm fine-thread pockethole screws. Secure the Bottom Brace in the same manner at the location shown. Add the second Side, making sure, once again, that the pocketholes are oriented in the correct direction.
GOOD TO KNOW
Because space is tight, you won’t be able to fit a standard pockethole driver bit in place. An IXO with right-angle attachment solves the problem easily.

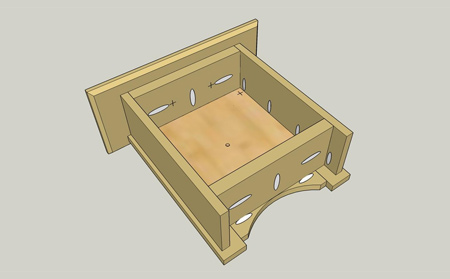
7. Place a frame assembly flat on a work surface with the pocketholes facing up. Place the clock body on the frame so the pocketholes in the Sides and Braces the Sides face to the Frame. Orient the body to the frame as shown, so that it sits flush with the upper end of the frame, and there are equal overhangs along the Sides. Attach the clock body to the frame assembly using wood glue and 25mm fine-thread pockethole screws.
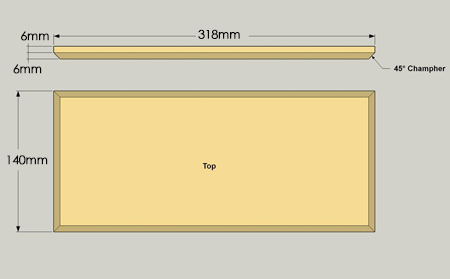
8. Cut the Top. Add a decorative profile on the lower edges with a chamfer router bit or 45-degree bevel. The easiest way to create the chamfer is with a router. You could also use a plane, file, or sander to create this profile. Sand smooth.
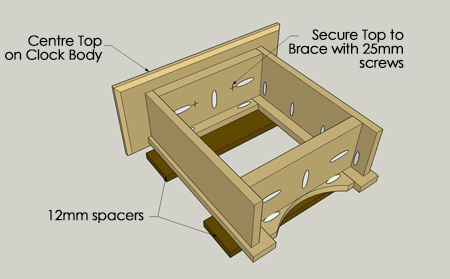
9. On a flat work surface, place the clock assembly on a couple 12mm spacers. Set the Top against the Top Brace, centre it from side to side, and secure with [2] screws.
10. Print the clock dial on a heavy paper and cut out dial. Cut a 3mm Backer to fit.
11. Following the instructions with your clock movement kit, drill a hole in the centre of the board for the clock shaft. Now drill [4] pilot holes to attach the Backer to the front frame of the clock. Make sure the Backer or the printed dial are clean, centre the dial, and then stick it to the Backer with a spray adhesive.
12. Before final assembly, it’s a good time to stain and finish your clock. That way, you don’t have to worry about getting stain on the printed dial. Do any final sanding, then apply the stain or finish of your choice.
13. After the stain and finish, set the backer/dial assembly in position inside the clock so it sits against the inside of the front frame. Make sure that the dial is right side up! Secure the backer with [4] 12mm screws.
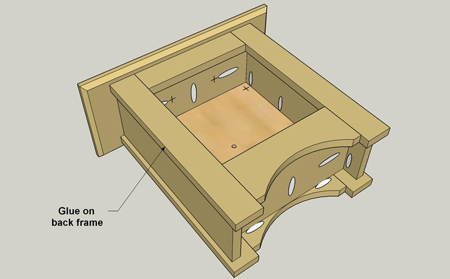
14. Apply glue to the exposed edges of the Sides and Braces, then place the back frame in position with pocketholes facing the inside of the clock. Make sure the frame overhangs the Sides equally. Then use clamps or masking tape to hold the rear frame in place while the glue dries.
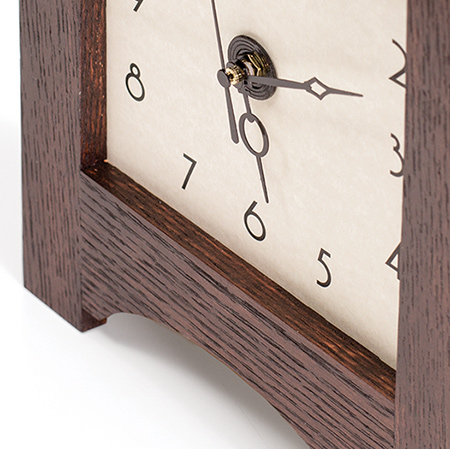
15. Install the clock movement and hands following the manufacturer's instructions. If the hands are longer than you’d like, you can trim the tips off.