
Paper mache bluebirds
I recently stumbled across a post that has some really nice projects and shows you how to make a very good paper mache recipe. Today’s paper mache project, these two little bluebirds, started out as a challenge to myself. I wanted to find out if it was possible to create a paper mache gift in just one day.
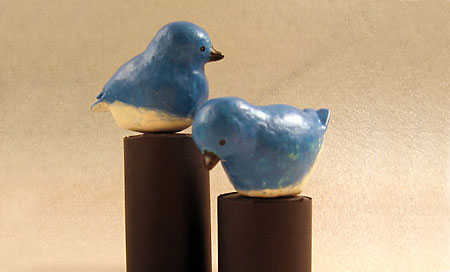
Today’s paper mache project, these two little bluebirds, started out as a challenge to myself. I wanted to find out if it was possible to create a paper mache gift in just one day. My inspiration for these two little figurines were a pair of doves I gave to my mother when I was a child, (about 50 years ago), and a tiny soapstone quail my daughter gave me when she was in grade school. Since both of these gifts have stayed around all these years, I decided that a pair of birds (if they turned out nice) could be a perfect gift for someone who appreciates hand-crafted art.
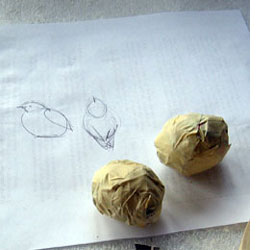
1. To keep from being sidetracked by too much detail I made two very simple sketches to work from, and didn’t look at the photos again until it came time to choose a color for the birds.
2. The next step was to make two bodies of newsprint. I used one page of a tabloid-sized newspaper for each ball and taped them tightly with masking tape. The two balls are the size and shape of a small chicken egg.
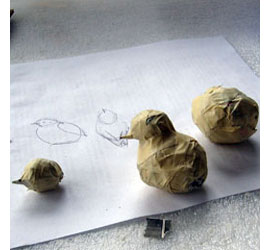
3. Now I needed some heads. I first cut out two beak shapes from cardboard, and then used 1/4 sheet of tabloid-sized newsprint for each head.
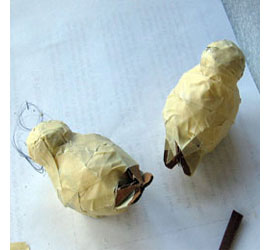
4. I taped the head balls tightly with masking tape, and included a beak in each one. Then the heads were flattened slightly (so their shape from the side is an oval), and taped them to the birds. One bird’s head is in an upright position, as shown above, and one bird’s head was attached so that it appears to be looking at the ground. Take a look at the large photo at the top of this post to see what I mean.
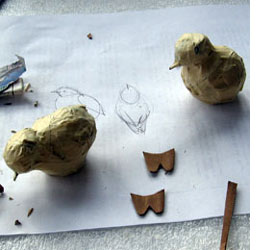
5. Now the birds need a flat bottom so they’ll sit nicely on a shelf. I cut two small ovals from heavy cardboard and taped one to the bottom of each bird.
6. I cut two tails from cardboard. They are sort of 'W' shaped, with a crescent shape cut out at the top to help them fit next to the bird’s rear-end. The tails were taped securely to each bird.
7. I cut out the wing tips and taped them to the birds.
8. The wing tips have now been taped on, just above the tail. The very ends of the wings cross each other. Once the paper mache has been added, the edges will be much smoother.
9. The skin coat is used to smooth the sculptures and to add colour. The first two or three layers are made from the flour and water paste that is left over from the paper layers, with a bit of wood glue and a small amount of white paint added. The glue is to prevent the layer of paste from cracking when it dries on the outside of the figurines.
I didn’t measure anything, but I started out with about 1/4 cup of regular paste and added about a tablespoon of glue. The white paint helps the paste to be more opaque. I put on two layers of white paste.
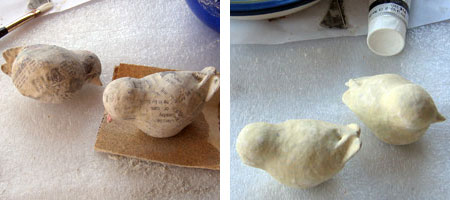
10. Use a broad brush to add the skin coat in thin layers to each bird. The birds are too difficult to handle if you put the paste on the entire bird at one time, so I had to do one side first, then put the bird back in the oven at 80 degrees C to dry. While the first bird dried I put the skin coat on half of the second bird. The birds dried in about 20 minutes each time. I then sanded the birds again, to make them as smooth as possible before adding the blue paste.

11. I decided to use another layer of skin coat for the colour. I used the paste left over from the last step and added a touch of blue acrylic paint. Two layers of this blue paste was added to the birds, leaving a patch white below their tails. When the blue paste was dry the birds were very lightly sanded one last time, and I turned them over and put a last coat of white paste to the area under the tail and to the bottom of the figurines, using a wet finger to blend the white paint into the blue.
I used black acrylic craft paint for the beaks. When the black was dry I found a needle and dipped it in white paint. I touched this tiny amount of white paint to each eye for a reflection – the eyes won’t look alive without this.
When all the colour was dry I added a coat of water-based polyurethane.