

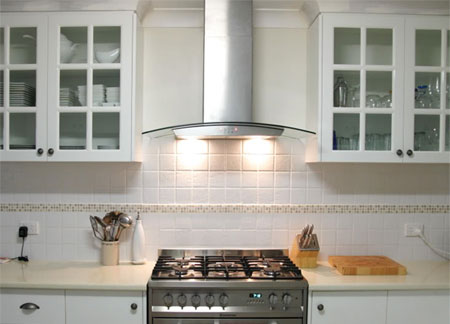
Add a kitchen splashback
Just as good looking as it is practical, a tiled splashback is a smart option for upgrading hardworking surfaces in the kitchen, bathroom, or laundry.
thewhimsicalwife.com
Unlike finishes installed in large sheets or panels that often require off-site fabrication and a crew of professionals, tile can be installed with just some basic skills.
Thanks to the ever-expanding range of colours, textures, shapes, and designs offered by tile manufacturers, you can create interesting, one-of-a-kind tile patterns simply by mixing and matching the pieces and playing around with various patterns. And tile will give your budget a break because it's easy to get a stylish look for a relatively low cost.
The individual elements of good architectural design often go unnoticed. A well-proportioned house or intelligently laid-out kitchen simply has a natural rightness about it. In the same way, instead of shouting for attention, a well-designed tile installation should fit in naturally. When a surfacing material jumps out at you, the design probably has
failed. The age of your house, the decorating style you seek to capture, and your budget all affect the design you choose. Books, magazines, and tile brochures are some of the best sources of ideas. However, be sure the types and patterns of tile that you find attractive suit your space.
YOU WILL NEED:
Tile adhesive
Ceramic tile
Grout mix
Masking tape
Level, straightedge or framing square
Tape measure
Pencil or felt-tip pen
Trowel
Scribing tool
Safety goggles and gloves
Snap cutter
Tile nippers
Tile spacers
Rubber-blade float
Sponge
Small stiff-bristle brush
Soft, dry cloth
HERE'S HOW:
1. Check wall surface. Lay a level or long, straight board across the wall horizontally and vertically to see how level the surface is. Fill in low spots with drywall or surfacing compound; let dry. Sand wall smooth.
2. Use a tape measure to locate the wall centre. Then, using a level, draw horizontal and vertical guidelines with a soft-lead pencil or felt-tip marker. Plot out your tile pattern and, starting at the midpoint, arrange a single row of tile in each direction to see how they fit. Adjust the spacing as needed to minimize cutting and waste. The best spacing may require straddling the centre row of tile on the vertical or horizontal guideline, in which case your actual baseline will be slightly off-centre.
GOOD TO KNOW
Be sure that tiled areas stop short of electrical boxes or extend beyond them; cover plates shouldn't overhang the outer row of tile. Using a level or a framing square, mark the final baselines.
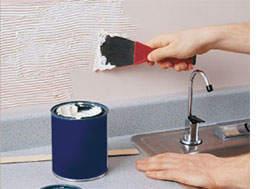
3. Spread adhesive on the wall with the smooth edge of the trowel and then use the notched edge to cut a series of V-shape furrows. Apply just enough tile adhesive to set one or two short rows of tile at a time so that you can adjust the spacing before the adhesive hardens.
GOOD TO KNOW
Avoid covering your baselines with adhesive until you're certain that the horizontal and vertical spacing is working out according to plan.
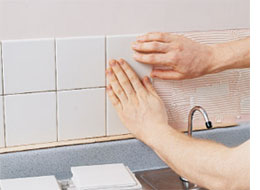
4. Before pressing a whole group of tiles into place, press a single tile and then pry it off and check the backside to see if the adhesive is evenly distributed. Voids or extra-thick deposits of adhesive can weaken the bond. Repeat this test each time you apply a fresh swath of adhesive.
GOOD TO KNOW
If your wall tile doesn't have built-in spacing lugs (nubs that protrude along the edges), add temporary spacers to keep the tiles from shifting before the adhesive hardens. Also, it's important to use spacers between the countertop and the first row of backsplash tile in order to leave room for caulking. You can buy small bags or flat sheets of spacers from a retail tile supplier or discount building centre.
5. To mark a tile for cutting to the right fit, lay it face up directly on top of the whole tile it will adjoin. Next, butt another whole tile against the edge you're cutting to and overlap the tile to be cut. Scribe the face of the first tile along the edge of the lapped one, making sure to etch through the glaze; this will help minimize chipping when you cut the tile. When cutting tile, wear safety goggles and work gloves.
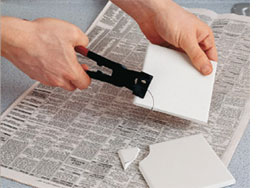
6. Cut tiles to fit - For straight cuts, lay the tile face up on the bed of a snap-cutting tool. Position your scored mark under the tool's scoring wheel and lock the tile into place with the tool's adjustable brace.
7. Apply firm steady pressure as you draw the scoring wheel across the tile. After scoring, park the wheel in the slot above the tile and exert firm downward pressure on the lever arm. The tile should snap neatly apart along the scored line. A few tiles will break no matter how careful you are, so expect to redo some cuts. For irregular cuts, use either a pair of tile nippers. Before using either tool, practice on a piece of scrap to get a feel for the technique, then proceed cautiously.
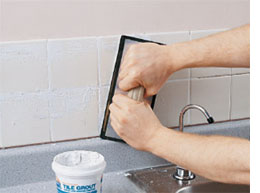
8. Allow the tile to set at least 24 hours before grouting. Follow directions on the package for mixing the grout, then apply immediately with a rubber-blade float, holding the tool at an angle to help work the grout into the joints. Repeat until all the tile is grouted. When grouting, wear rubber gloves to protect your skin from irritants.
9. Wait about 10 minutes for the grout to firm up, then wipe off the excess with a tile sponge. Rinse the sponge in a bucket of water after each pass. After the last sponging has dried, remove the final haze with a soft cloth or scrub it off with water or a solution of water and white vinegar. Dump the rinse water outdoors; grout deposits can clog waste lines.
10. Grout is porous and will stain easily if left unsealed. As soon as it has dried thoroughly (usually about three days), apply one or two coats of grout sealer with a small stiff-bristle brush. Use a soft, dry cloth to remove excess sealer from the tile itself as you work; some sealers can discolour tile finishes. Where the tile meets the countertop, run a double strip of masking tape along the joint, then fill the joint with caulk and smooth it with a wet finger. When the caulk dries, peel off the tape.