

DIY kitchen revamp - A kitchen goes black!
Some kitchen makeovers are pretty darn amazing. This is one of those. Melissa of a familiar path shares a kitchen makeover that will have you running out to grab some paint.

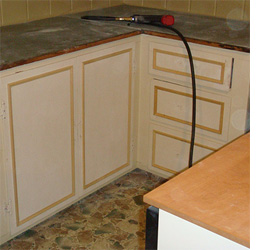
Built in the 1950's, this home features the original kitchen cabinets that were installed when the house was built. They needed major updating and we did just that. The doors and drawers are plywood with no detail, trim work or routing.
We decided to add trim to every door and drawer to make a more custom look. We used 19mm trim moulding on the doors to add a panelled look.

This was the start of my husband adding the trim to each cabinet door and drawer.
GOOD TO KNOW
I have found a lot of different moulding and trim styles at Builders Warehouse, ranging from plain quarter-rounds, to detailed strips.
Attaching these to cabinet doors is easily done with some wood glue and panel pins.
When using panels pins, angle them slightly to one side. By doing this you reduce the chance of them popping off later on.
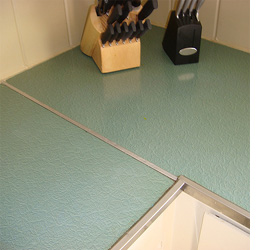
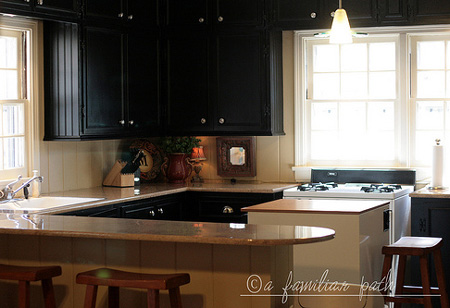
Next we decided on a paint colour for the cabinets. I was sick of white - not that I don’t like white kitchens, but mine looked more dingy than clean and I wanted to go for an entirely new look. We decided on black cabinets. Now, I knew the black paint would not help my green countertops look any better, so we decided to paint our Formica countertops as well.
I was apprehensive about going with black cabinets until I saw the grey primer go on. Just that colour helped the look tremendously. I knew we were not going to regret going with black.
GOOD TO KNOW
If you lightly sand the door fronts, sides and back with 180-grit sandpaper you shouldn't need to apply primer. Simply paint on the first coat.
Once the primer dried, we started on the countertops. You can see we had this retro stainless steel edging that was hammered on. Lovely. My husband removed all the silver edging and replaced it with a simple wood trim.
Once all trim was nailed on and holes were filled, I started with the paint.

I used the craft acrylic paints for my base colour, as well as my accent colours. I started with a white craft paint and a taupe paint and mixed the two to create a soft beige. This went over the entire surface of my countertops. I let that dry for 24 hours and the next day I came back with three accent colours. I was trying to create a faux granite look using three colours.
The darkest was 'burnt umber' and the other two were combinations of the taupe and burnt umber to create a darker taupe and lighter taupe.
I started with the darkest, burnt umber and used a splatter technique. I dipped my 3cm brush in the paint and flicked the end of it to splatter the surface. Once I was happy with the amount of dark splatters I moved on to the other colours.
I mixed up enough paint of the darker and lighter taupe so that I wouldn’t run out halfway through and have to mix more. I added equal parts scumble glaze and paint. This glaze creates a transparency with your paint. So, instead of you covering up your base paint with a top paint you are able to see both colours.
I used a scrunched up plastic bag to apply the two taupes - dipped into both paint colours and added to the countertops.
My husband came behind me with a paper towel and helped blend the two colours together. In the end the faux finished looks more like a stained concrete than granite, but anything looked better that the fabulous green, so I was happy.
afamiliarpath.com