
Repair damage to plastered walls
If there are damaged walls in your home, areas where you have removed tiles, or walls that are uneven or highly textured, plastering is one of the ways to fix these types of defects.
Using a plaster mix, plastering is the technique for covering up raw and rough surfaces. After plastering, surfaces are treated with primer and paint to finish them off.

Asides from adding ornamental value, plastering is important for other reasons as well. It protects the surface and structure from any environmental conditions such as weathering, dampness and variation in temperatures.
However, there are various types of plastering, so here is a quick run down on the various plastering techniques that can be used:
Solid Plastering
This type of plastering is where the plasterer would apply wet finishes to whatever surface they are working on. They would then apply protective coverings to the surface.
Exteriors walls need stronger and tougher plaster work. Cement is more resistant to dampness and water, so cement plaster is used extensively for exterior walls and on interior walls where there is a risk of dampness.
Fibrous Plastering
Using a mixture of plaster and short fibers, the plasterer creates ornamental plasterwork. This might include the creation of ceiling roses, columns and archways.
Dry Lining
This part of the job is for fixing the internal plasterboard or wallboard partitions. To do this, the plasterer fastens them together on a timber or metal frame. They would then be ready of either painting or papering.
Plastering Tools
A plasterer applies the plaster by using many different types of tools. Plastering tools include:
Hawk
Trowels
Straight edge
Plumb level
String line
Steel floats,
Splash brush
Plastering Tips
- Usually, plaster is applied in two coats – backing coat and the final coat.
- While mixing the plastering material, use only cold water. Never add water to plaster.
- Always add plastering material to the water to save it from getting lumpy.
- Plaster sets very quickly, so mix small quantities at a time.
- Plaster should be applied when it is still creamy and soft. You can apply base coat in two layers to achieve the right kind of thickness.
- Application of the final coat is called skimming and it requires fineness. Apply final coat when the base coat is set but still damp.
Plastering Mix
Mixing plaster is relatively simple. It is important that you always start by adding the plaster to the water and not the other way around. Therefore, how much plaster you will mix is dictated by how much water you start with. Remember a full 25kg bag of plaster will cover approximately 9 to 10 square metres (i.e. a surface 3m x 3m) and require approximately 11.5 liters of water (although it is better to mix by feel than maths). Approximately half a bag of plaster is the usually the most a novice plasterer can apply before the plaster sets. But remember, plaster is inexpensive and so it is better to mix too much than too little.
Step 1
Plaster and water are mixed on a roughly 50/50 basis. Therefore, to make a single bucket of plaster, you will need half a bucket of thoroughly clean and fresh water (clean enough to drink).
Pour the fresh water into a thoroughly clean bucket which is more than large enough to accommodate the full final mix and allow space for the mixing.
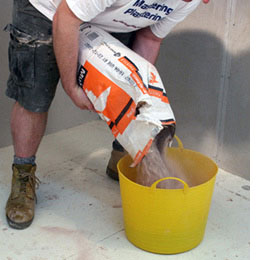
Step 2
Add some of your plaster (but not all of it). The plaster will sink and a good rule of thumb is to add just enough in the first instance that it begins to heap on the surface of the water.
You should be adding approximately half of your total amount of plaster in the first instance.
Step 3
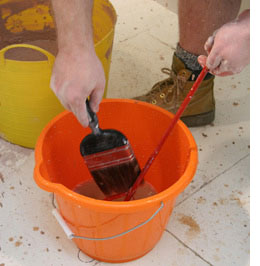
Immediately plunge in your mixer and start mixing – if you delay you will get lumps that you’ll struggle to mix out.
Use the drill on a very slow speed (to prevent the plaster splashing all over the room) and swirl in both clockwise and anticlockwise directions – raising the paddle up and down as you go and being sure to get into ever edge and corner of the bucket.
Step 4
After you have mixed in the first load of plaster to a smooth consistency, quickly add more of the plaster (about 50% of the total remaining amount to match the amount of water we put in).
Again, plunge in the mixer and start mixing until you have worked out all of the major lumps. Be sure this time to get into every corner of the bucket to dredge out any dry plaster and ensure a smooth, lump-free mix.
Step 5
Using a large margin trowel or bucket trowel, scrape round the bucket to mix in any lumps or dry plaster sticking to the side of the bucket. Also, test the plaster by seeing how it sits on your trowel – you should be able to heap it on the level trowel without it running off.
In most cases, the plaster will run off the trowel too easily at this stage and so be too sloppy to use, if so then we need to continue.
Step 6
Now we continue to add plaster in smaller amounts (handfuls), mixing it in and testing it with our trowel until we have the right consistency (approximately the thickness of melting ice cream).
However, avoid over-mixing the plaster as this can cause its own problems.
The plaster is ready when it is smooth, creamy, lump-free and capable of sitting on the flat trowel without running off. A good plastering tip is to mix the plaster slightly thicker for ceilings and a little wetter for walls as this makes for a less messy job when plastering a ceiling. There is some matter of personal preference in the final consistency but a stick placed in the mix should stand upright unaided when the plaster is properly mixed. If you feel the plaster is a little too thick then you can add a little more water and give a short re-mixing but try and avoid needing to do this if you can.
Step 7
Immediately pour out half of the plaster onto the pre-dampened spot board (the rest will keep better in the bucket).
The plaster is now ready to use and will be fully set in approximately 1½ to 2 hours and as a rule of thumb you have approximately 30 minutes to apply this mix to the wall before it is unworkable. The humidity and temperature of the room can make this vary greatly. The warmer the temperature the faster the plaster will set. In my example I have mixed my plaster slightly wetter than I would usually to try and combat the heat from the studio lights.
masteringplastering.com
Step 8
Wash the equipment immediately before proceeding (ideally a labourer or assistant would do this for you so that you can start plastering as you are always fighting the clock with plastering).
Do not leave the plaster to even partly dry on your equipment as it will be hard to re-move and can ruin your equipment. Also, when doing a second mix, any contamination from previous mixes can cause your plaster to set too quickly to be usable.