
Install crown moulding
Installing crown moulding, like playing the piano, takes practice. Unlike playing the piano, however, most people can get the hang of it with only a little practice.
YOU WILL NEED:
Skirting
Tape measure
Pencil
Hammer
Chisel
Cut masonry nails
Sander and 180-grit sanding pads (optional for repairing walls)
Line level and chalk line (optional)
Wood filler
Silicone sealer
HERE'S HOW:
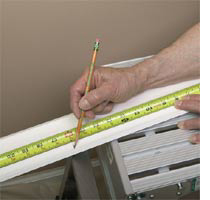
1. Cut the first piece of moulding to length. Have someone help you put it in place. If the fit is tight, flex the moulding slightly to get it in place, then push it against the wall for a tight fit. Nail the moulding to the wall. To stay flat, crown moulding must be nailed along both the top and bottom edges. Drive nails along the base edge into the wall and slightly above the middle of the moulding into a joist, into a ceiling nailer, or into blocking.
Leave about 30cm of moulding loose at each end for now. Set the pins, driving the heads slightly below the surface with a hammer and nail set.
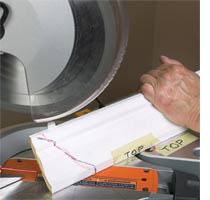
2. For the next piece, mitre the edge (either using a Compound Mitre Saw or Mitre Box) and then fit it against each end of the installed moulding before you nail it. If there's a gap in the bottom of the joint, tap on the sample to push the moulding toward the wall and close the gap. Nail the ends of the moulding to the wall once the fit is right.
3. Fill any gaps with silicone sealer. the moulding to length now, before you cut the cope joint. The edges of a coped joint are razor thin and hard to measure along without making a mistake and damaging the joint. To cope the joint a mitre cut exposes the profile of the moulding. Cut along the profile with a coping saw. Tilt the handle of the saw higher than the other end so that the cut removes more from the back of the moulding than the front. Test-fit the joint against a piece of scrap. Nail the moulding to the wall as before.
4. Fill any gaps with silicone sealer.