
Install a ceiling fan
The popularity of ceiling fans continues to grow as more and more homeowners discover dramatic, year-round energy savings. In summer, ceiling fans create cooling breezes at a fraction of the cost of that to run an air conditioner. In winter, they circulate heated air to keep the room warm.
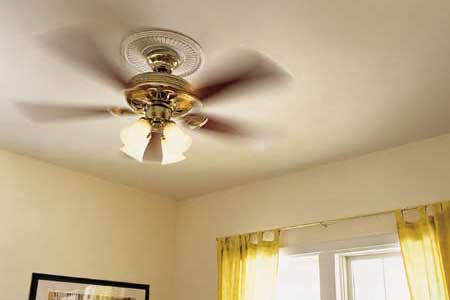
Installing a ceiling fan is relatively simple, especially if the space above is accessible from an attic. However, even when it isn't, the job is still quite doable. Here, we'll show how to replace an old light fixture with a new ceiling fan and light, in a room with no attic above. The advantage of this approach is that you don't have to run new wiring. The fan connects to the existing cable from the old light.
Just remember, electrical boxes used for ceiling lights aren't strong enough to hold a ceiling fan. You must replace the existing electrical box with one designed for ceiling fans, or install additional support above the ceiling.
Here's how:
1. Remove the existing light fixture and make sure electricity to circuit is turned off and carefully remove the glass shade or globe from the old light fixture. Unscrew the retaining nut or screws that hold the fixture to the ceiling. Lower the fixture and disconnect the wires by twisting off the plastic connectors from the ends of the wires.

2. Remove the old electrical box from the ceiling. If it's nailed to a joist, pry it free with a flat bar. If it's suspended from a bar, you may have to take off a metal plate to unscrew the box; then pry the bar from the joists. Use a small saw to cut a larger hole for the new electrical box if required. DIY Tip: Hold a vacuum cleaner wand next to the saw to catch the dust.
3. Feed the electrical cable coming from the ceiling into the new electrical box. Set the box into the hole cut through the ceiling and press it tight against the underside of the joist. Attach the box to the joist with the two screws provided. Drive in the screws with a drill/driver. Wrap the bare copper wire around the grounding screw inside the box. Allow the wire end to hang down.
5. Glue any ceiling medallion to the ceiling before attaching the fan. Hold the fan's metal ceiling plate up to the electrical box and pull the wires through its centre hole. Attach the ceiling plate to the box with two machine screws. DIY Tip: If you're going to paint the medallion, do it before installing the ceiling plate.
6. With the fan on the floor, feed the wires coming from the motor through the centre of the canopy. Set the canopy on top of the motor. Next, pass the wires through the hollow down-rod pipe. Thread the down-rod pipe into the top of the motor. Use a wrench to tighten the square-head locking screw on the side of the pipe.
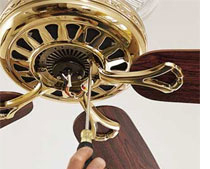
7. Hook one side of the canopy onto the ceiling plate.
Using twist-on
wire connectors, join the two green wires to the bare copper wire coming from the cable.
Join the two white wires. Then connect the two black wires. (OR red to brown and black to blue). Swing the fan up into position against the medallion and secure it with the two canopy screws.
8. Attach each fan blade to a blade iron (the bracket that holds the blade to the fan). Then, fasten the blade irons to the motor with the screws provided. Plug the fan light-fixture housing into the wire hanging from the underside of the fan motor. Install the shades and light bulbs. Screw the plastic holder for the remote control to the wall beside the wall switch (if supplied).
Pop into your local
Builders Warehouse and see the latest range of Radiant ceiling fans for your home.