
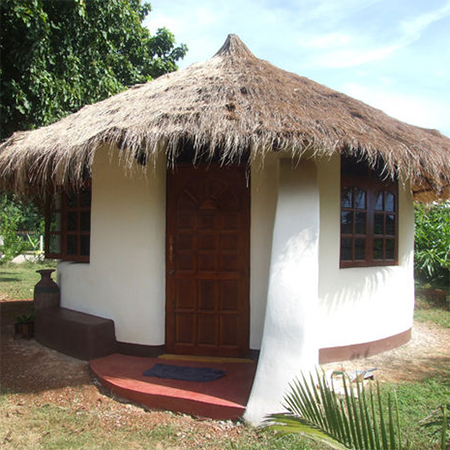
Build an earthbag rondavel
If you want an easy way to build a rondavel, using earthbags is one of the most affordable and eco-friendly ways to do it. Using subsoil that you already have, or perhaps from a neighbour digging out a pool, or from a sand/gravel/soil supplier, all you need are some polyprop bags and spare time to build a comfortable rondavel for outdoor entertaining or as a guest bedroom.

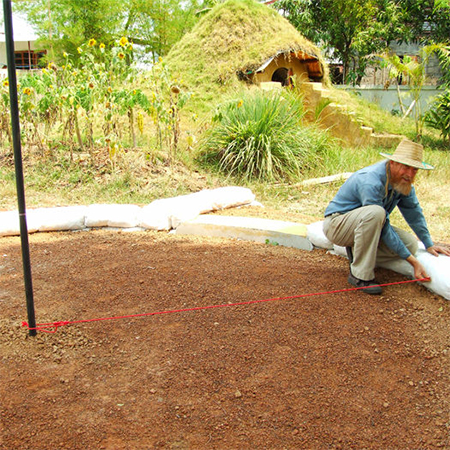
Before starting any building the site needs to be cleared and levelled, with top soil removed and a trench dug and and plenty of soil for filling placed around the site.
The following instructions assume you have cleared and levelled the site and removed the layer of topsoil. A trench is dug out for the foundation to a depth of 60 centimetres with a 30cm layer of gravel in the base.
You will need a pole in the centre with a string line to measure and mark out the radius for the rondavel.
GOOD TO KNOW
Have plenty of fill soil around the perimeter of the site for easy packing of bags as you work.
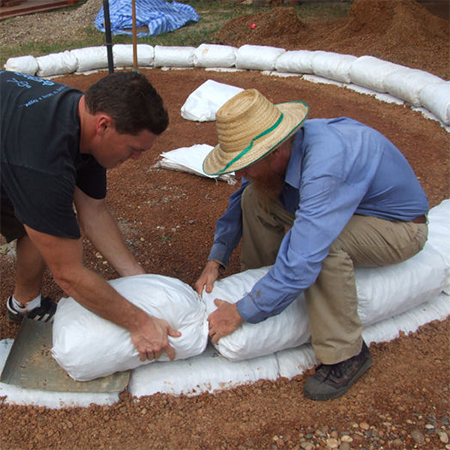
Laying the foundations
For the foundation of your rondavel you will need to use earthbags filled with gravel. The ends of the bag are folded over and stitched closed.
An earthbag is a polypropylene feed or rice bag filled with soil, but for the foundations you will use a double-layer bag packed with gravel. The gravel will allow moisture to drain away easily. Polyprop bags can last hundreds of years when not exposed to sunlight, so these are ideal for filling with gravel for a strong foundation.
Each earthbag must butt tight against the previous bag and the bags tamped flat after each course is complete. A double row of 4-point barbed wire is laid between each course.
Add courses of gravel-filled bags until you’re at least 15 centimetres above the risk of moisture damage.
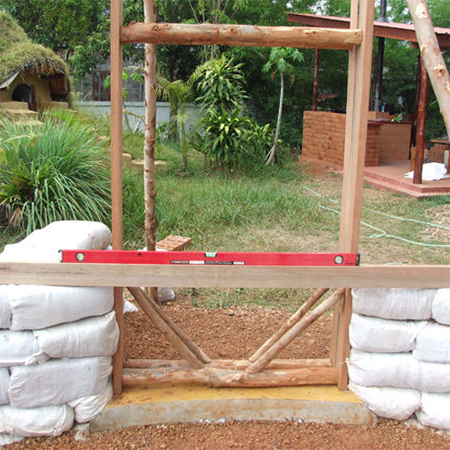
For door thresholds it is best to lay a concrete or stone slab of about 8 to 10 centimetres thick with a slight slope outwards - away from the interior - on top of the earthbag foundation. The finished floor inside the rondavel will be the same height as that of the concrete or stone slab.
Allow 7 days for the concrete slab to cure. During hot weather lightly spray the slab to prevent the concrete from drying too fast and cracks occurring. With the slab in place you can set the door frame on the threshold and brace securely in position.
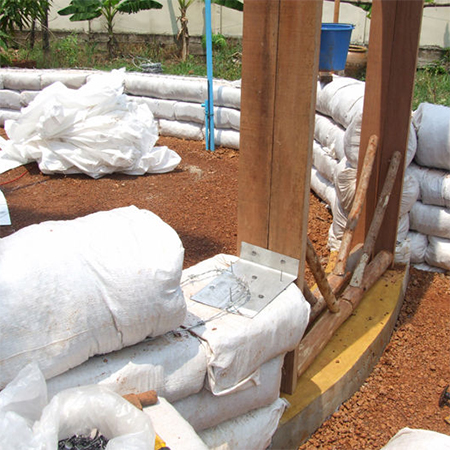
ABOVE: Use galvanised steel brackets every few courses to secure door and window frames to the earthbags. Simply nail the brackets into the earthbags with galvanized nails and screw into the backside of the frames.
Continue stacking courses of earthbags to build the walls but now you can use soil as a fill for the bags. You can use almost any type of subsoil for earthbags - subsoil being the layer below topsoil. You can also get in touch with company that supply sand and gravel to see if they offer a soil mix that you can use.
Continue to tamp earthbags solid and level after each course is complete. Tamp the high points first. Then evenly tamp the entire wall several times as you continually move the tamper.
GOOD TO KNOW
If you use the same number of buckets of soil in each bag and are careful placing the bags, the courses will be reasonably level.
Remember to place two strands of 4-point barbed wire between every course.
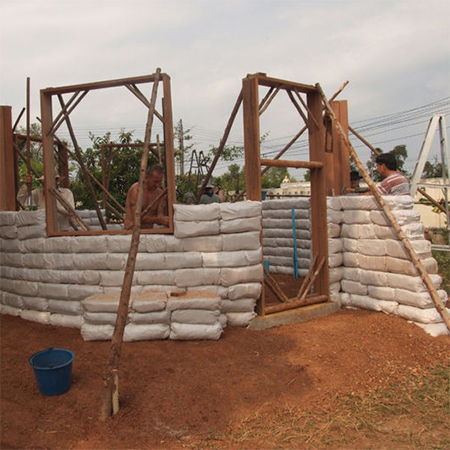
Set window frames when you reach windowsill height. Use braces to hold the frames square and keep them plumb and level. It’s often a good idea to hammer 12mm steel rebar down through the bags on either side of door and windows to reduce the possibility of movement and improve strength.

At roof height a reinforced concrete lintel - or bond beam - needs to be installed. Make frame using two layers of 6mm plywood and run 12mm steel rebar pins into the top of the bagged walls. At the same time you can embed rebar bent at a 45-degree angle for securing roof poles.
GOOD TO KNOW
Pour the concrete mix continuously so you don’t have any joints. Allow to dry several days before stripping the forms and building the roof. Any voids in the concrete can be patched when you plaster.

The beams for the roof are attached to the rebar embedded in the lintel - bond-beam - and wrapped with wire to secure in place. A steel compression ring supports the beams, with radiating wood poles covered in thatch. Create large roof overhangs of approximately 60 to 80 centimetres to protect walls from moisture damage.
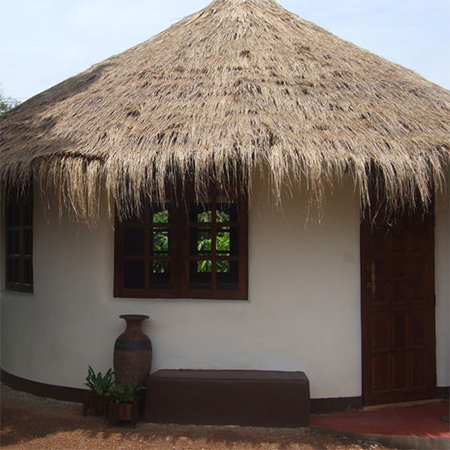
Thatching is probably the most laborious part of the entire project but are the easiest and most affordable option for roofing a circular rondavel. Plan on re-thatching every 5 years or so, depending on the quality of your thatch. Some thatch will last 10 years or even longer.
The windows and doors are added before plastering begins. Cover the window frames and remove doors to prevent damage and reduce cleanup later.
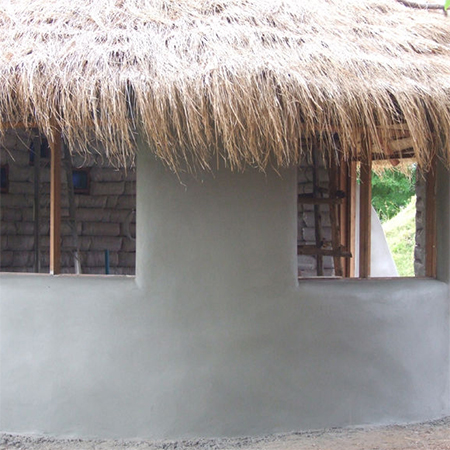
Plastering the exterior involves packing plaster mix between any recesses between the bags before adding a thin coat over the bagged walls. This coat is allowed to dry before applying a further two thin coats, each coat being allowed to dry.
The last coat is floated smooth with a wood or rubber float.
It boils down to adding a little plaster at a time. Leave each coat rough so the next coat will better adhere. No plaster mesh is needed - the plaster sticks to the earthbags without any problems.
GOOD TO KNOW
Resist the temptation to overwork the plaster or you’ll lose adhesion to the bags. Allow to dry slowly for best results. If necessary, spray a fine mist of water over the plaster.

For the interior you can use earthen plaster or conventional plaster. The first step is to fill the recesses between bags and apply plaster around doors and windows. You can apply earthen plaster with your hands or with a hawk and trowel.
Plaster mesh is recommended around all windows and doors to help prevent cracking. Allow each coat to thoroughly dry before adding additional coats. Leave each coat rough so the next one will more readily bond. Add more coats of plaster until your walls are finished. Smooth the final coat until you’re satisfied with the results.
More resources:
http://www.earthbagbuilding.com
http://www.naturalbuildingblog.com
http://www.instructables.com/id/Step-by-Step-Earthbag-Building/