How to Lay a Composite or Wooden Deck over a Concrete Slab
Don't live with an ugly concrete slab for your patio when it is so easy to turn it into an attractive deck that will enhance your outdoor living.
23/07/2022

family handyman magazine
While there is nothing wrong with laying a concrete slab for a patio or entertainment area, we can be honest and say that it doesn't really add much in the way of aesthetics to your outdoor space. There are plenty of ways to spruce up a concrete slab from painting and stencilling or even adding aggregate such as pebbles and pea gravel to make it look good. If you fancy making a first impression, one that most definitely adds something to an outdoor space, consider laying composite or wood decking - or a combination of the two - over the top of a concrete slab - instant attention grabber!

There is nothing more of an eyesore than a stained or cracked concrete slab and trying to fix this up can be just as much of a fuss. A cracked concrete slab takes a lot of work to fix, and it doesn't always work out the way you had hoped. Instead of wasting your time trying to fix cracks or replacing the slab, here is a better solution for you to consider. The only requirement is that the concrete slab be sturdy and level.
YOU WILL NEED:
Composite or timber decking planks
50 x 76mm untreated pine planks (available at Builder's stores)
100mm concrete fasteners
Decking screws
Self-levelling mix
Plastic or cement-fibre spacers
Chalk and chalk line
TOOLS:
Drill plus assorted bits
Circular saw
Impact or hammer drill
Spirit level
Tape measure and pencil
Safety gear
Builders stock a selection of products for marking straight lines for a professional project.

HERE'S HOW:
Step 1
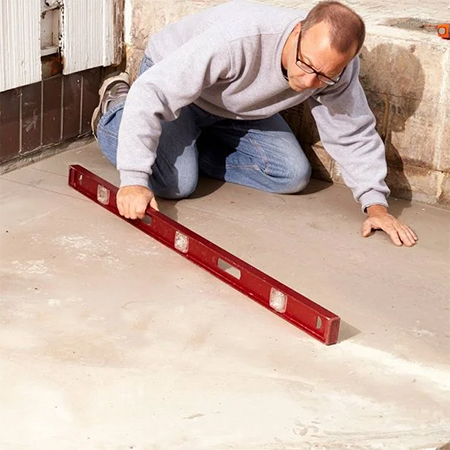
Use a spirit level to assess the existing level of the concrete slab. You want it to be level to avoid any water pooling or flooding problems, and even a slight angle away from the property is ideal. If there are any dips or low areas, use self-levelling mix to fill these and then leave for the recommended time to cure. Perhaps spread this project over a couple of weekends so that you can get everything done the right way.
Step 2
Measuring and planning the layout for the decking is vitally important. It is a good idea to measure the total area and make a rough sketch of the layout you want. Use a tape measure and chalk line to mark the location and, orientation, and layout for the decking. By using a chalk line to mark, you can then walk around and assess the layout to see if it works well. This method will also let you work out the quantity and lengths that the sub-floor and decking planks need to be cut.

Step 3
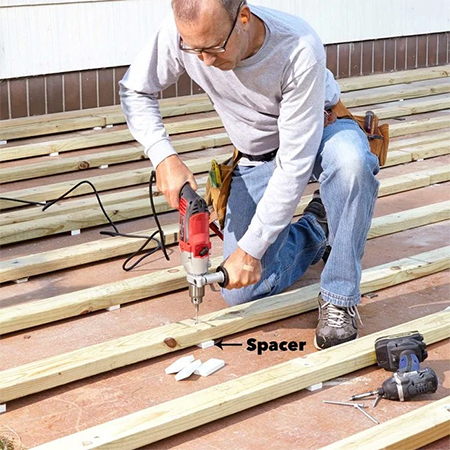
The sub-flooring is laid using 50 x 76mm untreated pine. This is far cheaper than PAR pine and the rough-sawn finish will not affect the overall appearance. Since you do not want the timber laid directly onto the concrete slab, plastic or cement-fibre spacers are necessary to elevate the sub-floor above the concrete. Builders offer plastic or cement-fibre spacers, but they do not resemble those as shown in the image below.
Using an impact or hammer drill, secure each sub-floor plank onto the concrete slab using the spacers and concrete fasteners placed equidistant along the length. It is better to have more spacers along the length than have too few. To prevent blunting the drill bit quickly, make sure to clean out the hole as you drill.
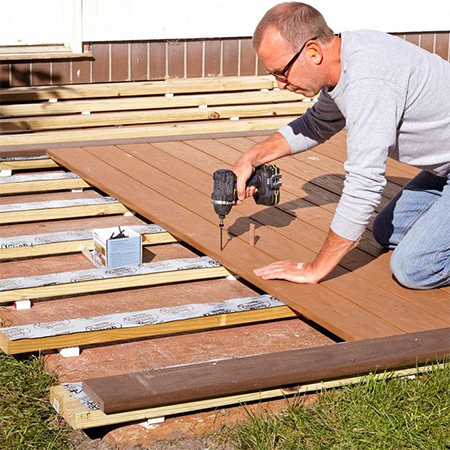
Step 4
Check that all the sub-floor planks are level before you start laying the composite or timber decking planks. Use decking screws to fasten the decking planks onto the sub-floor. The screw heads need to be sunk level with the surface. If using hardwood or composite decking, use a countersink bit to drill precise holes for the screws used.