
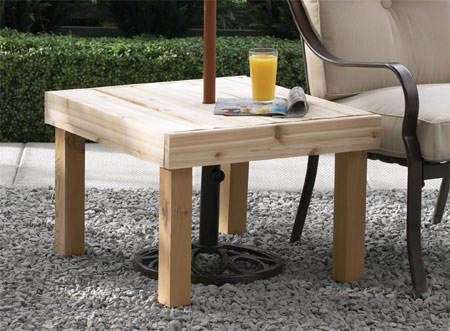
Do-it-yourself garden umbrella table
Here's the perfect project for anyone who enjoys a cool drink under a shade umbrella on a hot summer day. The 600 x 600mm table will accommodate an umbrella and stand, have enough surface space for drinks and snacks, and looks great.
YOU WILL NEED:
2 metres 76 x 76mm pine
3 metres
22 x 100mm pine
Wood nails
Wood glue
Hammer
Woodoc 30 exterior sealer
Paintbrush
Woodoc steel wool
Sander and 180-grit sanding pads
Clamps
Drill-driver
Jigsaw or
circular saw
Assorted drill and screwdriver bits
Countersink bit
Hole saw - to size of umbrella shaft
Tape measure
Pencil
HERE'S HOW:
1. To make the legs cut 4 pieces of 76 x 76mm pine to 450mm lengths.
2. For the table skirt cut [2] 22 x 100 x 660mm lengths and [2] 22 x 100 x 600mm lengths. Assemble a box with these four pieces. Glue and nail together.
3. Position a leg in one corner of the skirt, firm against the sides and down against a 22mm thick spacer block. Glue, countersink and screw through the leg into the skirt. Repeat for all corners.
4. Cut fastening pieces to fit between the legs. Glue and screw them into the skirt against flush with the top of the table legs. You can use another 22mm spacer block.
5.To make the table top, cut five pieces of pine to fit inside the skirt. So all pieces are of equal width, measure and divide by five, then cut the five pieces to equal widths. Lay the five pieces together on a flat surface and fit the table over them. Countersink, glue and screw through the fastening strips into the pieces.
6. Stand the table upright on its legs and use the hole saw to drill a hole in the centre, to accommodate the umbrella.
7. Fill all cracks and holes with wood filler. Sand, stain and apply Woodoc 30 exterior sealer according to the recommended instructions. You need to apply 3 coats, letting dry and lightly rubbing with Woodoc
Steel wool after the first coat.
home depot