
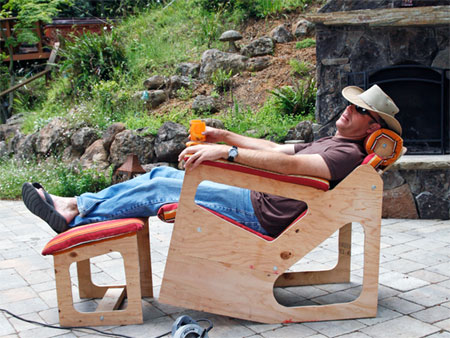
Build a rocking lounger and stool
Get ready for lazy summer days in the garden, or by the pool, with this lazy garden rocker and stool.
Made from pine plywood, you will only need one sheet for the garden chair and stool and which only costs around R400 per sheet.
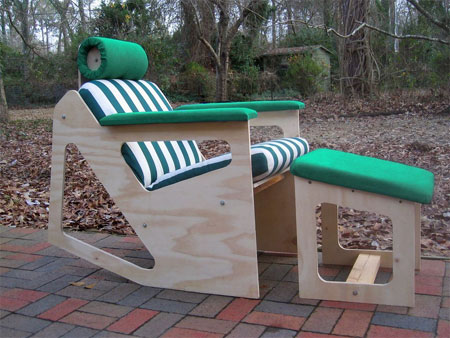
Can a chair be comfortable, look good, recline, disassemble for compactness and portability, and still be made from just a single sheet of plywood? With a determination borne of frustration and frugality, I set about designing a chair that would meet all my requirements. The rocking lounger is very comfortable, easy and inexpensive to build, can be assembled or dis-assembled in a few minutes, and can be stored and moved about easily, taking up very little space.
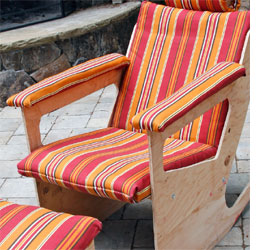
If you’re really ambitious, you can upholster your own cushions, as well as the headrest and footstool, for a perfectly matched set. The upholstery techniques are similar for most any fabric. Fabric work can be limited to cutting with good scissors and making 1 long seam — with either a sewing machine or fabric bonding tape — then stapling in place.
YOU WILL NEED:
12mm pine plywood sheet - ask for all offcuts
Rust-Oleum polyurethane spray
Wood screws3 x 20mm
Washers
Lag bolts
Pine 50 x 100mm x 1.8 metre
Pine 20 x 100mm x 1.8 metre
Wooden dowel 20mm diameter
Pine 50 x 50 x 1.8 metre for footstool top supports
TOOLS:
Jigsaw
Drill/Driver with assorted drill and screw bits
Orbital sander with 60-, 120- and 220-grit sanding pads
Tape measure
Pencil
Rachet wrench for lag bolts
HERE'S HOW:
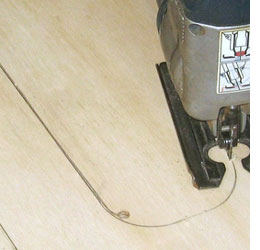
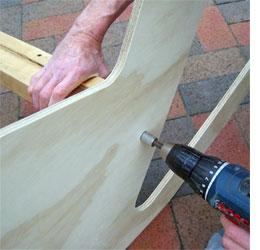
1. Have all the sections cut to size at your local Builders Warehouse. That way you'll only need a jigsaw to round off the corners.
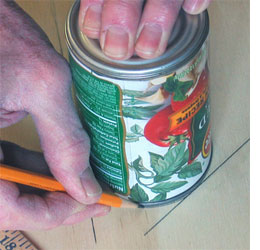
2. Use an empty can or something similar to assist you with rounding off those corners as marked on the diagram. Use a jigsaw to cut all the rounded sections.
DIY Tip:
Place the board over two trestles or workbenches so that you have a clear space underneath and plenty of room to move around as you cut the rounded corners.
Always ensure that the power cord is safely out of harms way.
3. Lay the chair sides face to face and drill the three 6mm holes for attaching the sides to the cross braces. To minimize splintering, place scraps of wood under the side where the bit will exit. Repeat this process for the mounting holes in the stool sides.
4. Cut out the headrest disks from the offcuts that you have.
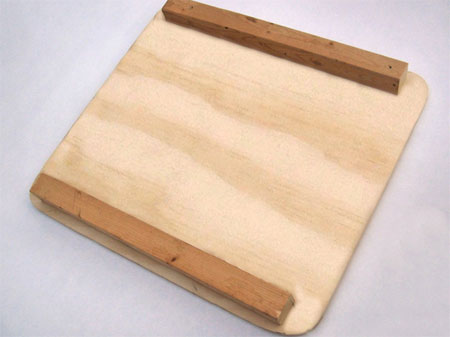
5. Cut three 560mm lengths of 50 x 100mm pine for cross braces A, B, and C. You'll modify A and B to accommodate the headrest and backstop.
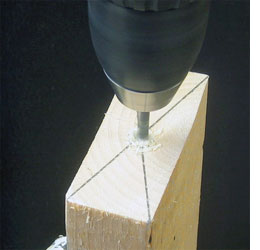
6. After cutting, draw an X on all the ends, corner-to-corner. At the centre of each X, drill a 3mm hole at least 50mm deep.
Cross brace A:
If you plan to make a headrest, you need to shape a mounting surface for the headrest support piece. Using a hand or power plane, create a smooth, flat 40mm-wide surface, at least 250mm long, at approximately the angles shown. The 53° and 37° angles ensure that the headrest support is vertical before the chair is rocked back.
Cross brace B:
Attach the backstop, a 560mm x 30mm x 6mm strip of plywood that will support both seat and back pieces. This extra piece of plywood catches the bottom of the back, which then stops the seat. Use three wood screws, spaced approximately 200mm apart.
7. Before assembling to test, take the time to sand all the cut sections. This is not only an appearance issue, but an obvious comfort issue as well. Start with 60-grit for rough areas, then onto 120-grit to smooth and remove any splinters, and finish off with 220-grit.
8. Prop the sides apart while you fasten the cross braces between them using the lag bolts and washers.
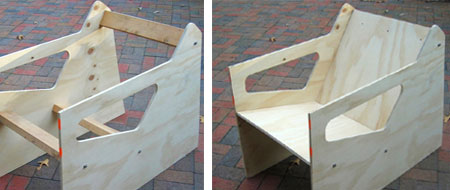
9. Drop the back (3 screw holes up) and seat (any orientation) into their respective positions. Notice that the bottom of the back fits between the rear edge of the seat and the backstop on cross brace B. Do not sit yet!
10. With the seat and back pieces flush with the wide side of all 3 cross braces, fasten the back to cross brace A with three wood screws. These screws prevent braces A and B from rotating; your weight will keep brace C fixed.
Now throw in a patio chair cushion set and give your chair a test-sit. The back cushion should rest on top of the seat cushion, whether they’re a stitched assembly or separate cushions. You can trim the sides along the bottom if required so that your feet will be well supported when you sit in the chair.
If you’re sure you want to build only the basic configuration, you can make the large bottom cutouts in the sides. However, if you’re building the rocking version, leave the sides solid for now. Don’t be tempted to make cutouts in the sides under the seat. This will almost certainly make the chair too weak and wobbly.
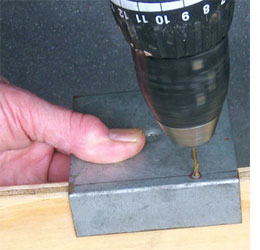
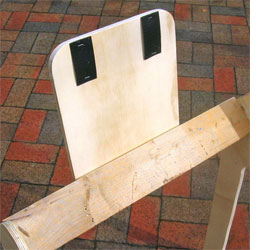
11. The only thing tricky about adding armrests is the mounting itself. Each side of the chair will have 5 screws 120mm apart, centred in the top edge. If these holes aren’t drilled properly, the wood could split.
You can control your drill bit better with a drill bit guide. It can be a piece of sheet metal, bent at a right angle or attached to a wood block. In any case, drill a 3mm guide hole with an HSS bit, so that when using the guide, the guide hole will be exactly in the centre of the plywood edge.
Draw lines on the top edge of the chair sides, then using the drill-bit guide, drill 5 holes straight down into each side.
Position an arm with the front of it overhanging the front of the chair side by 10mm. This overhang is necessary for stapling the fabric if you pad the arms. Mark the bottom surface of the arm to line up with the holes drilled in the top of the side. Drill the screw clearance holes from the bottom, which should ensure that the screw holes line up exactly. Repeat for the other arm.
Countersink the screw holes from the topside of the arms so the screws will be slightly sub-flush. Mount each arm with five wood screws.
DIY Tip:
If you don’t want to pad the arms, you could round the top-front corners of the arms with a 6mm radius router bit, or just sand something close. If you do want to pad the arms — highly recommended for comfort and appearance — that will be the very last step in building the chair.
Make the footstool assembly.
Assemble the sides and top for the footstool. The top has two 50mm x 50mm runners at each side, and the sides of the stool are screwed onto these.
Make the headrest

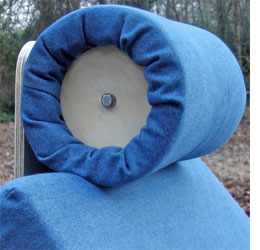
A well-padded headrest is key to a comfortable chair. Cover it with the same fabric you use for the cushions and footstool. For attaching the finished headrest to its support, you’ll sew on velcro at least 20mm wide. Adhesive velcro doesn’t stick well enough to fabric.
Cut the fabric to 560 x 560mm. Secure the seam and velcro strip. You have a choice of sewing or using fabric bonding tape. Use a sewing machine if you can. However, I found that iron-on bonding makes a surprisingly strong seam.
Sew a 200mm velcro strip to the visible side of the fabric, about 20mm from one edge, centred. Sew all the way around the velcro. Fold the fabric in half, wrong side out, and sew a 560mm straight seam about 12mm from the open edges. Turn the fabric sleeve right side out. It should be about 180mm in diameter.
Cut a piece of foam 480 x 300mm and tightly roll up; insert into the fabric sleeve and let it unroll. On one end, poke the surplus fabric over the foam and into the centre hole. Cut the wood dowel and drill both ends as shown above. Attach one HR disk to the end of the dowel with a lag bolt and washer.
Press the disk assembly, dowel first, into one end of the cylinder. Gather the material as you press, and space the folds neatly around the inside circle. Stop pressing when the outside face of the disk is about 40mm from the end.
From the other end, stuff batting between the dowel and the inside wall of the cylinder. Hold the other disk to keep it from being pushed out the end. Try to fill all voids, keeping the dowel in the centre. The more stuffing you can push in, the more comfortable your headrest will be.
Put a lag bolt and washer through the hole in the second disk, then push the tip of the bolt into the hole in the end of the dowel. Tip the disk inward and press it into the foam core, keeping the fabric as neat as you can. You can press the other end’s disk in a little farther to make it easier. Tighten the second lag bolt with a ratchet wrench, while holding the first bolt with pliers. Neaten your fabric folds at both ends.
Staple two small strips of velcro to the headrest support near the top, so their outside edges are 200mm apart.
Mount the support to the bevel on cross brace A, exactly in the centre, with three screws. Temporarily stick the headrest to the velcro strips on the support and give the chair another test-sit.
Make it a rocker
To allow the chair to rock back, the bottoms of the sides must be cut into shallow V. The tipping point of the V is critical as the chair must:
- be completely stable when rocked backward; do not cut off more than a total height of 120mm.
- stop, with a small thump, in the reclined position.
- not lean prematurely; it should require a light push with your feet, but not be difficult to rock backward.
larry cotton