
Make a home wrapping station
This compact-sized, wall-mounted wrapping station keeps all of your ribbons, paper and accessories neatly organized. Build two identical pieces, one for paper and one for ribbons. Once installed, you can quickly access supplies whenever a birthday or holiday event occurs.
.
YOU WILL NEED:
1,8m of 20 x 100mm pine
Rust-Oleum 2X spray paint - white
Wood glue
Mitre saw, jigsaw or mitre box and backsaw
Orbital sander and 180-grit sanding pads
Clamps
Drill/Driver with assorted drill and screw bits
Router or Dremel Trio - or use a spade bit
Pencil
Tape measure
HERE'S HOW:
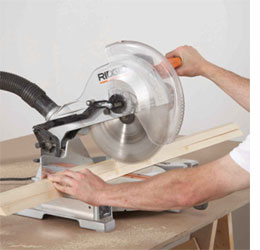
Step 1
Using a jigsaw with the mounting plate set at 45° and a piece of 20 x 100mm pine, cut a 600mm length. Save the offcut for the second support. From another 20 x 100mm piece of pine, make a 45° cut at 40mm to create the
hanger bracket.
Step 2
Using the mitre saw, jigsaw or mitre box and backsaw, cut the supports to 880mm in length. Cut the 40mm support bracket slightly shorter, to 876mm.
Step 3
From a length of 20 x 150mm pine, cut 4 square end pieces, 140 x 140mm. Then measure 25mm off
two opposing corners and cut off at a 45° angle. This will create triangular pieces with 2 right-angled corners.
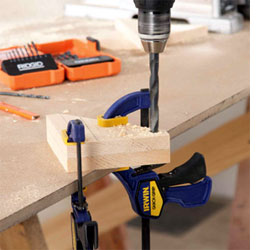
Step 4
Align and clamp end pieces together and drill a 12mm hole in one of the offset corners to accept the 12mm dowel that will act as a straight edge.
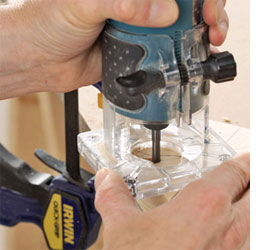
Step 5
Use a router or Dremel Trio to rout a channel 20mm deep channel on an angle, and 12mm wide, to accept the dowel that will hold ribbon/paper.
Step 6
Assemble unit by gluing bottom and rear supports flush to the back of the end pieces – the 45° angles should be oriented as shown in the main image. During assembly, also glue a 12mm dowel, cut to 890mm long, into the predrilled holes. Countersink woodscrews – 2 in the ends of the rear support and one at each end of the bottom support. Glue screw caps to hide the screws and dowel hole.
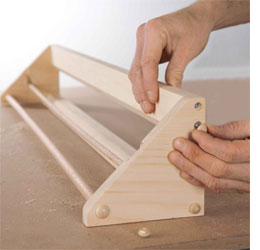
Following assembly, cut the second dowel to length to fit between the routed channels – this is the removable carrier for ribbons or paper.
Step 7
Fill, sand, prime and paint as desired.
Using screw and wall plugs, install the wall mounting bracket on the wall with the 45° angle facing in to accept the 45° angle on the back support piece.