
Build a custom wall unit
No matter how small or large a home, shelves and cupboard are always needed for storing and displaying items. A wall unit not only looks good, it serves as a display unit for your collectibles, or to house a flat screen TV, and provides plenty of storage for audio/visual equipment and other items.
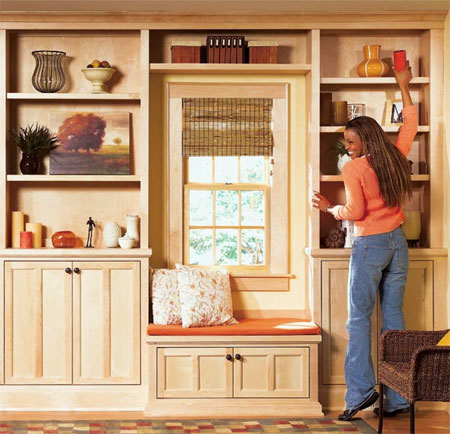
As far as design go, this wall unit has to be one of the easiest projects to do-it-yourself. Using basic woodworking and cabinet carcasses from a home centre, the assembly is simple. But despite its simplicity, the shelves have a custom-built look that will enhance any room.
Because the wall unit is designed to incorporate standard cabinets, or cabinets that you can easily DIY, most of the difficult work is eliminated. With plywood and boards - no tricky joints or fancy curves - you can build this wall unit in a couple of weekends. Because it’s built in sections, it could run partway along a wall or completely cover the longest wall in any house. The window seat and the shelf above it are optional.
It’s stylish enough to dress up a living room with its open shelves, and its closed cabinets will add practical storage space, whatever the room
YOU WILL NEED:
19mm plywood for cabinet bases
9mm SupaWood for doors and frames
Pine moulding and trim
L-brackets
Wall plugs and screws
Shelf supports or pins
Masking tape
Cut screws in assorted sizes
TOOLS:
Hammer
Clamps
Mitre saw or mitre box and backsaw
Drill/Driver and assorted bits
Tape measure and pencil
Circular saw
Spirit level
Stepladder
Router
Speed square
Router or Dremel Trio and router bits
Safety gear
HERE'S HOW:
Step 1
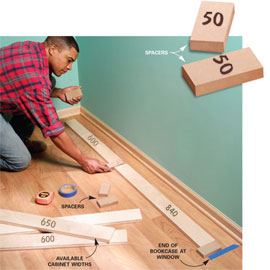
Cut wood strips to match cabinet widths and various spacing widths. Experiment until you determine the sizes that best fit your space. Because this whole project is built around cabinets, you have to carefully plan their positions and spacing. By experimenting with various cabinet and spacing widths, you can find a combination that perfectly fits the length of a wall.
Step 2
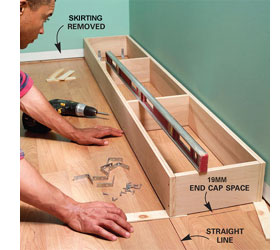
The cabinets sit on plywood bases that are fastened to the floor with L-brackets. Make the bases match the depth of the cabinets and install them about 5mm from the wall to allow for any irregularities in the wall. When determining the length of the base, subtract 5mm to give yourself some adjustment space. Be sure to allow 19mm for the end caps.
Step 3
When the bases are level and fastened, screw on the plywood covers.
Step 4
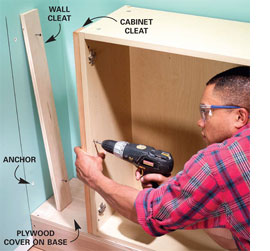
Set wall-end cabinet on the base. Push it up against the wall and draw a line on the wall to mark position of the wall cleat. Hold the cleat in place to drill holes through it and into the wall. Screw in anchors and drive screws into them. Screw cleat to cabinet with 30mm screws.
Step 5
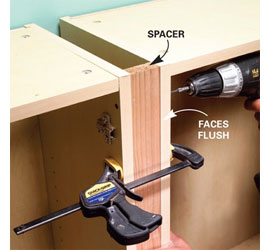
Join cabinets by driving 40mm screws into the spacers between them. Predrill and make sure the spacers are flush with the cabinet fronts. Position the cabinets and screw them to the base.
Step 6
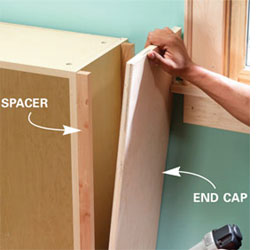
Screw spacers to the end cabinets and nail on the end caps. Cut the end cap to fit tightly against the wall, flush with the front of the cabinets, and to stand about 50mm taller than the cabinet.
Step 7
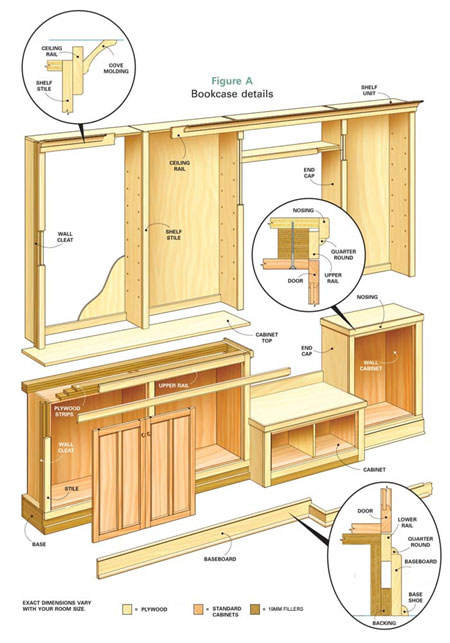
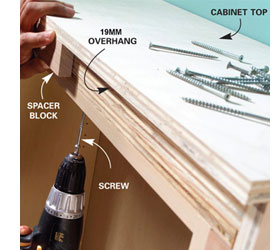
Build up the front and back edges of the cabinets with three layers of plywood strips. Drill 3mm pilot holes through the strips and cabinets. Fasten the cabinet top with 80mm screws. Use a spacer block to ensure that the front overhangs 19mm.
Step 8
Assemble shelf unit sides and cleats and square the unit by measuring diagonally both ways. When the measurements are equal, the unit is square. Then nail the back into place.
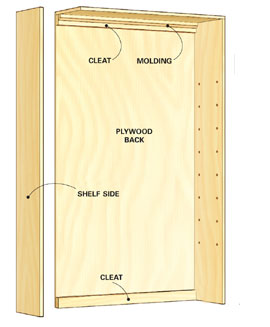
Step 9
Attach wall cleats even with the fronts of the shelf units. Join units with glue and then clamp them. Put wax paper under them to keep excess glue off the cabinet top.
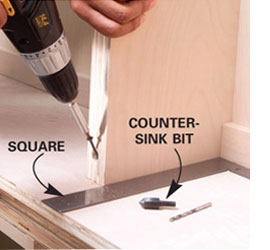
Step 10
Position the shelves, then fasten the fronts of the shelf units with 60mm. screws. Drill a recess for the screwhead with a countersink bit and then drill a pilot hole.
DIY TIP
Screw the shelf units to the wall. Cover the screw heads with pine moulding.
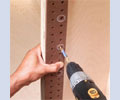
Use pegboard as a guide for drilling shelf holes.

Step 11
Screw a straightedge in place to help you perfectly align the door tops. Hang the doors. Hinges on frameless cabinets let you adjust the doors simply by turning screws.
Make your own doors with PG Bison SupaWood
Have 9mm backs csut to the size of the doors
required and 9mm frames for the sides, top and bottom. If you want a
decorative finish to the frames, use a router - or add any number of
trim combinations. The side, top and bottom frames are glued and clamped to the back panel.
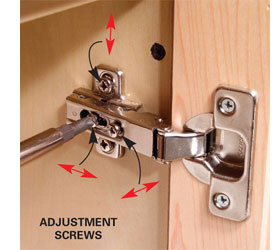
Concealed or European hinges are the best type of hinges for this type of arrangement. To drill out the holes you will need a 35mm Forster or MAD bit and a 500-watt minimum power drill. Leave a gap of 6mm between the edge of the door and the hinge hole and drill to a depth of 12mm. You will find more information on installing concealed or Euro hinges in our DIY section.
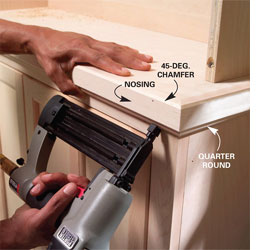
Finish off your new shelf unit with pine moulding and trim. Wood glue, panel pins and a hammer can be used as a good substitute for a compressor nail gun. Now you are ready to stain and seal, varnish or paint your completed project.
family handyman