
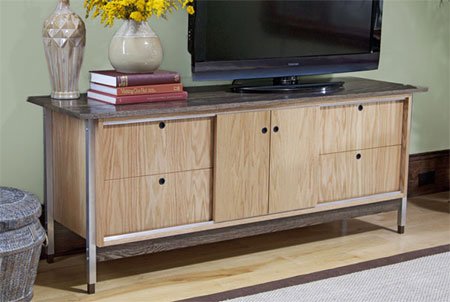
Make a stylish TV cabinet
Make this stylish TV cabinet from a few sheets of plywood and some boards and get a thumbs up from the family.
lowescreativeideas.com
Note: This project has been modified to allow for metric equivalents and local material/supplies availability.
YOU WILL NEED:
400-grit sandpaper
30mm wood screws
Wood glue
Wood filler
Tape measure
Pencil
Combination square
3mm x 19mm x 1450 aluminium bars
19mm flathead sheetmetal screws
30mm flathead sheetmetal screws
19mm panhead sheetmetal screws
40mm panhead sheetmetal screws
Edging strip
Woodoc Gel Stain in choice of colour
Woodoc 5 or 10 interior sealer
Woodoc steel wool
2 x 19mm cup pulls
TOOLS:
Iron
Tablesaw
Craft knife
Drill/Driver plus asstd bits
Countersink bit
Pockethole jig
Clamps
Orbital sander
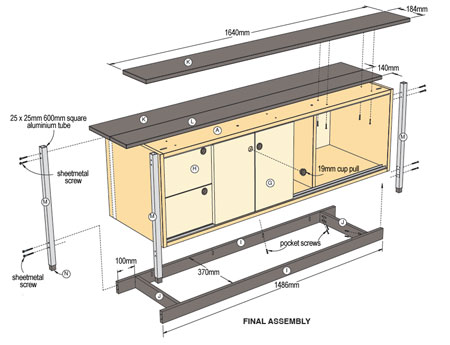
CUTTING LIST
QTY |
W |
L |
MATERIAL |
ITEM |
||
A |
2 |
460 |
1450 |
19mm plywood | top/bottom | |
B |
2 |
460 |
460 |
19mm plywood | ends | |
C |
2 |
406 |
425 |
19mm plywood | dividers | |
D |
2 |
368 |
445 |
19mm plywood | centre shelves | |
E |
2 |
406 |
460 |
19mm plywood | side shelves | |
F |
2 |
610 |
460 |
6mm backing | back | |
G |
1 |
410 |
480 |
19mm plywood | door panels | |
H |
2 |
410 |
480 |
19mm plywood | drawer panels | |
I |
2 |
64 |
1486 |
19mm plywood | rails | |
J |
2 |
64 |
370 |
19mm plywood | cross rails | |
K |
2 |
184 |
1640 |
19mm plywood | wide top planks | |
L |
1 |
140 |
1640 |
19mm plywood | narrow top plank | |
M |
4 |
25* |
600 |
aluminium | legs | |
N |
4 |
22 |
76 |
22mm pine | feet |
*May need to modify this due to availability of aluminium.
HERE'S HOW:
Step 1
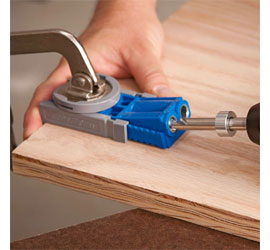
Drill pocket holes at the ends of the top/bottom, and the bottom face of the centre shelves as shown in the diagram. Using a small handheld jig on larger panels makes drilling pocket holes easier than taking these large panels to a jig fixed in position on a bench.
Note: It's a good idea to edge all the plywood before assembly.
Apply an iron-on veneer edging to all of the panels as you proceed. Veneer only the front edges you’ll see when the project is complete. Use a iron on the cotton setting to apply the edging. Allow the iron to warm up, cut the veneer about 2cm longer than needed, and apply the edging to the piece. Use light pressure and keep the iron moving to prevent scorching. After a few seconds, the veneer will be set and you can trim it with a utility knife. Now sand the panels smooth.
Step 2
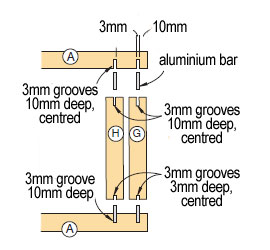
The top/bottom [A] need two grooves for the aluminum door rails (these grooves are on the opposite face from the pocket holes you drilled earlier). Cut the groove 10mm from the front edge using your table saw.
Test-fit the aluminum as you proceed. If the fit is too tight, slide the table saw fence over about 6mm and make another pass. Now repeat for the remaining groove at 34mm from the edge.
Step 3
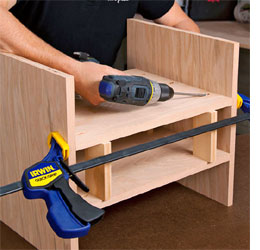
Assemble the centre section of the case - the dividers [C] and centre shelves [D] - upside down on your work surface. This allows easy access to the pocket holes on the bottom of the shelves. Cut four 127mm-long scraps to use as spacers for assembling the centre section. Place the scraps on your bench, apply glue to the ends of the centre shelves [D], rest the shelf on the scraps, and drive the pocket screws through the shelf into the dividers.
Move the spacers up to the next shelf, position the second shelf, and drive the screws to attach the second centre shelf. Align the front edges of these parts as you assemble the centre section.
Step 4
Add the bottom to the centre section. The bottom is flush to the back edge of the dividers and centred on the centre assembly. Mark the position of the dividers on the bottom. Apply glue to the dividers and rest the bottom in position. Apply clamps, drill countersunk holes, and attach the bottom to the dividers.
Step 5
Flip the unit over and add the top, again centring it side to side on the centre section with the back edges flush.
Step 6
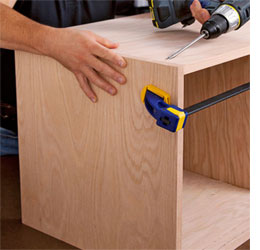
Position the ends [B] against the top/bottom and secure the ends to the case assembly using glue and pocket-hole screws. When securing the ends, align the front edges of the top/bottom with the front edges of the ends. The offset at the back of the parts will conceal the plywood edge of the backs [F].
Step 7
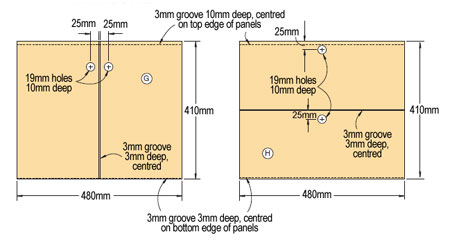
Cut a groove down the centre of the door face and the centre of the drawer faces. Set your table saw with the blade 3mm above the table. This groove will give the illusion of a pair of doors or drawers.
Step 8
Drill the two 19mm holes 10mm deep for the cup pulls in each of the door and drawer panels. Be sure to reference the top of the doors to drill the holes in the proper location.
Step 9
Slip the runners into the grooves and temporarily clamp them in position.
Step 10
Test the fit of the doors by engaging the top of the door in the upper rail. Swing the bottom of the door in and lower onto the bottom runner. Adjust the grooves as necessary for a smooth slide. Add the veneer edging to the sides of the doors, and sand the panels smooth. Remove the veneer edging where the grooves have been cut at the top and bottom edges of the panels.
Final Assembly
Step 1
Drill pocket holes in long rails [I] and cross rails [J] and sand the parts. Assemble the base frame with the cross rails inset from the ends of the long rails by 100mm using glue and screws; set the frame aside.
Step 2
Sand the parts top planks [K] and narrow top plank [L] smooth and ease all of the edges with sandpaper. Easing the edges adds nice detail lines to the completed top. It’s also easier to make a top this way instead of edge-gluing the boards and trying to make them one perfectly sanded surface.
Step 3
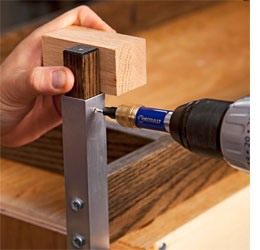
Cut the aluminum legs [M] to length and then cut a 50 x 50mm piece of pine to 300mm in length to create a blank for the feet [N]. Rip the blank to fit inside the aluminum legs -- rip it once to width and then a second time to thickness. When the blank slips into the legs, cut the blank into four equal-length parts for the feet.
Step 4
Sand all of the parts one last time and apply Woodoc Gel Stain. The top, base frame, and feet are all stained a deep ebony colour. When the stain has dried, apply two coats of Woodoc 5 or 10 interior sealer to all of the parts, including the case and doors. Apply one coat, allow it to dry, and lightly sand with Woodoc steel wool. Apply a second coat to all of the parts. For the top planks, add a third layer of finish for extra protection.
Step 5
Using 400-grit sandpaper, sand the aluminum runners for the door and drawers, and install into the case using 5-minute epoxy. Mix up a small amount of epoxy following the manufacturer’s instructions, apply to the edge of the aluminum in 4 or 5 small spots, and fit into the case. Tap the rails with a block of wood to make sure they are seated and clamp the top runners while the epoxy sets.
Step 6
Drill 3mm pilot holes through the top [A] for attaching the top planks [K] and [L]. Place the top planks with the ends aligned on your work surface with the best face down (place them on a drop cloth or moving blanket to protect the finish). Now flip the case upside down and centre it on the top planks.
Step 7
Mark the location of the holes in the top on the planks. Remove the case, drill 12mm deep pilot holes at the marked locations, and then attach the top planks to the case using screws.
Step 8
Position the backs [F] against the case, predrill for the panhead screws, and secure. The centre is open to allow for air circulation and for access to wires for your electronic components. If you need access to the side areas for wiring, drill a 25mm hole in the back in the area of the side compartments.
Step 9
Position the base assembly on the bottom of the cabinet and secure using pocket screws.
Step 10
Drill 5mm holes through the legs [M] for securing to the case. After drilling the holes, position the legs on the cabinet; using the 5mm holes as a guide, drill pilot holes into the case and long rails. Buff the aluminum with a scuffing pad, and then secure to the case. The top holes into the case need 40mm-long screws, and the bottom holes into the long rails need 50mm-long screws. Slip one foot into one of the legs. Use a scrap of the 40mm-thick material to use as a spacer to ensure the feet project the same amount from each leg. Position the foot, drill a pilot hole, and secure with a screw; repeat for the remaining feet and legs. Drill the pilot holes on the back face of the legs to hide the screws from the front of the cabinet.
Step 11
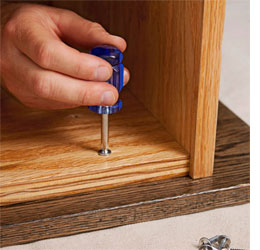
Place cup pulls into the holes you drilled in the door panel [G] and drawer panels [H]. Tap the pulls into the holes with a hammer and scrap block.
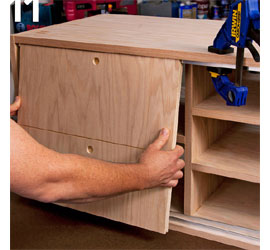
Step 12
Flip the case upright and install the doors and drawer panels. The drawer panels go onto the back runners and cover the side openings; the door panel goes on the front runner and covers the centre opening of the case.