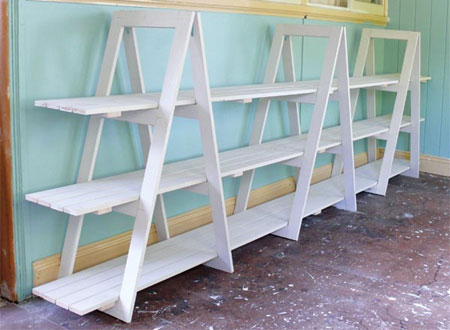
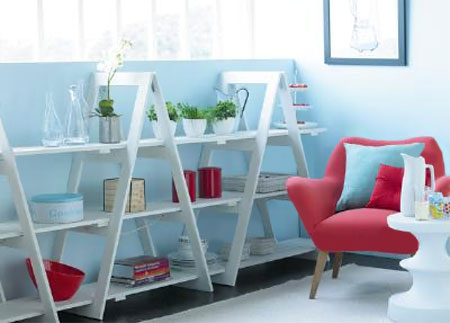
Build your own trestle shelves
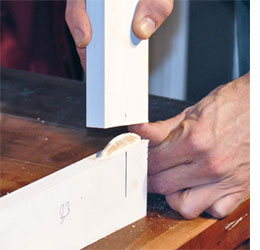
Dowel joints add strength to edge-to-edge joints. For this trestle shelving, the rails are attached to the legs using butt joints secured with dowels and wood glue.
GOOD TO KNOW
The original instructions for this project included the use of biscuits and a biscuit joiner, but how many own biscuit joiner? Do I see two hands in the back! Exactly, so forget about the biscuits and use dowels and dowel centres instead.
YOU WILL NEED:
Wood glue
32 x 8mm dowels and dowel centres
2 x Strap hinges
Wood Screws
Drill/Driver + assorted bits
8mm Cord
Paint
Clamps
Prominent Paints Sheen, white
Paint brush
CUTTING LIST:
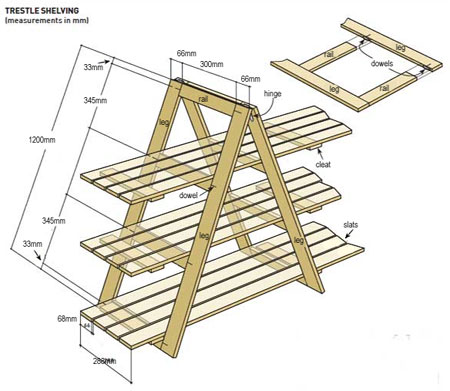
| 12 x | 1200mm | 64mm | 19mm | pine legs | |
| 24 x | 300mm | 64mm | 19mm | pine rails | |
| 12 x | 3600mm | 64mm | 19mm | pine slats | |
| 15 x | 290mm | 64mm | 19mm | pine cleats |
HERE'S HOW:
Step 1
Have everything cut to size at your local Builders Warehouse and take the time to sand everything with 120- and then 240-grit before you assemble. It makes it much easier if you do it this way, and once assembled, the units are ready to paint. Paint all the pieces before you put the trestles together, you can always touch up once you've done.
Step 2
Along the legs measure 30mm and 380mm from the ends to mark the centre of the biscuits dowels and then mark along the centre of the rail ends. Clamp the pieces on the workbench to drill the holes for the dowels in the rails and then use dowel centres to mark on the legs. Drill the holes for the legs. The holes in the rails and legs should each be half the length of a dowel.
Step 3
Position a leg with the dowels facing up, apply wood glue into the dowels and along the adjoining faces, push in the biscuit dowels and then position the rails. Attach the opposite leg, checking for square and clamping until dry.
Step 4
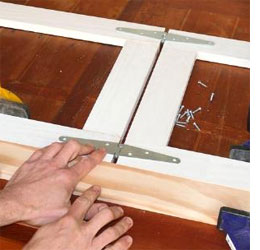
Position the frames top to top, using the barrel of the strap hinges as spacers, clamp a straightedge along the side then secure the hinges using wood screws.
Step 5
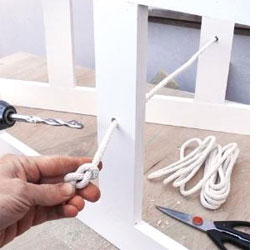
Use a drill with a 10mm wood bit to make holes in the rail that supports the middle shelf. Tie a figure-eight knot in the cord, mark 550mm along, feed it through and tie a second knot at the mark. Trim the end and apply a drop of adhesive to prevent fraying.
Step 6
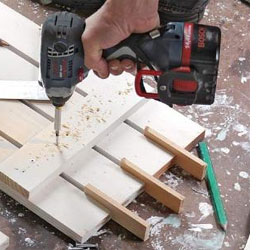
Position four slats with 12mm wide offcuts as spacers, mark 100mm from the ends then three marks 850mm apart to position the cleats evenly. Make pilot holes and countersink, securing the cleats with two screws into each slat.
Step 7
Check the fit of the frames with the shelves then remove all the hardware to touch up the paint and leave to dry. Replace the hinges, slide the closed frames along the shelves then open them up.