
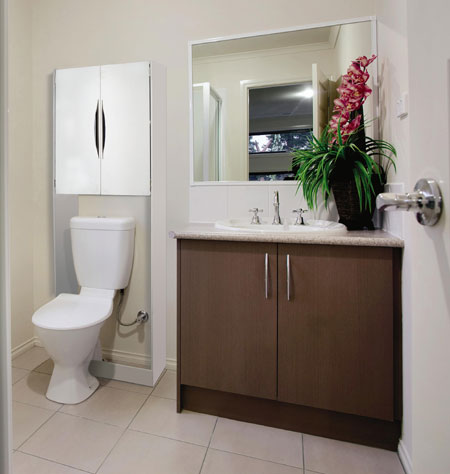
DIY above-toilet storage
This project is designed for those living in a rented home, where bathroom storage is always limited and the Landlord has a fit if you drill into the walls. Our over-toilet storage cabinet will fit easily into any bathroom and, although there are a couple of holes to be drilled you can drill into the grout and easily touch this up when you leave.
YOU WILL NEED:
We are using 12mm SupaWood for the project, which is lightweight yet still offers enough strength for this project.
2 of 200mm x 1500mm - sides
3 of 188mm x 510mm – top/bottom and shelf
2 of 250mm x 600mm – doors
1 of 100mm x 534mm – bottom support
4 Brass hinges, small
2 Plastic corner brackets
3 x 13mm wood screws
3 x 20mm wood screws
2 Handles
Tape measure
Pencil
Prominent Paints acrylic sheen - broken white or white
TOOLS:
Bosch Drill/driver and assorted drill and screw bits
Countersink bit
220-grit sandpaper
Foam roller and paint tray
Small paintbrush
Bosch PDO Multi Electronic detector
HERE'S HOW:
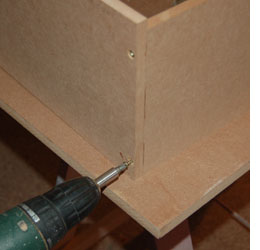
1. Working on a flat, level surface, place the top section between the two sides. Hold firmly - or clamp - as you drill 2mm pilot holes and countersink the holes. Drive 3 x 20mm screws through both sides into the top section.
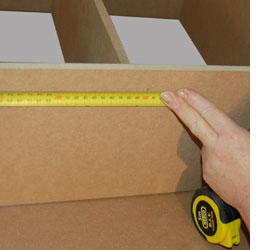
2. Measure 300mm from the top on both sides (front and back) and draw a line. This is where you will mount the shelf. Once again, hold or clamp the shelf in place as you drill a 2mm pilot holes, countersink and drive in 3 x 20mm screws.
3. Measure down 600mm from the top on both sides (front and back) and mark as the position for the bottom shelf. Note that the shelf must be mounted on top of the line so that it lines up with the bottom of the doors that are still to be fitted.
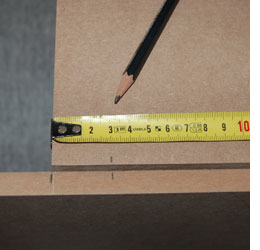
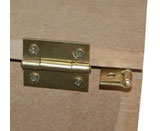
4. Position the doors over the cabinet and measure 30mm from the top and mark on the door and side frame for mounting the top hinges. Repeat this at the bottom of the door, measuring 30mm up.
5. Place the top of the hinge against the top mark, with the barrel (or pin) of the hinge hanging over the edge and mark the position of the holes with a pencil. Drill 2mm pilot holes and drive in 13mm screws to attach the hinges.
DIY Tip:
When attaching the hinges, note that the board is 12mm thick and the screws are 13mm long. Be careful not to drive the screws too hard as they will damage the other side of the board.
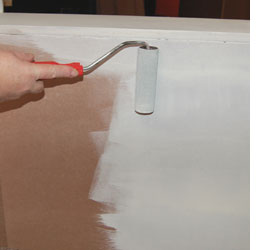
6. Sand all edges with 220-grit sandpaper before applying two to three coats of Prominent Paints acrylic sheen in broken white. Use a small paintbrush to get into corners. Allow sufficient drying times between coats and use a foam roller for a brush stroke-free, smooth finish.

7. Mark the position for the door catches on the back of each door. Use 13mm screws to attach.
8. Also mark the position for door catches on the bottom shelf. These catches should overlap the edge of the shelf by 3mm to allow for the thickness of the hinges. Use 13mm screws to attach.
9. Mark each door at 300mm. On the handles, measure the distance between the screw holes and transfer this onto the door, using the centre line as a guide for correct positioning. Attach handles.
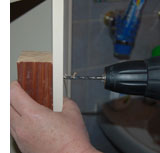
10. Use a 3mm wood bit to drill the holes for the screws.
DIY Tip:
Use a scrap piece of wood at the back of where you are drilling to reduce splitting of the wood.
ADDITIONAL MOUNTING
Use small plastic corner brackets to attach the cabinet to the wall. Position the brackets so that they can be screwed into the grouted area between tiles. Any holes can easily be concealed when you leave by filling in with grout.
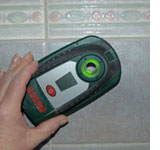
GOOD TO KNOW: When drilling into walls, especially tiled walls, use a detector to scan the area to prevent drilling into pipes or electrical conduits.