
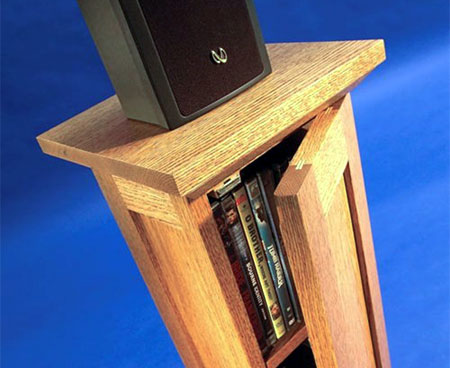
Make a speaker stand with CD or DVD storage
These DIY speaker stands are ideal for your home theatre speakers, plus they allow you store your CD's out of sight in a convenient storage unit. Even the wires for the speakers are out of sight - they run inside the stands.
YOU WILL NEED:
| A | Narrow stile | 4 |
25mm |
710mm |
Groove one side | ||
| B | Wide stile | 4 |
45mm |
710mm |
Groove three sides | ||
| C | Upper rail | 4 |
50mm |
95mm |
Groove three sides | ||
| D | Lower rail | 4 |
60mm |
95mm |
Groove three sides | ||
| E | Upper spline | 8 |
10mm |
45mm |
6mm plywood | ||
| F | Lower spline | 8 |
10mm |
50mm |
6mm plywood | ||
| G | Panel | 4 |
105mm |
610mm |
6mm plywood | ||
| H | Subtop/bottom | 2 |
140mm |
146mm |
19mm plywood | ||
| J | Shelf | 2 |
136mm |
143mm |
19mm plywood | ||
| K | Frame side | 8 |
50mm |
230mm |
Mitre ends - cut biscuit slots | ||
| L | Base side | 4 |
38mm |
240mm |
Mitre ends | ||
| M | Corner block | 4 |
38mm |
98mm |
Mitre ends | ||
| N | Screw block | 1 |
124mm |
124mm |
19mm plywood | ||
| P | Top | 1 |
240mm |
240mm |
Edge-glued boards | ||
| Q | Banding | 2 |
19mm |
146mm |
Make from 6mm-thick wood | ||
| R | Shelf banding | 2 |
19mm |
142mm |
Make from 6mm-thick wood |
Table saw
Biscuit joiner and #0 biscuits
Router
Drill/driver plus asstd bits
Wood glue
Woodoc 5 or 10 or Woodoc Gel Stain & Rust-Oleun spray-on polyurethane
180-grit sandpaper
Woodoc steel wool
Paint brush
Tape measure
Pencil
Quick clamps and strap clamp
8 shelf pins
Door handle
2 brass hinges
Weights
Bolt and washers
HERE'S HOW:
Whatever wood you choose for this project, straight-grained pieces emphasize the simple lines.
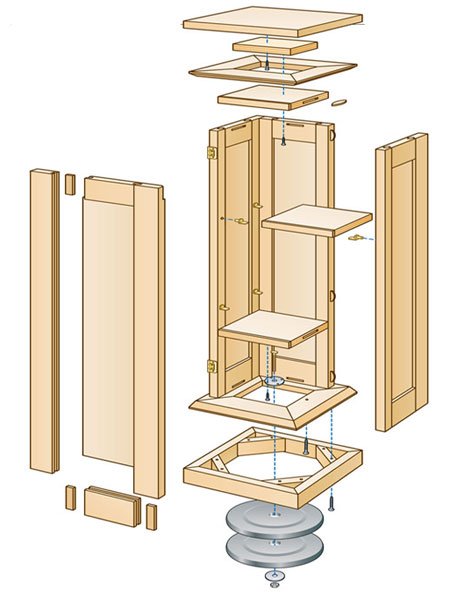
Rails, Stiles and Panels
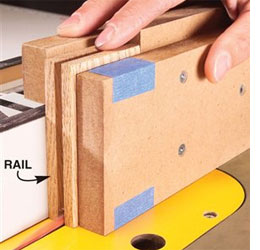
The storage cabinet is basically four frame-and-panel assemblies with similar stiles and rails. They are grooved to hold plywood panels (G) and splines (E, F). The splines join each assembly. We’ll use a standard blade to cut the grooves, rather than a dado blade, because 6mm plywood is usually undersized.
1. Rip and crosscut the stiles (A, B) and rails (C, D). Hang on to your offcuts to use as trial pieces when making the grooves. Note that the stiles are two different widths: The back has two narrow stiles; the door has two wide ones. The sides have a narrow stile in front, a wide stile in back.
2. Cut the plywood panels (G) and use leftover scraps to make splines.
3. To make assembly easier, use sandpaper to slightly round the edges of the panels.
4. Select and mark the best-looking side of each rail and stile as its face. Place the face against the fence each time you cut a groove. That way, any slight variations in wood thickness will create uneven joints on the inside rather than the outside of the speaker stand.
5. Set your blade to 600 cutting depth and set your fence 6mm from the blade. Cut one kerf in some trial pieces and every stile and rail. Move the fence and make a second pass in one of the trial pieces. Use a spline to check the fit of the groove. The spline should slip in easily, allowing room for glue. Adjust the fence if necessary and finish grooving all the pieces.

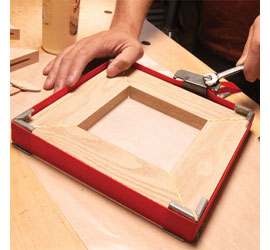
Assemble the Cabinet
Make a dry-run assembly to ensure everything goes together smoothly. You’re assembling rails and stiles of different widths and each part has a face and a backside, so take a moment to double-check the configuration before you spread any glue. Pay special attention to the face sides when cutting biscuit slots and assembling the left and right sides of the cabinet, otherwise, you might end up with a side that’s inside out.
6. Assemble the door, sides and back of the cabinet.
7. Cut the subtop and subbottom (H) of the cabinet from 19mm plywood. We covered the front edges of these parts (and the shelves) with 6mm-thick strips of oak banding (Q, R).
8. Cut slots for No. 0 biscuits. Biscuits aren’t vital to the strength of the cabinet, but they hold the parts in alignment and make assembly much easier.
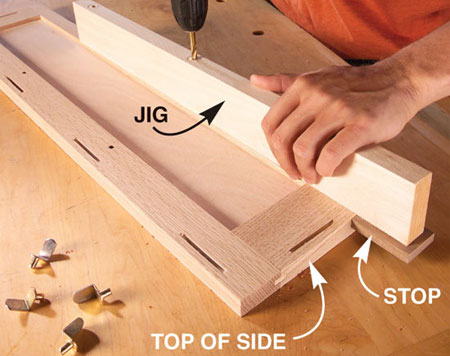
9. Drill the holes for shelf pins before assembly.
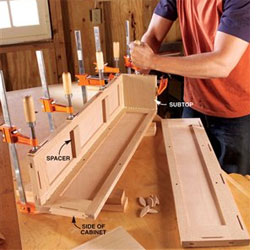
10. Glue up the cabinet in two stages. First, glue and clamp the back to one of the sides. Immediately add the subtop and subbottom to square the assembly. When the glue has set, add the other side.
The Top and Base
The top and base are attached to identical mitered frames that are beveled to 45 degrees.
11. Mitre the frame sides (K) and cut slots for No. 0 biscuits.
12. Glue up the frames. This is where a strap clamp comes in very handy.
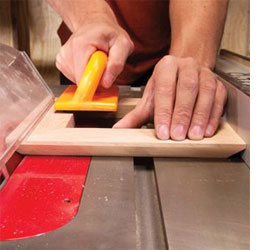
13. Bevel the frames by running them over - not under - the tilted blade. If you have a right-tilt saw, move the fence to the blade’s left side. If there isn’t enough room, cut the bevels using a 45-degree chamfer bit in your router.
14. Cut the sides (L) and corner blocks (M) for the base.
15. Assemble the base sides and glue in the corner blocks.

16. Stick the frame and base together with double-sided carpet tape. Screw and glue them together.
17. Use the same tape-screw-glue method to fasten the beveled frame to the cabinet.
18. Make the top (P) by gluing three boards together. A single, wide board is less likely to stay flat.
19. Attach the bevelled frame to the top using screws, but no glue. Drill oversize clearance holes in the frame so the top can move freely with changes in humidity.
20. Screw a scrap of 19mm plywood (N) to the top, inside the frame, so you can screw the top to the cabinet.
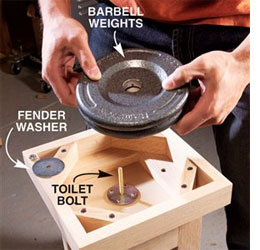
21. Fasten weights to the base to stabilize the stand.
Hang the Door
At this point, the door is the same height as the cabinet. The top and bottom ends need to be trimmed to leave 3mm gaps above and below the door. Make the trim cuts with a mitre saw or tablesaw sled.

22. Trim the door just enough so that you can set it in place and check the fit. Adjust the angle of the final trim cuts to compensate if the cabinet is slightly out of square.
23. Cut a 3mm-deep, 30mm-long finger pull at the top of the door using a router and chamfer bit.
24. Hang the door using no-mortise hinges. Install a magnetic catch to keep the door shut.
Finishing Touches
25. Drill holes in the top and bottom for speaker wire. Set a speaker on the stand to determine the best hole position.
26. Finish the speaker stand with Woodoc interior sealer in clear or tinted stain, apply Woodoc Gel Stain followed by three coats of Rust-Oleum spray-on polyurethane.
27. Stick adhesive-backed felt pads to the underside of the base.
americanwoodworker.com