
Smart sanding tips
If you’ve ever admired the glass-smooth surface a master woodworker achieves, you’ve appreciated the capabilities of using right tool. And even if you don’t have the same experience or skill level, you still can achieve impressive results. Sanding is part of the preparation required for virtually every type of surface treatment work.

But even a dedicated do-it-yourselfer may balk at one of the most dreaded aspects of home improvement and decorating projects - sanding. Sanding can be hard work and a lot of dedicated do-it-yourselfers dread it for that reason. Yet sanding is a necessary evil for many DIY projects, and if you skip it or skimp on it you can end up with less-than-perfect results. Nearly every home decorating or home improvement project that calls for sanding will turn out better if you actually do it, and do it properly.
Here are some simple steps to make sanding easier:
- Generally speaking, sanding is a technique used to remove small amounts of material from a wood surface. Coarse abrasives can speed up the sanding process. They also can be used to make an uneven surface more level - especially if you follow up with a finer grit.
-
From wood filling and smoothing dents, dings and nail holes before you paint a wall to refinishing a favourite piece of furniture, sanding is a necessary part of a good DIY job. Proper preparation can help make virtually any project look better when you're finished, so think of sanding as the basic foundation of doing a good job.
- It's important to use the right grit of sandpaper for your job. Generally, it's best to sand multiple times, starting with the coarsest grit and finishing with the finest. A typical grit progression would be 80 to 120 to 240 for many projects.
-
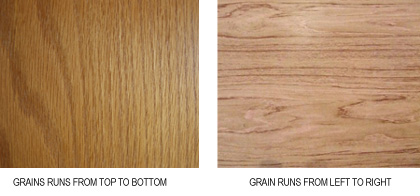
- For the best finish, it's important to follow the grain of the material, especially when dealing with wood. By following the grain, you minimize visible scratches on the surface as well as improve the overall final finish.
- There's no shame in using power sanders whenever possible. Most popular sanding tools include orbital motion (for general surfaces) and random orbit motion (for fine sanding and polishing). If you do a large project or many projects, it's probably worth investing in a good quality sander that will meet up to your requirements.
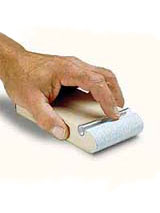
- Sooner or later, you'll have to set aside your power sander to do some hand sanding. Be careful if you use your fingers to back the sandpaper; it can lead to finger grooves in the wood or an uneven overall surface. It can also be very uncomfortable to hold the paper in your hand.
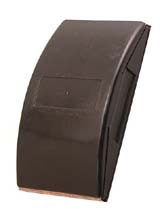
A better alternative is to use a sanding block that is designed to make hand sanding an easier, finger-sparing activity.
The unique handle fits into the hand, reducing fatigue and protecting your fingers.
The 2-part block is opened and sandpaper hooked and wrapped around the flat section of the block to securely hold the sandpaper in place while you're working and makes changing paper simple and easy.
How to make your own sanding block
To make the sanding block use a scrap block. Drill a couple of rounded channels across the top of the block - to the same diameter of the silicone tubing. Round the nose of the block with a sander, and if you want to get really fancy, you can rout a finger grip on each side. The sandpaper is held in place by two pieces of tubing that are cut to length and pressed into the channels. To use the sanding block, simply secure the back end of the sandpaper with one of the silicone tubes and wrap the paper around the block and secure the other end.
A home you can be proud of never goes out of style. Almost every home improvement project, whether you are painting, refinishing or remodelling, will start with some sanding … and sometimes end with more sanding. Following a few simple rules, and having the right tools at hand, can make the process easier and produce results that will do any do-it-yourselfer proud.