
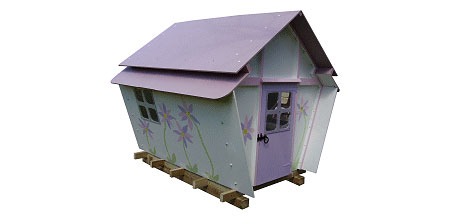
Make a playhouse
Mostly constructed of fibre cement board, this outdoor playhouse will keep the kids occupied forever. In fact, they may even want to move outside!
buildeazy.com
YOU WILL NEED:
9 of
fibre cement board (12mm) or Shutterply (18mm) 1200mm x 2400mm sheets
2 of Pine 100mm x 100mm x 2150mm long
1 of Pine 90mm x 45mm x 17 meters
1 of Pine 45mm x 45mm x 27m
1 of Pine 45mm x 18mm x 6m
Acrylic sheet 4mm thick - 3 of 490mm x 490mm / 2 of 245mm x 490mm (Optional)
Carriage bolts 10mm diameter with nuts & washers - 12 of 135mm long, 46 of 75mm long, 4 of 100mm long.
1 of 2400mm length of 50mm x 50mm galvanized angle for the roof ridge
12 screw tie angle brackets about 25mm x 50mm
12 galvanized metal strap ties about 150mm long
Silicone sealant - clear - for the windows
Ponal wood glue
6 of hinges for the windows and door
1 of latch for the door
Galvanized nails100mm for the floor frame
Galvanized nails 75mm for the floor
Assorted cut screws
Bolts 6mm x 25mm
Click here for Floor Plan
Click here for Front Elevation
Click here for Side Elevation
Click here for Front Wall Cutting Detail
Click here for Rear Wall Cutting Detail
Click here for Side Wall Cutting Detail
Click here for Roof Cutting Detail
Click here for Window and Door Cutting Detail
HERE'S HOW:
Making the floor
Refer to the plans and cutting detail plans when necessary and use the menu at the top to jump back and forth as need be.
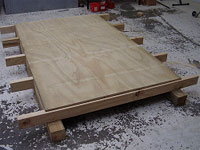
1. The skids
Cut 2 of 100mm x 100mm skids to 2150mm long.
Lay them parallel on a flat surface so that they are equally 1200mm apart.
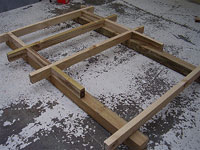
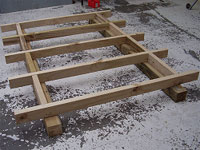
2. Floor joists
Cut 5 of 90mm x 45mm joists to 1600mm long.
Fix the two end joists (one each end) to the skids, 100mm in from each end.
Attach a string-line to one side, giving a straight line to set the intermediate joists to.
Cut six blocks of wood out of 90mm x 45mm to 430mm long. Fix the first two against an end joist so both of them are parallel and flush with the outside edges of the skids.
Place an intermediate joist against the blocks and the string-line and nail in place. Repeat the procedure until the final intermediate joist is fixed in place. Measure, cut, and fix the last two blocks into position.
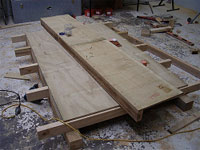
3. Floor
Cut a sheet of shutterply or fibre board 1920mm long x 1200mm wide and sit it on top of the floor joists.
The sides of the board should be flush with the outside edges of the blocking, and the two ends should be set back approximately 12mm from each end joist, thus allowing a ledge for the front and end walls to sit on.
Once positioned, nail the board floor in place.
Making the walls and roof
4. Cut plywood
Measure, mark and cut all the plywood or fibre board pieces as detailed in the diagrams above.

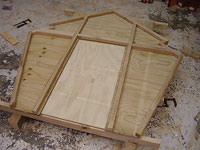
5. Assemble front and rear walls
Lay the pieces that make up the front and rear walls together.
Cut 45mm x 45mm battens to go around the perimeter of the front and rear walls and other intermediate pieces, as show in the drawing left.
Glue the battens in place and hold with the occasional nail until the glue dries. Then turn the walls over and screw the plywood or fibre board to the battens from the other side.
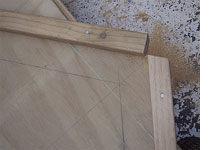
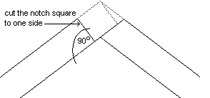
6. Cut a notch in the apex of front and rear walls
Use an off-cut of batten for a pattern.
Note the roof apex is not 90°, so make the cut square with one rake (see drawing below) and be sure that the front wall notch is consistent with the back wall notch.
7. Make up the roof pieces
Glue and screw a 2400mm length of 90mm x 45mm wood along one edge of both lower roof panels. Glue and screw a 2400mm length of 45mm x 45mm wood along one edge of one upper roof panel. Only one upper roof panel needs doing.
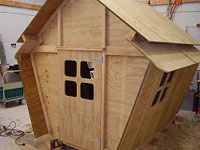
Standing and fixing the walls
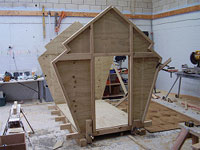
8. Fixing walls in place
Clamp a couple of blocks to both end joists to prevent the front and rear walls from slipping off the joists while they are being worked on.
Stand up the rear frame and hold it in place with a temporary brace.
Do the same with the front wall. Mark a couple of pencil lines across each of the two side walls 280mm in from the front end and 200mm in from the rear end. Refer to the side elevation plan.
Clamp the side walls in place ensuring that the insides of the front and rear walls line up with the pencil lines on the side wall (as mentioned above).
Bolt the side walls to the 45mm x 45mm battens on the front and rear walls using 10mm galvanized bolts. Pre-drill the bolt holes first. Allow for four bolts at each corner. Shave or shape (with a planer or sander) the top of the side walls to be flush with the rake of the top of the front and rear walls.
Attaching the roof and strengtheners
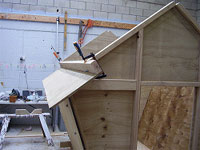
9. Fixing the lower roof
Lift the two lower roof pieces in position and hold them in place with a couple of clamps each side. Drill and bolt through the 90mm x 45mm wood and the batten it rests against. There will be a bolt each end of both lower roof pieces, four altogether. Use 100mm long bolts.
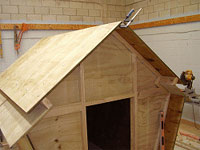
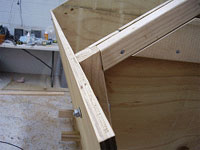
10. Fixing the upper roof
Lift the roof piece with the attached batten in place. The batten should sit neatly into the apex notch. Bolt the upper roof to the lower roof, through the 90mm x 45mm wood that runs the length of the lower roof. Use six galvanized bolts 135mm long spread out evenly along the length of the roof. Next put the other side upper roof on.
You will need someone to help hold it in place until you get a couple of clamps on. Fix it in place with six bolts to the lower roof (the same as was done on the other side) and six bolts along the apex. Use 135mm long bolts at the lower roof and 75mm bolts at the apex.
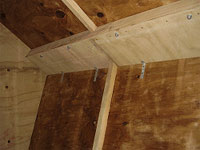
11. Inside fastening and strengthening
Add 12 angle screw ties (six each side) on the inside of the playhouse where the side walls meet the roof. Then measure and cut 45mm x 45mm wood to go all around (walls and roof) the middle of the inside of the playhouse. This is to add a bit of strength to the plywood walls and roof.
Fix the strengtheners with glue and screws BUT DO NOT screw or glue the ends of any of the strengthener pieces, as doing so would prevent the playhouse from being easily dismantled.
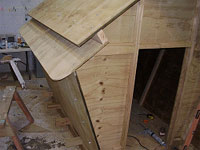
12. Round the lower roof corners
Round the lower roof corners with a jigsaw. This is to take the sharp point off the lower corners of the roof.
Making the door and windows
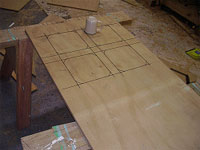
13. Making the door and windows
Make the door, two window shutters, and cut out the windows to the dimensions given in the drawings. First cut the plywood door and window shutters to size and then cut out the window holes.
Also cut out the window holes in the two side walls to the dimensions given below.
Glue and screw the 45mm x 18mm wood around the perimeter of the door. Also glue and screw the pieces required for the two window shutters as per drawings below.
Take note that one shutter has one piece of 45mm x 18mm wood running lengthwise flush with the edge, and the other shutter has two pieces, one running lengthwise flush with the edge and the other overlapping the edge by half of its width.

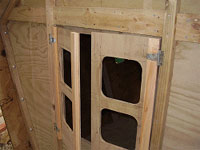
14. Fit the door and shutters
Simply hinge the door and shutters and hang them in place.
Dismantling and adding the window panes
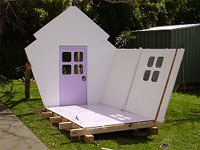
15. Painting and finishing
Give the playhouse an undercoat of
primer for exterior wood while it is assembled. Once dry dismantle the playhouse. Take it down the same way it was put up. Make sure you keep all the bolts, washers, nuts, and anything else safely tucked away in a box to save buying them again. Spread all the playhouse segments around the place and do some more painting - only limited by your imagination.
The best paint to use for a playhouse that is going to be kept outdoors is Prominent Paints Premium Satin - tinted in your choice of colours. Apply 2 coats to the surfaces, allowing drying time between coats.
16. Fitting the window pane (Optional)
Cut 5 pieces of 4mm thick acrylic sheet to cover the window holes.
3 pieces of 490mm x 490mm and 2 pieces of 245mm x 490mm - slightly bigger than the window.
Drill 6mm screw holes in from each corner and also one in the middle. Place the acrylic sheets in place over window holes and lightly pencil around perimeter. Remove panes and apply a clear silicone to inside the pencilled area. Position the panes back in place. Screw the corners and the middle.
17. Re-assembling the playhouse
Put it all back together again.
By now you have already assembled the playhouse once, so second time around shouldn't be a problem.
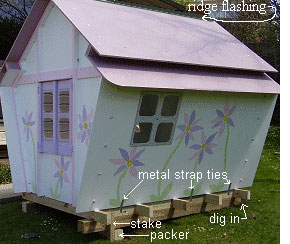
Most important is to ensure that the floor is made level. It may need digging in in parts, or packing up in parts. Secure to the ground - use a couple of stakes hammered into the ground and nailed to the skids.
Fasten the walls to the skids and end joists with pieces of 150mm long galvanized metal straps. Finally, fix a length of 50mm x 50mm galvanized angle flashing along the roof ridge.
Click here for more information on Fibre Cement Boards