Build a wood-fired pizza oven
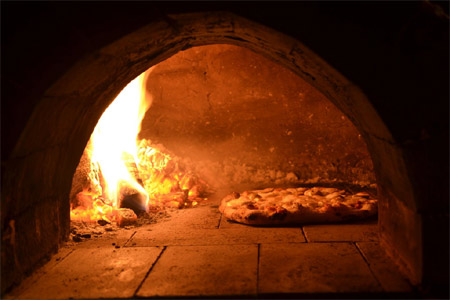
Instead of focusing your attention on building a firepit, rather spend more effort into building a pizza oven that not only warms up your outdoor space and adds atmosphere, but can also be used for cooking a variety of meals, including pizza! Winter is the perfect time to build a pizza oven - when it's not too hot and the clay can dry slowly.
instructables.com
I have been dreaming about building my own oven for ages now. I started talking about how much I would love to build one when I was renting a two bedroom flat. So I couldn’t really make one then.
A couple of years after that we moved to a house, but still renting and I wasn't going to spend all that effort improving someone else's garden. Finally, last year we bought our own house and I could finally build my oven I had been dreaming of all this time!
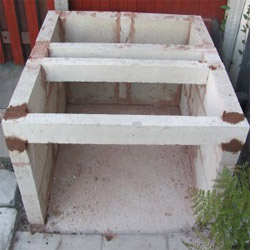
Pour the base
Your pizza oven will need a firm base. I poured a
concrete slab and set to building the walls, both of which were a first for me. I wanted to store wood under the oven, as we don’t have a lot of space for a separate wood pile.
Note: The walls and top frame were built using concrete lintels that you will find at your local Builders Warehouse.
Thinking about it later I wish I had left the back open so there would have been better air flow around the wood to keep it dry.
Add the flagstone stop
The frame was topped off with concrete flagstones.
Note: Try to design the shape of the frame to accommodate the size of the flagstone you will be using, so it will be a perfect fit.
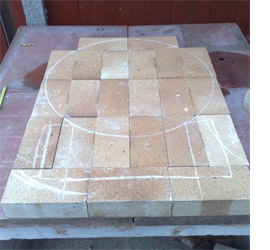
You will need refractory or fire bricks for the base of the oven. Normal clay or cement bricks simply will not stand the heat and will crumble.
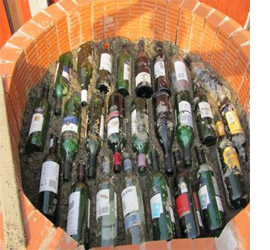
Incorporate insulation
After laying a single row of bricks vertically to form the circular fire pit, I decided to use the wine bottle insulation method. The gaps between the bottles (leaving room for them to expand under heat) are filled with a clay and sawdust used for pet bedding. Top off the bottles with a 5cm layer of clay soil and sawdust.
You will need a fair amount of clay for the insulation pit and for cladding the dome. If you have a marshy area close to your home this is normally a good place to find clay soil. Mix 3 parts clay soil to 1 part cement and mix to the consistency of thick porridge.
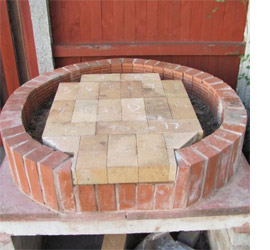
So now you have the frame with concrete flagstones on top, a vertical brick surround filled with sand and wine bottles and topped off with refractory or fire bricks. Before adding the fire bricks, place a layer of thin sand over the soil - no cement or clay needed. Just work out the best fitting bricks on the floor first.
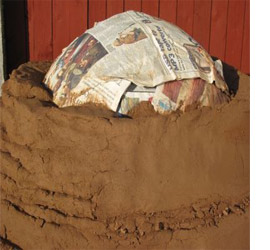
Make a form for the dome
Use wet sand to make up a form for the dome. Pile it up and compact it into the shape and then finish this off with a layer of wet
newspaper. That way you know when to stop when emptying the sand out once the clay dome is dry. Now comes the clay mix. You want compacted clay and sand for thermal mass.
To make the mix, spread out a big tarp and cover it with a couple of buckets of sand and in my case a couple of bucket of clay (broken up in to little walnut sized bits). Tread it into to each other with your feet. If you have made pastry it is very much like rubbing the fat into the flour. You need to really thoroughly mix them together. Add a bit of water till it holds together but doesn't splat when dropped from a waist height and you are ready to start building.
You are going to do this a lot of times before the day is out. You want to build the first layer all in one go so you don't get and dry joints, which will crack under high heat. Grab a hand full of mix and compact it down into a solid ball in your hand. Build it up this way hand full by hand full until you have a layer about 10cm thick around the dome.
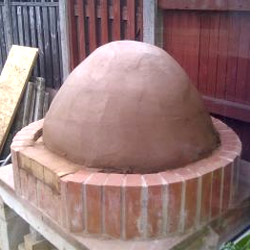

Drying time
It will take about 3 weeks of sunny weather to dry. If there is chance of rain, cover with tarp so it doesn't get wet. When I did open it up and pull all the sand out, I cut back the front a bit and put in a brick arch (only bricks - forgot to buy fire bricks! Also I had a good look at the inner surface of the oven and smoothed out any cracks with a bit of water and the back of a spoon. The smoother and uniform the inner surface of the oven the better.
Then more drying and waiting... It is SO tempting to light a fire in there and just heat it up and be done with it.
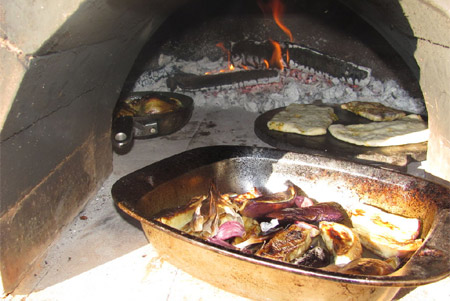
Air dry for a few days, then a few days later couple of tea lights and finally some of those big chunky candles going for hours on end. Then a small fire with kindling. The next night I tried to do another small fire but it got a bit large and some hairline cracks appeared. Next time... small fire and decided it looked pretty dry, so cranked it up. I got some cracks about 5mm on the outside appear but nothing on the inside. It took about 5-6 mins to cook a pizza. I am sure I can get that down with more drying and with the insulation layers added.
The final two layers were one of clay with sawdust - nice and loosely packed with loads of air pockets for insulation about 10cm. When that layer had dried I applied a thin layer of clay, sand and straw mix for plaster about 2cm thick with a very thin coat without the straw to give it a smooth finish.
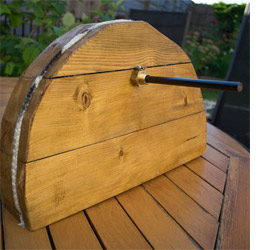
Adding a door
I finally decided to bite the bullet and make a proper door for my oven. I picked up a chimney flue thermometer. I glued and doweled together three pieces of 10 x 10cm fence post and cut as much as I could before using a planer to skim off the edges at a slight taper till I got a perfect fit.
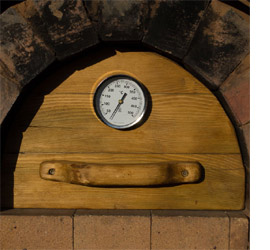
The handle is also carved out of off-cuts of the fence post. I added some stove rope in a routed gully just to give it an extra seal. I kind of like the massive probe. My only worry with this project is that because the first 10cm of the thermometer is encased in solid wood - the whole of the probe is not exposed to the full heat. But it works really well.