
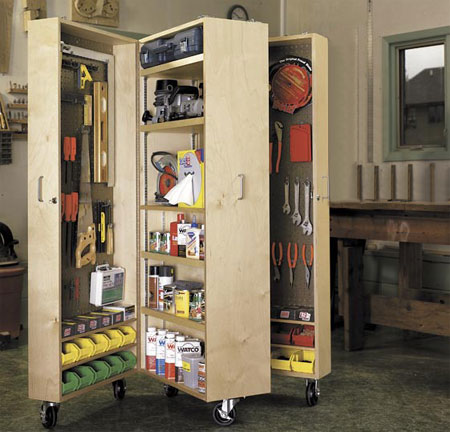
Mobile storage unit for a garage
Judging by the number of requests received from readers, the mobile workshop storage is definitely a great space-saving storage option, so I've got the plans for you to get cracking on making this unit.
YOU WILL NEED:
Qty |
Doors | mm |
mm |
||||
| A | 4 |
sides | 19mm |
plywood | 150 |
1500 |
|
| B | 4 |
tops/bottoms | 19mm |
plywood | 150 |
590 |
|
| C | 4 |
shelves | 12mm |
plywood | 140 |
590 |
|
| D | 2 |
backs | 12mm |
plywood | 590 |
1500 |
|
| E | 6 |
vertical spacers | 12mm |
plywood | 38 |
1140 |
|
| F | 4 |
horizontal spacers | 12mm |
plywood | 38 |
570 |
|
| G | 2 |
pegboard | 12mm |
570 |
1200 |
||
| Centre Cabinet | |||||||
| H | 2 |
Sides | 19mm |
plywood | 300 |
1500 |
|
| I | 2 |
bottom/centre shelf | 19mm |
plywood | 300 |
590 |
|
| J | 1 |
top | 19mm |
plywood | 300 |
590 |
|
| K | 1 |
divider | 19mm |
plywood | 590 |
740 |
|
| L | 2 |
upper shelves | 19mm |
plywood | 270 |
560 |
|
| M | 4 |
lower shelves | 20mm |
plywood | 105 |
560 |
|
| N | 12 |
edging | 20mm |
plywood | 30 |
570 |
16 and 35mm wood screws
24 of 6mm carriage bolts
4 castors with brake
2 casters without brake
2 piano hinge 1500mm length
3 handles
Rust-Oleum polyurethane spray varnish
Steel shelf braces
2 disc tumbler cam lock
24 of 6mm lock nuts and washers
2 door latches
24 steel shelf supports
TOOLS
Drill/Driver and asstd drill and screw bits
Router or Dremel Trio and 6 + 12mm straight bits
19mm Forstner or MAD bit
Orbital Sander and 220-grit sanding pads
HERE'S HOW:
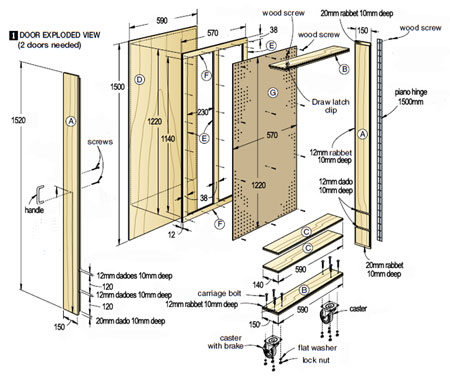
Start with the doors
1. Have all the individual sections cut to size at your local Builders Warehouse.
2. On the inside face of the side
pieces, rout 12mm dadoes 10mm deep to
receive the shelves, where dimensioned
on Drawing 1. Then, rout 19mm rabbets 10mm deep across the ends of the sides to accept the tops and bottoms. Now, rout a 12mm rabbet 10mm deep along the back edge of the sides, tops, and bottoms, to receive the back (D).
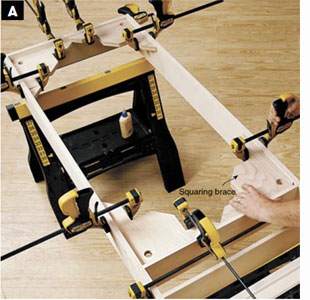
With the edges of the door-frame members flush, clamp the assembly together with squaring braces. You can
make simple braces from scrap plywood.
GOOD TO KNOW
You don't need a router if you have a Dremel Trio. You can easily use the Dremel Trio to cut rabbets, grooves and dadoes.
3. Glue and assemble a door sides, top, bottom, and shelves, as shown below, using squaring braces to keep the assembly square. With the glue dry, sand the door frame surfaces and edges using 220-grit sandpaper. Repeat to assemble the other frame.
4. From 12mm plywood, cut the backs (D) to size. Sand them with 220-grit, and remove the dust. Glue a back in the rabbeted opening in each door frame, and clamp it securely all around the frame.
5. From 12mm plywood, cut the vertical spacers (E) and horizontal spacers (F) to size. Glue and nail the spacers inside each door to the back (D), where shown on Drawing 1.
GOOD TO KNOW
Because actual plywood thicknesses vary from their nominal dimensions, measure all inside dimensions of the tool cabinet and cut the spacers, and later the upper and lower shelves (L, M) and shelf edging (N), to the necessary length for the best fit.
6. Spray the inside and outside of the doors with Rust-Oleum Polyurethane spray varnish.
7. Cut the pegboard (G) to size. Screw to each door spacers where shown.
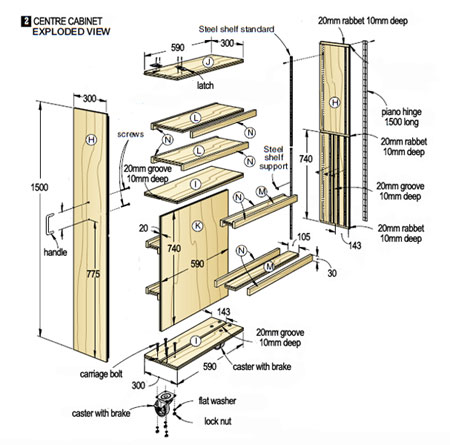
Build the centre cabinet
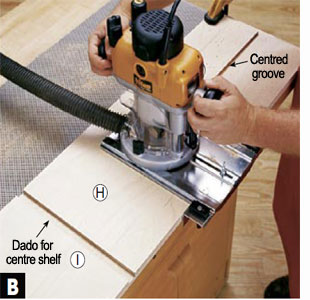
1. On the inside face of the sides, rout 19mm rabbets 10mm deep to receive the bottom shelf and top and rout a 19mm dado 10mm deep to accept the centre shelf, where shown on Drawing 2. Rout a centred 19mm groove 10mm deep in the sides to accept the divider, as shown in Photo B below. Using the same setup, rout the mating grooves for the divider in the bottom and centre shelf.
2. Sand the parts with 220-grit, dry-assemble them and verify they fit correctly. Then, glue and clamp the parts together, again using squaring braces to keep the assembly square. When the glue dries, apply the finish.
3. Measure the openings between the bottom and centre shelf (I) and between the centre shelf and top (J). Cut eight pieces of shelf braces to length to fit the bottom openings and four pieces to length to fit the top opening.
4. Position the four braces for the top opening on the sides (H), and mark the mounting-screw hole locations, as shown in Photo C. Then screw the standards to the sides. Following the same process, mount the four outer standards in the bottom openings. Then, mount the four inner standards to the sides, using the 19mm spacers to position them parallel to the divider (K).

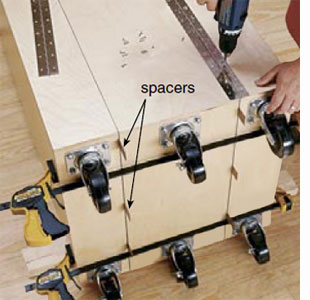
5. Position casters on the bottoms (B, I). Mark the centre of the casters mounting-bolt holes, and drill holes through the bottoms at the marked locations. Bolt the casters to the bottoms, as shown, making sure to locate the casters with a brake where shown.
GOOD TO KNOW
When attaching doors with continuous hinges, such as for the tool cabinet, leave a 2mm gap between the members to be hinged. The gap will prevent potential hinge binding due to wood movement, which could keep the parts from closing together tightly. To establish the gap, place 2mm-thick wood spacers between the parts as needed, and then clamp the parts together.
Hinge the doors to the cabinet
1. Align the doors and the centre cabinet on a flat surface with the back side facing up, and clamp them together.
2. Centre the hinges along the door/centre-cabinet joints and secure with screws. Now, set the tool cabinet upright on the casters.
Add the shelves
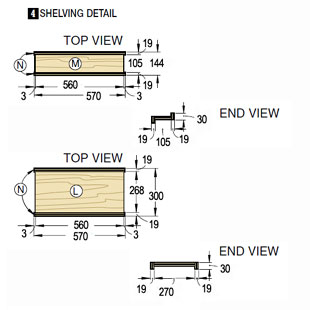
1. Glue and clamp the edging to the upper and lower shelves, where shown on Drawings 2 and 4. Centre the edging so it overhangs the shelves by 3mm at each end. When the glue has dried, sand the shelves and trim with 220-grit and apply the finish. With the finish dry, clip the shelf supports in the shelf braces at the desired locations, and install the shelves on the supports.
Install the locks and handles
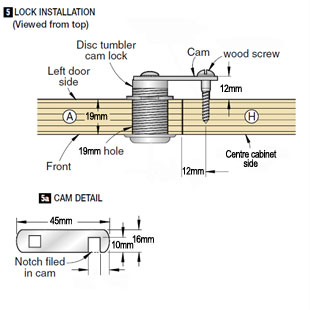
1. On the front of each door, mark the centre point for a hole to receive a disc tumbler cam lock, where dimensioned on Drawings 1 and 5. (Note that the two lock installations are mirror images.)
2. Using a 19mm
Forstner bit or MAD bit and a backer board to prevent tear-out, drill the lock holes through the doors.
Remove the screw attaching the cam to the back of each lock, and remove the cam. Install the locks in the holes as directed in the manufacturer’s instructions. File a notch in each cam where dimensioned on Drawing 5a. Then screw the cams to the locks.
3. On the back of the centre cabinet’s front side (H), mark the centre points for wood screws that engage with the locks’ cams, where dimensioned on Drawings 2 and 5. Drill pilot holes 12mm deep at the centre points. Then, drive in wood screws to the depth shown.
4. On the front of the doors and centre cabinet, mark the screw-hole locations for attaching the handles, where shown on Drawings 1 and 2 and then attach.
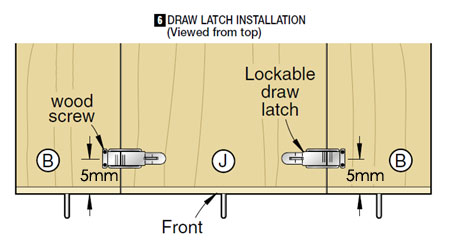
5. Clamp the doors snug against the centre cabinet at the front. Engage the lockable draw latches in the mating clips, and position the pieces on top of the tool cabinet, where shown on Drawing 6. While holding a latch and clip against the cabinet, carefully release the latch lever and mark the mounting-screw hole locations in each piece. Repeat for the other latch. Screw the pieces to the top. Now, to mount your tools and organize hardware in the cabinet.