
You've been framed!
Adding style to an empty space doesn't require a trip to an upscale art gallery or a visit to the bank. Head to your local fabric and art-supply stores instead.
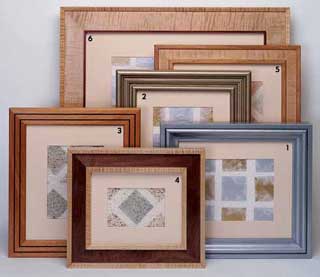
Hardwood Frames
Another approach to building frames is to use hardwood with either a clear or stained finish. In each of the following designs, we've combined different woods to create patterns of contrasting colours and textures. After building four oversize pieces of frame stock for each design, use a dado blade or router table to cut the frame rabbet on the inner edge of each piece. Then, use a mitre saw to cut the pieces to precise length and join the corners with plate joints.
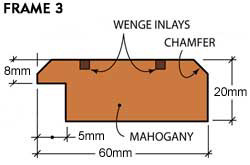
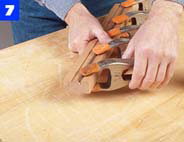
Frame 3 is constructed of mahogany with wenge inlay. Begin by ripping mahogany to 60mm wide. Crosscut the stock to rough length, then readjust the saw blade and cut two kerfs in the face of each piece. Use a band saw to rip inlay strips of wenge. Run a bead of glue into each saw kerf and press the inlay strips into place. Use spring clamps to hold them while the glue cures (Photo 7). When the glue is dry, use a plane or sharp cabinet scraper to trim the wenge flush to the mahogany surface. Then, install a chamfer bit in your router table and bevel the two top edges of the frame stock.
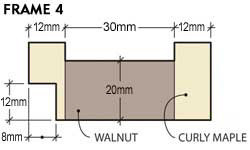

Frames 4 and 5 are variations on the same theme. For the first design, rip curly maple strips to 5 x 25mm and glue them to the edges of a walnut field (Photo 8). Keep all pieces flush on the back side of the frame.
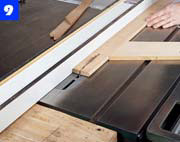
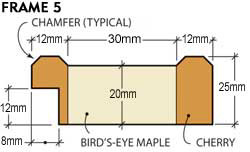
For the second variation, rip 5mm-thick cherry stock to 60mm wide. Use a router table with a chamfer bit to shape all four edges of the cherry, then rip the molded stock into 22mm strips (Photo 9). Glue these strips to both edges of a bird's-eye maple field.
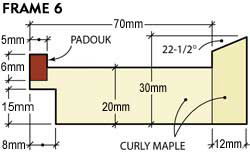
For Frame 6 we chose curly maple for the field and raised outer band, with a padauk inlay that accents the inner edge. After ripping the maple stock to width, use a dado blade or router table to cut a 2mm-deep x 5mm-wide rabbet along one edge of each of the four frame pieces. Then, cut pieces of padauk to fit the rabbet in each piece.
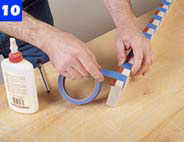
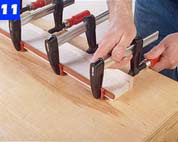
Glue the inlays in place, securing them with strips of masking tape until the glue sets (Photo 10).To make the outer band, rip a 22-1/2 angle on the edge of a 5mm-thick piece of maple. Re-adjust your saw to 90 and rip this bevelled strip from the board. With four band strips made, glue each to the outer edge of the maple field pieces (Photo 11).
After sanding to 220 grit, we finished our hardwood frames with clear varnish. This finish is easy to apply, it dries quickly, and it won't react with delicate artwork and mounting materials. Brush on a light coat with a good-quality bristle brush and let dry for at least 2 hours. Lightly sand with 320-grit paper to remove any roughness, and dust off. Apply one or two additional coats as needed. When the last coat is dry, rub it with 4/0 steel wool for a warm, satin gloss.
See Project [1] for more frames
spopular mechanic