
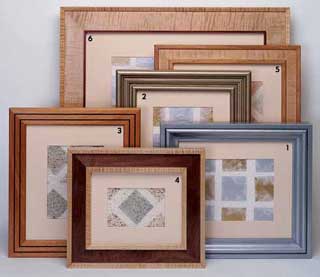
You've been framed!
Adding style to an empty space doesn't require a trip to an upscale art gallery or a visit to the bank. Head to your local fabric and art-supply stores instead.
Painted Pine Frames
Our first two frames are made from pine and are great candidates for a paint finish. They feature standard mouldings available at DIY home centres. For all the frames, it's best to cut the rough materials about 50 - 60mm longer than necessary before ripping to width or machining.
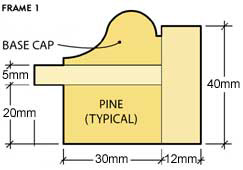
Frame 1 uses base cap moulding and flat pine stock.
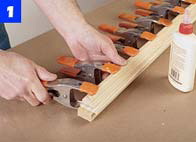
1. Rip four 20 x 30mm pine pieces and glue lengths of 5 x 40mm lath to each. Place them face to face with the edge of one piece flush with the adjoining piece. Use spring clamps to hold the assembly while the glue sets. Then, spread glue on the back of the molding and clamp it to the top of the lath (Photo 1). Make sure that the outer edge of the molding aligns with the flush edge of the flat-stock assembly.
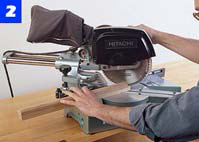
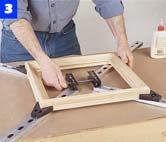
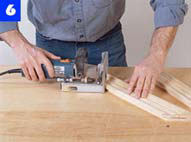
2. Cut the four laminated frame members to size with a mitre saw (Photo 2). Use a small brush to spread glue on the mitred ends and assemble the frame in a miter clamp (Photo 3).
3. Check that all corner joints remain tight as you tighten the clamp. After the glue has cured, remove the frame from the clamp and drive small brads into the corners to reinforce the joints.
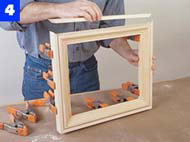
4. Rip pieces 5mm thick and mitre them to fit around the perimeter of the frame. Apply glue and clamp them to the frame with spring clamps (Photo 4).
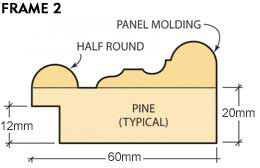
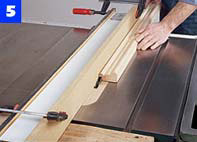
Frame 2 features a panel moulding and a half round, glued to pine. After cutting the stock to rough length, spread glue on the back of the moulding and use spring clamps to hold it until the glue sets. Keep the panel moulding flush to one edge and the half round flush to the opposite edge. When the glue is dry, use a dado blade in your table saw to cut the rabbet along the inner edge(Photo 5). Then, mitre the frame stock to exact length.
Since this frame is wider than the first, you can use No. 0 joining plates to reinforce the corners and eliminate the need for brads. Mark centre lines for the plate slots in the mitred ends of the frame stock and cut the slots (Photo 6).
Spread glue on the mitred faces, in the plate slots and on the plates, and assemble the pieces in the frame clamp to pull the corners tight. After about 20 minutes, use a small chisel or putty knife to remove any glue that has squeezed from the joints. To finish these painted frames, first lightly sand with 150- and 220-grit sandpaper. Then apply an aerosol spray finish, following the manufacturer's instructions.
See Project [2] for more frames
popular mechanic