
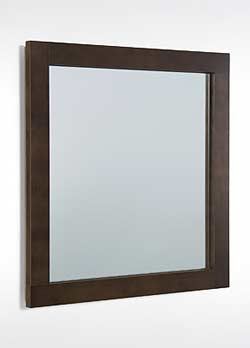
Mirror with sophisticated wood frame
Some mirrors can be as striking as a picture on the wall. Using our instructions, you can easily assemble a mirror like this yourself. It may become even more attractive the more often you look at your reflection.
The following assembly instructions apply to 20mm-thick laminated pine. Ask your DIY store to cut the required boards to size.
1. Place the mirror panel on your work surface with the rear facing downwards. Use a ruler to position the mirror centrally on the board so that the surrounding border is the same size on all sides of the mirror.
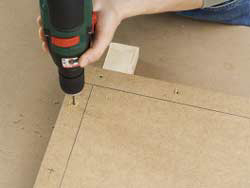
Trace the outline of the mirror in pencil on the mirror panel and place the mirror to one side again. Use a drill and 4mm wood drill bit to predrill the holes required to fix the frame surrounds with the mirror panel. Make three holes for each strip in the centre of the surface area between the pencil line and the outer edge of the mirror panel. Countersink the holes from the rear.
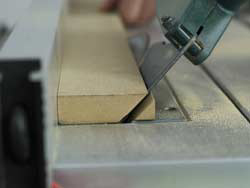
2. Cut the two suspension rails from a board measuring 500 mm in length and 120 mm in width. To do this, adjust the saw blade of the circular saw to 45° and split the suspension rail board in lengths. To achieve a cut that is exactly straight, you should use clamp clips to clamp a rail as a parallel guide.
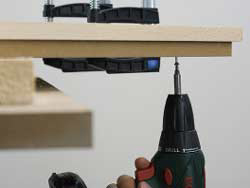
Predrill the suspension rails using a drill and 4mm wood drill bit and countersink the boreholes on the broader side of the rails. You must also predrill the spacer bar so that it can be screwed to the rear panel as described; countersink the holes as required.
You must fit the suspension rails accurately on the mirror panel and on the room wall for the mirror to hang straight and securely. A spirit level is useful for hanging the mirror on the wall. To fasten the suspension rails to the mirror panel, place the panel face downwards on trestles. Then position the suspension rail on the back in accordance with the height specifications in the illustration and fasten the rail using the predrilled holes with a cordless screwdriver and screws (4x35mm). Follow the same procedure for the spacer bar.

3.To ensure the mirror adhesive tape adheres properly, paint the surface that you marked with a pencil in step 1. For this purpose, sand the area with 120-grit sandpaper in the direction of the grain. Apply a thin layer of primer. Once the paint has dried, sand the area again and apply a slightly thicker coat of paint.
You can attach the mirror to the painted surface with mirror adhesive tape once it has dried completely. To do this, place the mirror panel with the front side facing up on trestles. The mirror outline from step 1 is still visible. To position the mirror precisely, use clamps to secure two strips at a right angle on one of the marked corners.
These act as a stop while you are positioning the mirror. Attach several strips of mirror adhesive tape to the back of the mirror, remove the protective film and then stick the mirror inside the marked angle on the mirror panel.
4.Using clamp clips, fasten each of the frame surrounds one by one to each side of the mirror panel. Mount the strips with the cordless screwdriver and screws (4x35mm) through the holes you predrilled in step 1.
5. Use fixings to fasten the second suspension rail to the wall. Mark the positions of the holes through the predrilled holes on the rail, which you should hold so that it is absolutely horizontal (use your spirit level). Use a drill or rotary hammer and masonry drill bit to drill holes in the wall, extract the dust and insert the fixings. You can now mount the suspension rail using the cordless screwdriver and the appropriate screws and hang the mirror.
6. Take time to prepare the surfaces so they are in the best working condition possible before starting assembly. Chamfer all edges of the frame surrounds with 180-grit sandpaper at a 45° angle to create a small bevel. Use your sander to sand all visible surfaces in the direction of the wood grain, first with coarse sanding paper (120) and then fine (240). Damp sponge the surfaces afterwards to wipe off the dust. The wood is now ready for surface treatment.