
How to edge plywood projects
As one of the more affordable ways to build a project, plywood does have its drawbacks. One of those is the fact that not everyone wants to see the raw edge.

familyhandyman.com
In this project we show you how to add a pine strip to plywood board, so that your shelves or cabinets have a neat and attractive finished edge.
If you can source good quality board, plywood is a great material for building cabinets, bookcases and shelves. But exposed edges usually look unfinished unless they’re covered up.
While edging strip is one way to cover edges, a better method is to glue or nail on a solid wood strip. It’s good looking and durable, and it protects vulnerable edges from abuse in high-wear areas. It also stiffens the plywood, an important feature for shelving. If you make it even wider than the plywood, as we show below, the extra stiffness will help keep plywood shelves from sagging.
YOU WILL NEED:
Clamps - if you only have one or two of your own, borrow from a friend (or see below)
for our "no clamp" alternative
Mitre saw or mitre box and backsaw
Orbital or belt sander with 120- and 22-grit sanding pads/belts
Safety gear: goggles, gloves and a dust mask
Putty knife
Router or Dremel Trio if you want a decorative edge
Wood glue
HERE'S HOW:
Step 1
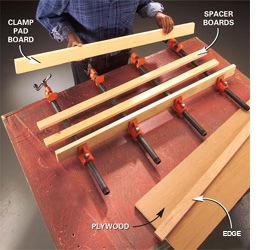
Set up your clamps to be spaced every 20cm and adjust the width spacing to slightly wider than the shelf and nosing. Your gluing and clamping operation will go more smoothly if you set up the clamps before you start. That way you can move quickly once you spread the glue. Any straight scraps of wood will work as clamp pads. They protect the edging and plywood and help spread the force of the clamps over a wider area.
Step 2
Spread a thin layer of wood glue along the plywood edge. You can use any size and thickness of nosing you want. But 20mm thick pine strips are easy to find and look great. Cut the plywood and nosing to length, or if you need more precision, leave it slightly long and cut it off later.
GOOD TO KNOW
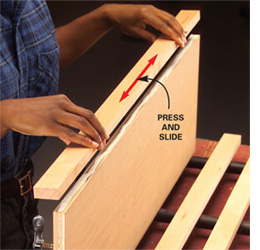
Press the edging onto the plywood and move it back and forth to spread the glue. A thin layer of wood glue is all it takes to make a virtually indestructible glue joint, plus too much glue just makes a bigger cleanup job, and it causes the nosing to slide around, making alignment difficult.
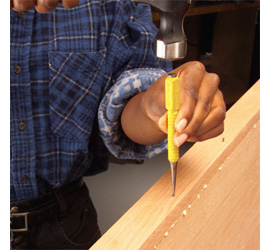
It might be a bit tricky to get the plywood and edging to line up perfectly flush when you clamp them together. Close up all of the clamps, but don’t tighten them. Then push the nosing up or down to adjust it as you tighten the clamps. Hold the nosing slightly above the plywood, about the thickness of a sheet of paper, and sand it flush after the glue dries. Use a nail set to drive the nail heads below the surface.
No-Clamp Nosing
If you’re painting the plywood or you don’t mind the look of filled nail holes, you can simply glue and nail the nosing into place rather than messing with clamps. Predrill holes for medium wire nails and drive them below the surface with a nail set. Fill the holes with wood filler in a matching tint and sand them smooth before you paint, stain or seal.
GOOD TO KNOW
Let the glue set for about 30 minutes until it’s rubbery and then crape off the partially hardened glue with a putty knife.
Step 3
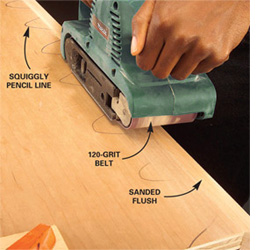
Scribble a pencil line along the length of the plywood, overlapping it onto the edging. Carefully sand the nosing with an orbital or belt sander and 120-grit until the pencil line disappears and the nosing is flush to the plywood.
GOOD TO KNOW
The top layer of plywood is a thin layer of wood, called veneer. It’s easy to accidentally sand through this veneer and expose the lower layer of wood, which doesn’t match the surface. Only apply light pressure when sanding the edge and stop as soon as the pencil line starts to disappear.
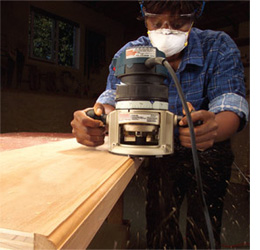
If you want to dress up the edge of a plywood shelf, simply rout a shape on the solid wood nosing. Make sure to wear safety glasses, hearing protection and a dust mask when routing. Move the router from left to right as you face the shelf. Personally, I grab my Dremel Trio - it's quick and easy and more comfortable to use.
Oops, I sanded through!
Over the years, I’ve glued on a lot of shelf edges and by far the toughest part is sanding the edge flush to the plywood. I can’t tell you how many times I’ve accidentally sanded through the veneer in the process. Usually it’s because I decided to remove the last bit of protruding edge with the belt sander, rather than stop and finish sanding by hand. But even sanding through the veneer isn’t a fatal mistake. In most cases you can still use the shelf, and you’ll be the only one who notices the mistake.