
Makeover a hollow-core door
To lighten the look of my restored home I’ve brushed many a litre of crisp white and soft neutral paint on cabinetry, furniture, trim, picture frames, and floors. Chairs and sofas, too, were slipcovered in downy white canvas. Nevertheless, something dark and unnerving remained, lurking throughout my house: dark-brown varnished hollow-core doors!
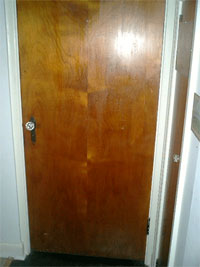
Rather than replace these original, nothing-wrong-with-them doors with beyond-my-budget raised-panelled doors, I decided a fresh facelift with paint mixed with a little creativity was a fun and affordable solution.
YOU WILL NEED:
RemovAll coating remover
Paint scraper
Orbital sander
180-grit sanding pads
Clean cloths
T-square
Tape measure
Pencil
Masking tape
YOU WILL NEED:
1. For ease, remove the door from its hinges, placing it atop a pair of sawhorses, so that you will be able to work on the door, sides, top and bottom, and then turn it over easily to do the other side.
2. Use RemovAll biodegradable coating remove on the varnished surface. This non-toxic remover is simply applied thickly over the varnish and left on until you can see that the varnish or paint is starting to lift from the surface. Use a paint scraper to remove the old paint or varnish.
3. Once all the paint or varnish has been removed, give the surface a light sanding with an Orbital Sander and 180-grit sanding pads for a smooth, scratch-free surface that is ready for painting.
4. Use a paint that is durable and washable for the door, so that it can be cleaned as and when necessary. Prominent Paints non-drip enamel is an affordable and quality paint option for this type of project. Apply two coats of Broken White to the front and back of the door, as well as the top, bottom and sides - allowing for drying time between coats.
DIY Tip:
Use a foam roller for a perfectly smooth finish that is free from brush strokes.
Leave the paint to dry for at least 48 hours (2 days) before proceeding with the next step. If you do the next step before the paint is completely dry, you could pull away the paint when removing the masking tape.
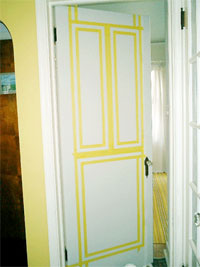
5. Measure the door and plot out the size of your mock door panels using a tape measure, a T-square, a pencil, and masking tape. Essentially you are taping up pairs of parallel lines that become individual 'frames.' Remember that you are going to be painting the mock panel outline in a lighter colour, so the masking tape needs to be affixed to allow painting of this portion of the door.
6. Use a gloss white to paint the masked off outline. This will give the door the mock panel contrast that creates the illusion of an expensive panelled door.
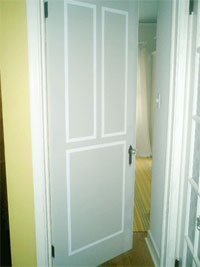
7. When the white paint is thoroughly dry, carefully remove the masking tape.
diy ideas