
Curing damp in walls
While many homeowners tend to paint over damp to try and fix the problem, with damp it's important to find the source of the damp first before you can proceed with curing damp walls. Simply painting over any areas of damp causes further problems, as the constant supply of moisture is then diverted to other areas.
Plascon Dampseal has a unique forumlation that reacts with moisture in walls - forming an impenetrable barrier through which the movement of water and dissolved salts is not possible. It is these salts, found in the cement plaster, that when damp, trapped beneath the paint film and cause paint to discolour and peel.
Finding the source of damp
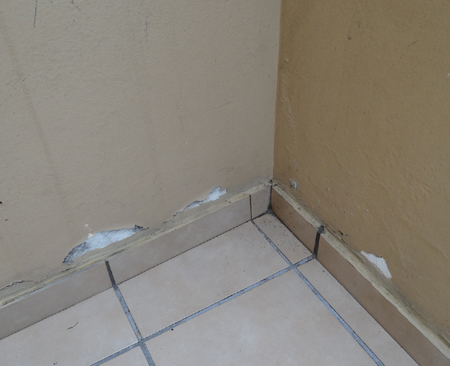
Take a closer look at the area affected and inspect surrounding walls and areas to determine where the damp in a wall is occurring: lower wall or middle wall and whether the other side of the wall is interior or exterior.
If interior, what room is on the other side, such as a bathroom? If exterior, are there pipes running in or on the walls? Are there taps and gully’s? Is it a North-West facing wall (driving rain side)? Is there a garden with an irrigation system close or next to the wall? Is the water (if any) able to run-off easily and is the level of soil higher than the floor level of the kitchen? If the damp is occurring closer to the ceiling, then there are possible roof or parapet wall leaks.
- It might be necessary to scrape off some of the existing paint down to the plaster.
- If the plaster is a very dark grey colour, this indicates that the wall itself is excessively wet.
- Drill 10mm diameter holes into the plaster using a masonry bit to allow moisture to escape.
- Place a fan close by if possible and allow this to run for a couple of hours.
- Fill holes with exterior Polycell Crack Filler (not interior crack filler).
- Proceed with the Plascon Dampseal application.
Applying Plascon Dampseal
- Divide the affected area into 3 horizontal sections with the top section extending at least 30cm above the affected area.
- Ensure that the area also extends by 30cm to the left and right of the affected area.
- Treat the lower section by applying a thinned coat of Plascon Dampseal (3 parts Dampseal to 1 part turpentine in volume) and allow 24hrs drying and curing time.
- Repeat the process for the middle section and the top section with 24hr intervals.
- After 3 days of application of the first thinned coat to each section, apply the second coat to the entire section and allow 24hrs drying and curing time.
- If using a water-based / acrylic paint you may apply the coatings directly onto the Dampseal.
Note that drying and curing times must be adhered to for the product to provide maximum protection against damp. Weather conditions need to be factored into the drying time, as high humidity levels will result in slower drying time.