Kiddies play table and chairs
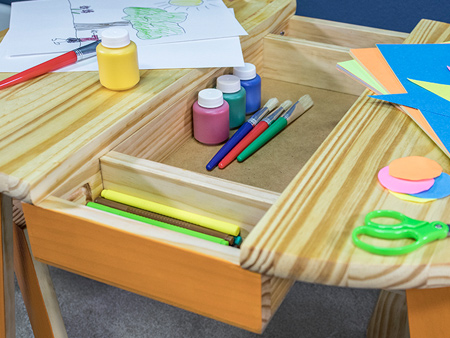
This child-sized play and craft table will inspire creativity. Featuring work and storage space and chairs that are just the right size. Use a ready-made top and ad a few angles and gentle curves for style.

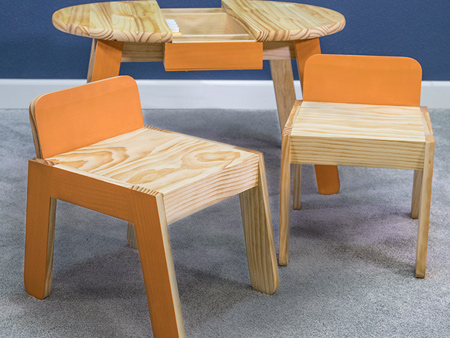
We applied butterscotch acrylic paint on the outside faces of the table base and sealer to the rest of the table. If you’re also building chairs, you can paint all the pieces when you’re done building the chairs
YOU WILL NEED:
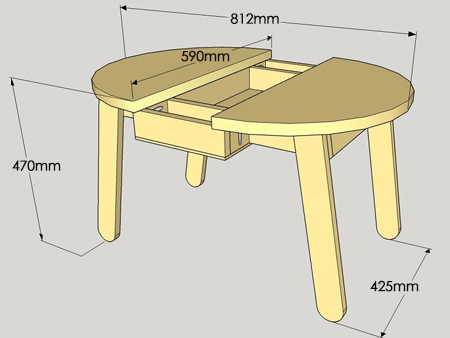
1 of 610mm dia pine - table, top - cut in half
4 of 67 x 457mm pine - table, legs
2 of 67 x 619mm - table, side rail
2 of 67 x 349mm - table, end rail
2 of 67 x 340mm - table, tray rail
4 of 67 x 76mm - table, tray filler
2 of 67 x 241mm - table, tray end
1 of 241 x 603mm - 3mm hardboard/masonite table, tray bottom
4 of 67 x 314mm pine - chair, leg
2 of 67 x 222mm pine - chair, leg rail
1 of 67 x 286mm pine - chair, seat rail
2 of 140 x 286mm pine - chair, seat slat
1 of 180* x 286mm pine - chair, seat back
*Join together [2] 140 sections for seat back
32mm coarse-thread pockethole screws [70]
32mm screws [8]
20mm screws [14]
Wood glue
Woodoc 5 interior sealer and paintbrush
TOOLS:
Drill / Driver plus assorted bits
Kreg pockethole jig kit
Jigsaw and clean-cut blade
Orbital sander plus 120- and 240-grit sanding pads
Tape measure and pencil
Buy all the tools and materials for this project at Builders Warehouse.
HERE'S HOW:
Note: The materials list is for one chair. To build two, double the number of boards and screws, and make twice as many of each part.
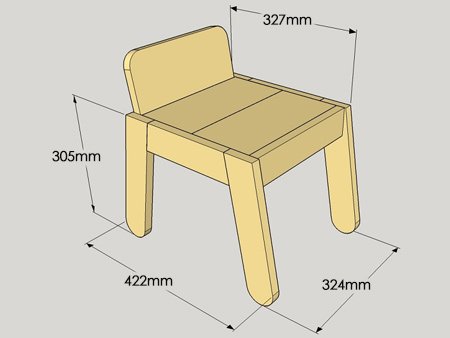
Table:
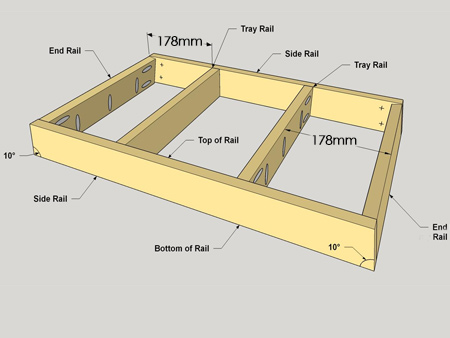
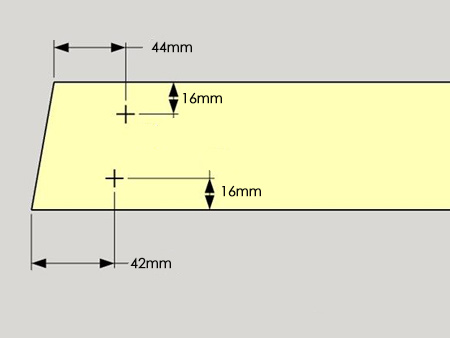
1. The Side Rails have opposing 10° angles on each end. Drill four pilot holes in each piece at the locations shown below. These will be used to attach the Legs later on.
2. On the End Rails, drill pocketholes for attaching these to the Side Rails. Also drill [3] pocketholes along the bottom edge of the End Rails to secure the Table Top later on. Repeat this for the Tray Rails.
33. Use pockethole screws to attach the [2] End Rails to a Side Rail so that the face of each End Rail is flush with each end of the Side Rail. Position the [2] Tray Rails against the Side Rail attach in the same way.
GOOD TO KNOW
The pocketholes that will be used to attach the Table Top should be oriented face down.
4. On the Legs cut a 10° angle on one end of each Leg. Use a suitably sized template to draw the radius on the opposite end of each Leg and then cut out with a jigsaw. Sand the curve smooth.
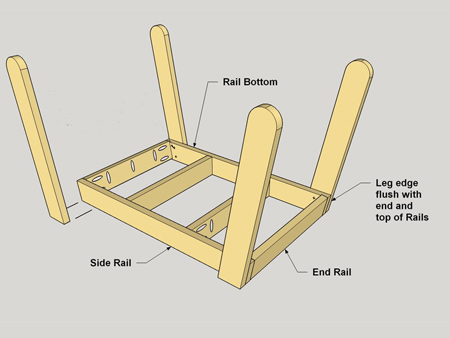
55. Lay the frame assembly face down to glue and clamp the Legs to the Side Rails. Ensure the edges and tops of the Legs are flush with the edge and top of the Side Rails. Secure with 32mm screws.
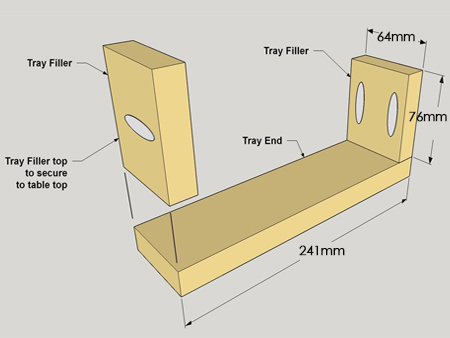
6. On one side of each Tray Filler drill a single pockethole at the location shown on the outside face. Then drill [2] pocketholes on the inside face of each Filler. Glue and clamp [2] Tray Fillers to one Tray End as shown above.
GOOD TO KNOW
Make sure the single pocket-hole side faces outward and that both Fillers are oriented with the pocketholes facing in the right direction.
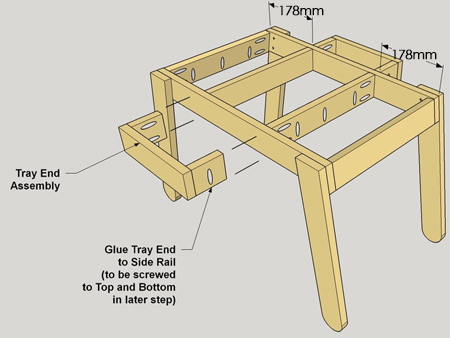
7. With the table base upright, glue and clamp the Tray End Assemblies to the Side Rails as shown below. The glue holds the assemblies in place temporarily, as they will be screwed to the Tray Bottom and to the table top later. Let the glue dry before you remove the clamps.
GOOD TO KNOW
Make sure the pocketholes that will be used to attach the Top later are facing upwards.
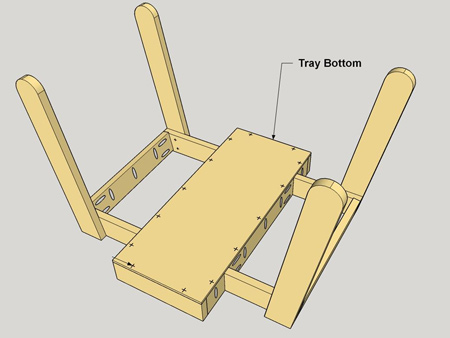
8. Mark the location of the pilot holes in the Tray Bottom and then drill each one with a 2mm bit. Apply glue along the bottom edge of the Tray Rails and Ends. Then lay the Tray Bottom in place and secure with 20mm screws.
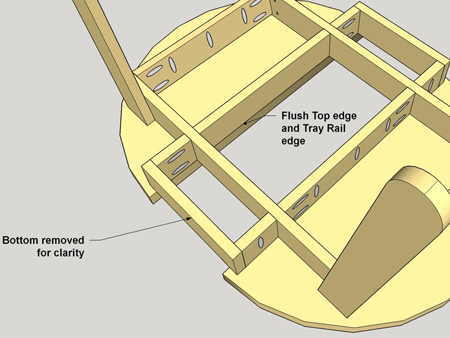
9. Lay the pre-made or made Top on a flat work surface - face down. Lay the table base over the top and align the parts so all edges are flush. Also make sure that the top overhangs equally on each side. Secure the Top to the table base by driving screws to secure.
Finishing
Do any final sanding, wipe clean and then apply finish and paint. We applied acrylic paint on the outside faces of the table base and Woodoc 5 Polywax sealer to the rest of the table. If you’re also building chairs, you can leave those steps until you’re done building the chairs
Chair:
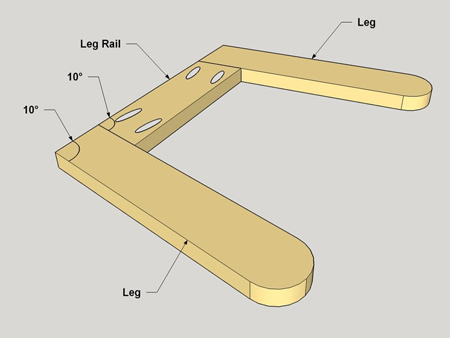
1. Cut a 10° angle on one end of each Leg. Use a suitable template to draw the radius on the opposite end and cut out with a jigsaw. Sand smooth.
2. On the Leg Rails cut opposing 10° angles on each end of each board, as shown. Drill pocketholes at the locations shown above. Sand smooth.
3. Align two Legs to one Leg Rail so the tops are flush. Add glue and secure the assembly with screws. Repeat for the remaining side.
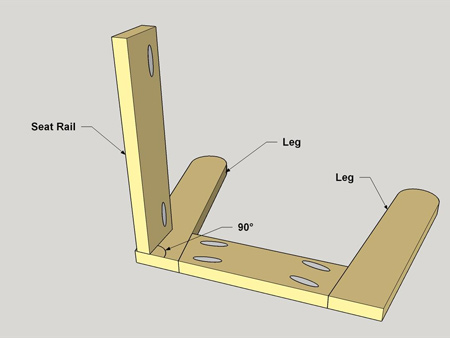
4. On the Seat Rail drill pocketholes as shown above. Sand smooth.
5. Inset the edge of the Seat Rail 3mm from the top edge of the Leg and align it so it is perpendicular to the top edge of the Leg. Secure with screws.
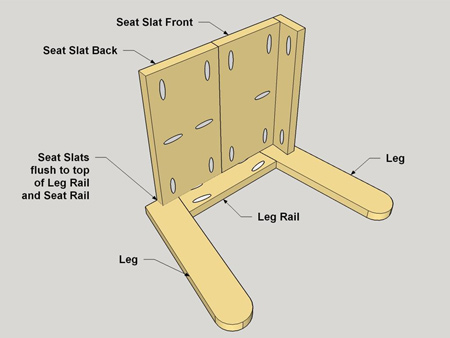
6. On the Seat Slats drill pocketholes, as shown below. Sand the Slats smooth - but NOT the edges.
7. Place the first Seat Slat against the Seat Rail and secure it to the chair side assembly and Seat Rail with pockethole screws. Set the second Seat Slat behind the first, and secure it to the chair side assembly and the first Slat and secure in the same way.
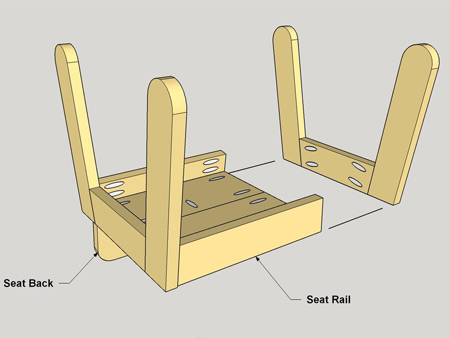
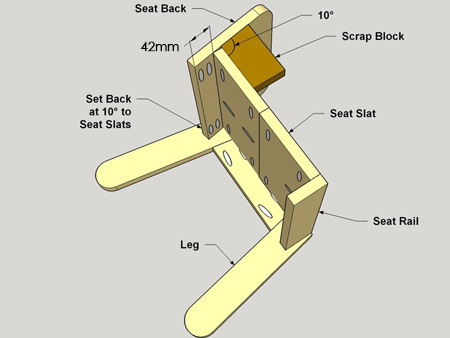
8. For the Seat Back draw the radiused corners, and cut out with a jigsaw. Sand smooth. Drill pocketholes and then sand.
9. Cut a 10° angle on a scrap block, shown below, and set the Seat Back in position. Clamp the block in position to support the angle of the Seat Back and then secure the Back to the Leg using screws. Secure the rear Seat Slat to the Seat Back with a single screw.
10. Set the chair to rest on its seat and position the second chair side assembly in place so it matches the first, and secure with screws.