
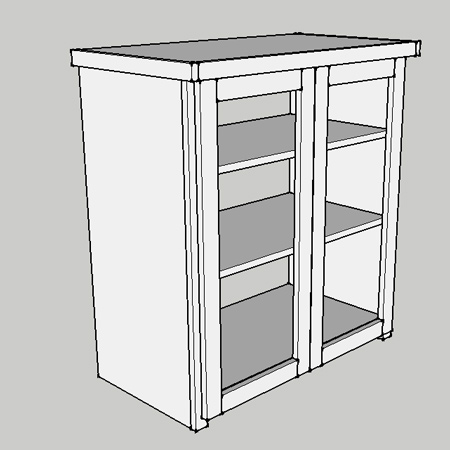
Build a 2-Door Cabinet
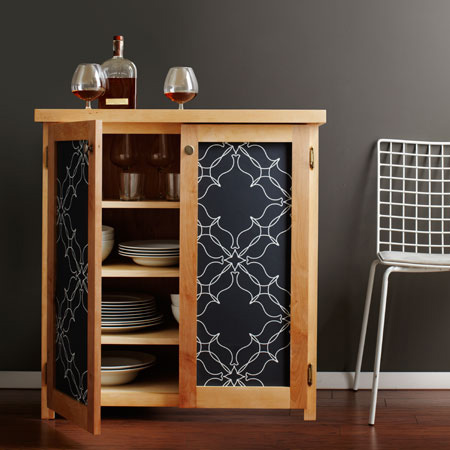
This take on the classic 2-door cabinet fits just about anywhere, and its panels can be made from a variety of materials, from steel or plastic mesh, glass, or Masonite panels sprayed with blackboard paint.
popularmechanics.com
The simple two-door cabinet is a basic home accessories and remains one of the most practical pieces to store your stuff. Our plans will show you how to build your own and finish it in a variety of styles. Our take on the classic 2-door cabinet fits just about anywhere, and its panels can be made from a variety of materials, from steel or plastic mesh, glass, or panels sprayed with blackboard paint.
YOU WILL NEED:
All sections 19mm birch- or meranti-veneered plywood
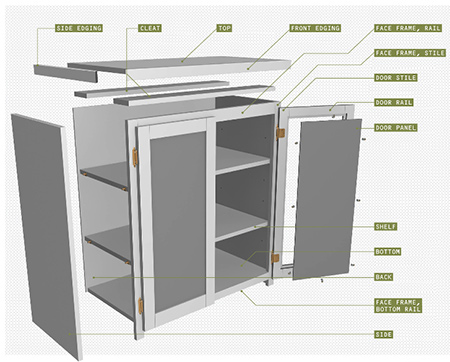
2 of 406 x 895mm - sides
2 of 100 x 775mm - cleats
2 of 406 x 775mm - shelf
1 of 406 x 775mm - bottom
2 of 38 x 895mm - face frame, stile
2 of 38 x 737mm - face frame, rail
1 of 445 x 813mm - top
2 of 38 x 464mm - side edging
1 of 38 x 813mm - front edging
4 of 50 x 840mm - door stile
4 of 50 x 286mm - door rail
Choice of material for door panel - see Finishing below
Coarse-thread pockethole screws, 32mm
30mm smooth shank screws
Wood glue
Wood filler
Hinges [4]
Knobs or handles and screws [2]
Shelf pins [8]
Plastic glass clips [16]
TOOLS:
Drill / Driver plus assorted bits, incl. countersink bit
Kreg Pockethole Jig
Bosch Tacker or heavy-duty stapler and staples
Orbital Sander and 120-grit sanding pads
Tape measure and pencil
Optional: Drill Press
Buy all the tools and materials for this project at your local Builders Warehouse.
HERE'S HOW:
If you haven't had all the pieces cut to size, do this now. You can use a table saw, circular saw, or jigsaw and a straightedge guide.
GOOD TO KNOW
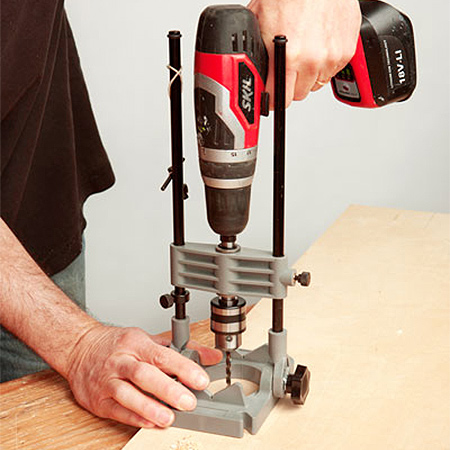
Before assembly, use a portable drill guide or drill press to bore holes for the shelf pins in the cabinet sides.
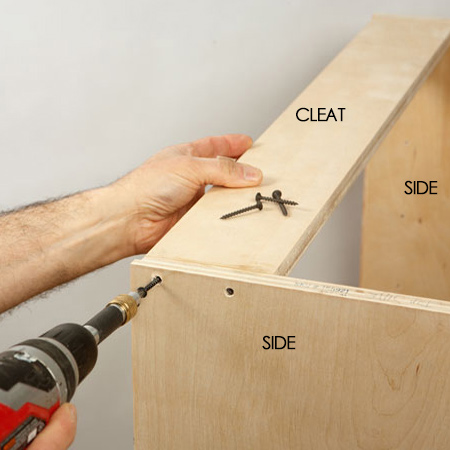
1. Attach the cleats between the cabinet sides. Drill 3mm countersunk pilot holes for each cleat and drive screws through the sides into the ends of the cleats.
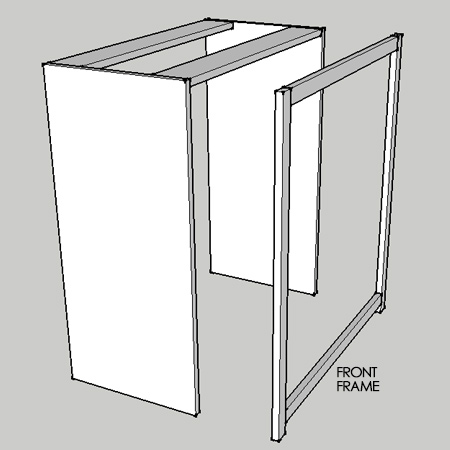
2. Assemble the four sections (rails and stiles) that make up the face frame using wood glue, pocketholes and coarse-thread pockethole screws.
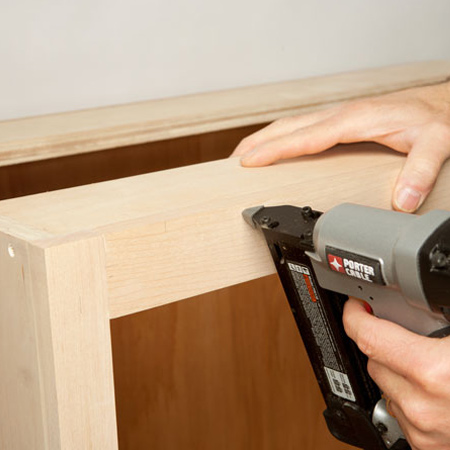
3. Attach the face frame to the cabinet with a pneumatic nail gun OR 35mm panel pins and a hammer. For either option, also apply a bead of wood glue to the cabinet ends. Wipe away any excess glue that oozes out immediately with a damp cloth.
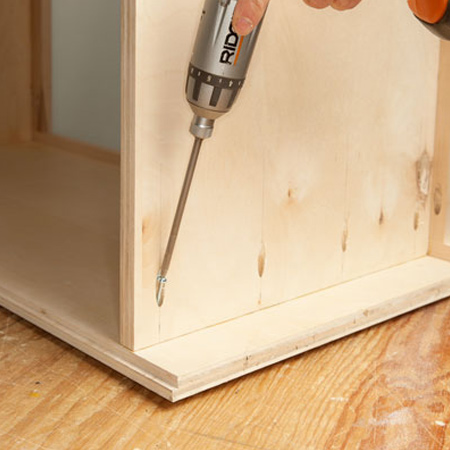
4. Pre-drill pocketholes along both sides of the bottom. Place the cabinet on one side and drive [4] coarse-thread pockethole screws through the bottom into the cabinet sides.
GOOD TO KNOW
Ensure that the screws do not go right through the sides.
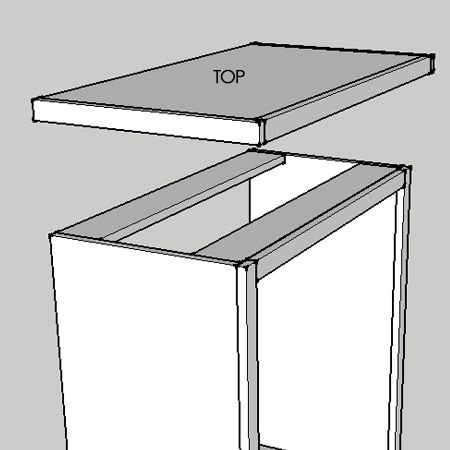
5. Assemble the top section (top, side and front edges) using wood glue, pocketholes and coarse-thread screws. Drill pocketholes around the front and sides of the top to secure the edges in place.
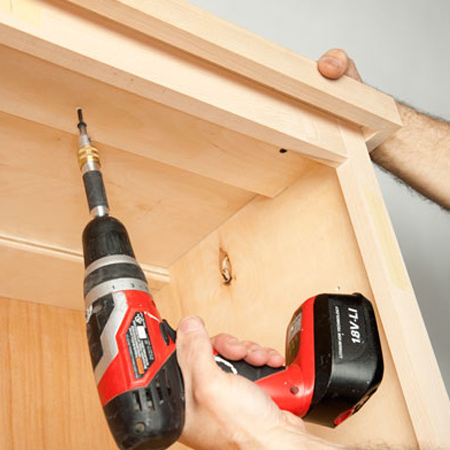
6. Place the cabinet top in position and drive 30mm screws through the cleats into the underside of the top section.
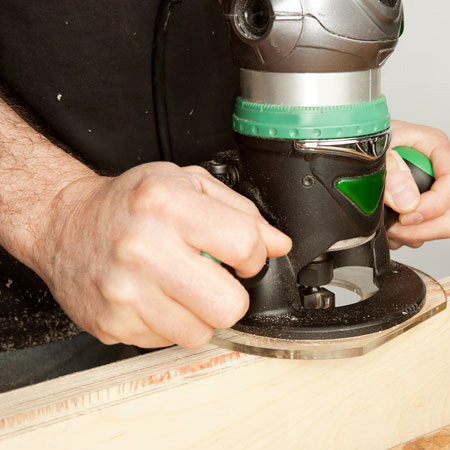
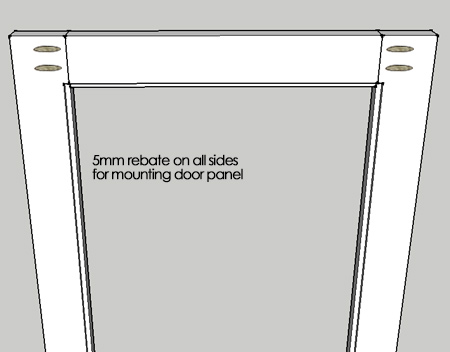
7. On all the frames that make up the door sections you need to cut a 5mm wide x 5mm deep rebate. Clamp two panels together for ease and rout the rebates.
GOOD TO KNOW
If you don't own a router, use flat pins or braces to attach the door panels to the frame.
8. Drill a pair of pocketholes at the end of each door stile, apply wood glue and then drive in coarse-thread screws.
Finishing
- Attach the back panel using a Bosch Tacker or heavy-duty stapler, or panel pins and a hammer.
- Decide on the panels you want for the door. This can be glass, perspex, 3mm white Masonite sprayed with black Rust-Oleum Chalkboard spray paint (as shown for this project), or mesh panels.
- Place the cut panels in the rebate and and secure with glass clips.
- Attach [2] hinges to each door. Lay the cabinet on its back and set the doors on the face frame, making sure the doors are centred with a 2mm space between them. Screw the hinges to the frame.
- Add your choice of handles or knobs.
- Fill screw / nail holes with wood filler, let dry. Lightly sand with 120-grit sandpaper. Wipe off dust and apply two coats of Woodoc 5 or 10 interior sealer. If you'd prefer to stain the cabinet, apply Woodoc Gel Stain and then apply sealer.
- Press shelf pegs into the holes in the cabinet sides to mount the shelves.
Optional
Finish off the edges with veneer edging strip in matching grain. This is applied either with glue, or where the glue is already applied, with a hot iron (no steam). Once cool, use an edge trimmer or utility knife and a sanding block to cut the veneer to fit.
Not responsible for errors or omissions