
Faux stone or brick wall
Give your patio an instant facelift by adding a faux stone or brick wall effect to an exterior wall.
Painting a surface to look like it is made of stone blocks or bricks is a versatile technique because you can customise the size, shape, arrangement, and colour of the blocks or bricks in the finished treatment.
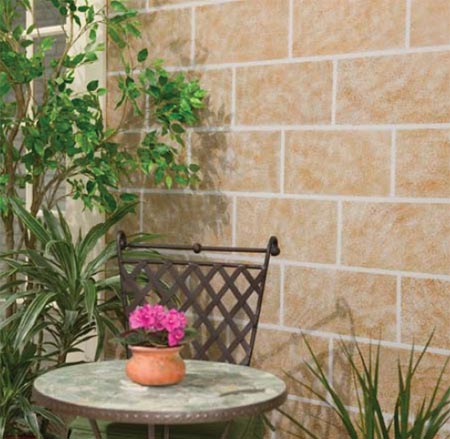
By combining the appropriate paint colours and dimensions, a stone block or brick project can resemble medieval cobblestones, Victorian pavers, modern cinder blocks, or a host of other popular masonry styles. The thickness of the masking tape you choose for this technique affects the appearance of the grout lines in your finished project.
Look
at real masonry projects to get a
sense of the mortar thickness that
is most appropriate for the type and
size of blocks or bricks you want to
represent.
YOU WILL NEED:
Prominent Paints - exterior matt - in your choice of colour
Prominent Paints - exterior matt - in a slightly lighter shade
Large paintbrush
Masking tape in assorted thickness
Newspaper or rags
Painting trays
Dropcloth
Spirit level
Pencil
Tape measure
HERE'S HOW:
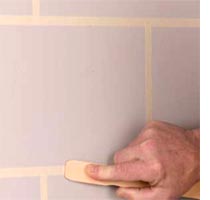
Using a spirit level, pencil, and tape measure, mark the placement of the horizontal lines for your design. Start from the bottom of the surface and make small pencil marks; don’t draw lines. Apply thin masking tape along the horizontal joint markings. Hang a plumb bob from the ceiling to help make the vertical mortar lines plumb.
Start from the far left and apply vertical tape strips to every other row of blocks or bricks to create a masonry effect.
DIY Tip:
Use your fingernail or a burnishing tool to smooth the
tape lines to the wall. The tape must adhere tightly to
prevent paint from creeping under the edges; that would
spoil the effect.
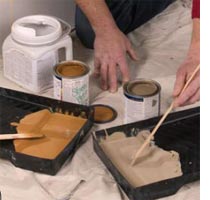
In small, separate mixing containers combine one part scumble glaze and one part paint; stir until blended. Pour equal amounts of each glaze colour into separate shallow plates or trays. Load a stipple brush or a stiff brush with the glaze that will be the dominant brick colour. Blot excess glaze on a piece of newspaper or a rag. Working within one taped-off block at a time, tap on the first glaze with the brush. Pounce quickly and randomly, rotating the position of your hand and arm frequently.
DIY Tip:
Cover floors with dropcloth to protect from drips and spills and reduce cleanup time.
Apply glaze inconsistently, allowing small patches of the base coat to show through the glaze. Avoid overpouncing and producing an overly blended finish. After completing each block, step back a few feet and evaluate your work; every block should have a distinct look but should still blend with the surrounding blocks.
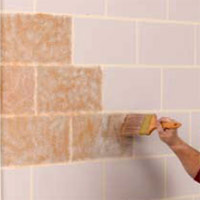
Load a second brush with the second colour; blot off excess. Working within the same block, apply the second glaze colour - with the same pouncing motion - as an accent, applying glaze to some areas and leaving other areas unglazed. Blend the glazes slightly, but don’t overblend. Begin working on another block, applying the first glaze to the entire area of the block and the second glaze as an accent to portions of the block. Allow each block to have slightly different amounts of each glaze and levels of blending for a more realistic look.
DIY Tip:
To create convincing bricks and
blocks, you must vary the textures
and dominant colours on each taped
area. Take a look at real masonry
projects to get a sense of the variety
of textures and colours present.
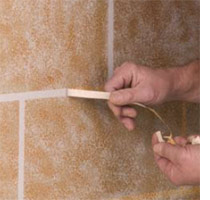
When you’re done painting a section of bricks, carefully remove the masking tape. Start by removing vertical tape pieces, followed by longer, horizontal bands. Regular masking tape left on a surface for days - or even several hours - can pull up paint, plaster when you attempt to remove it. Touch up any areas where topcoat glaze may have seeped under the tape by applying the basecoat paint with an artist’s brush.
Optional:
For a weathered effect, let the
two glazes used for the bricks dry;
then sponge on thinned green glaze
(one part paint, two or three parts
glaze, one part water) to resemble
moss and lichen. For an overall aged
effect, remove the tape lines and roll
on a very thin coat of grey or brown.