
Paint a hardwood floor
While hardwood floors are beautiful, where floors are no longer looking good are cannot take any more sanding, painting offers you an opportunity to add a new look without the expense of replacing the entire floor.
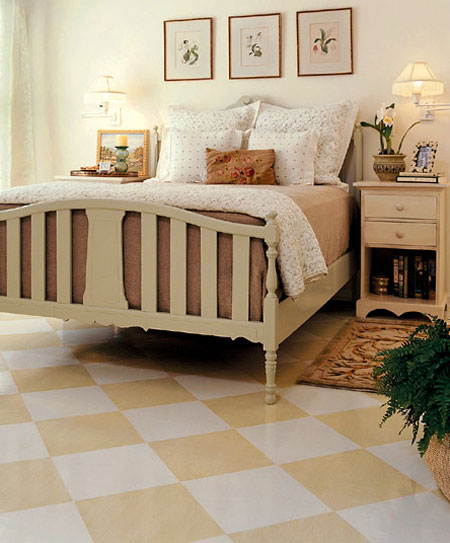
Hardwood floors add warmth and beauty and become even more nostalgic as they age. Painted hardwoods are becoming increasingly popular, because they are pretty and practical.
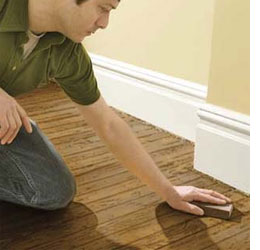
Step 1
To create a better bond between the floor and paint, sand and clean the floor first. For a varnished floor you will need to remove as much of the varnish as possible, but otherwise a light sanding with 180-grit sandpaper will be sufficient. Wipe the entire floor clean with a cloth lightly dampened with mineral turpentine to remove all traces of dust.
GOOD TO KNOW
Use a quality paint such as Plascon Wall & All for the light and dark colours, and top this off with two coats of polyurethane sealer.
Coating the entire floor using the lighter of the two colours as a base coat creates a clean slate for laying out the pattern and acts as a primer for the darker pattern colour.
GOOD TO KNOW
To prevent dust from blowing in and spoiling the paint finish, stick up a plastic sheet to cover doors and openings.
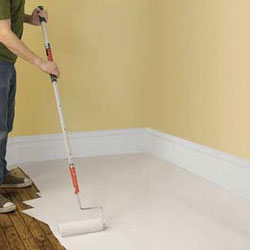
Step 2
Start off by using a paint brush to paint around the perimeter of the room. Use a paint roller fitted with an extension handle to paint the base colour onto the floor. Start at the furthest corner to avoid trapping yourself! Let the paint dry overnight before laying out the pattern and applying the second color.
Step 3
Setting a checker pattern on a diagonal looks dynamic and makes the room appear bigger. But the pattern will look best if it ends in perfect half-square triangles at the most visible walls. So figure out which wall is least visible and start measuring on the opposite side of the room. Keep in mind that the masking tape outlines the box you're painting, so it will fall on alternating sides of the pattern lines from square to square.
Estimate the number of squares you want to fit across the centre wall of the three most visible walls. Divide the length of the wall by the number of squares. With this measurement, mark the wall from corner to corner. Find the centre point between the first two marks and note the distance from the corner to the centre.
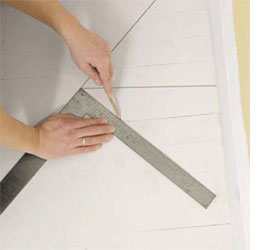
Using a framing square, draw a perpendicular reference line out from the point, making it the same length as the distance from the corner to the centre point. Then connect the corner to the end of the reference line. This is the side of the first square. Using a straightedge, extend the line out into the room.
Mark the entire line at intervals to match the length of the side of each pattern square. Using a framing square as a right-angle guide, complete the squares at each mark. Double-check your layout by making sure you connect back to the marks on the first wall.
Step 4
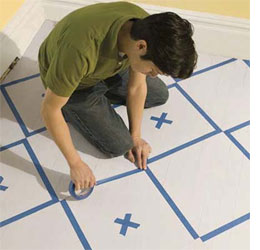
With all the squares drawn, use masking tape to' X' out the squares you
don't intend to paint. Tape around the outside edges of the
unmarked squares.
Cut each piece of tape perfectly by tearing it against a putty knife: Hold the blade on the tape and rip away from the knife to execute a perfect cut and make sharp corners for each square. Seal the tape to the floor by pulling the putty-knife blade over the tape to remove air bubbles and prevent paint from bleeding underneath and onto the lighter-coloured squares. Continue taping until all the unmarked squares are outlined.
Tip: Clean up pencil marks with a damp sponge instead of an eraser, which could damage the freshly painted base coat.
Step 5
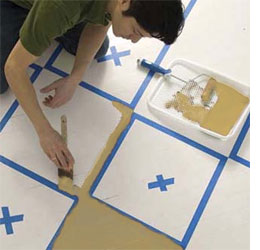
Apply paint around the edge of the square. Start each stroke on the tape and pull it into the square so that the colour doesn't push under the edge. Coat the entire perimeter of the square this way. While the edges are still wet, fill in the field using a mini roller. Roll the paint on in the same direction as the floorboards.
Continue painting the squares in this manner until the floor is finished. Clean up any drips or mistakes by wiping them up with a damp rag while they're still wet.
GOOD TO KNOW
Remove the tape before the paint dries so that it doesn't pull up any colour with it. Peel the tape up and away from the paint at an angle to leave a clean edge.
While most floor paints are durable, for high-traffic areas consider topping the floor with two coats of polyurethane. After the paint has dried for a full day, use a roller to apply the finish evenly across the floor. Lightly sand the first coat with 240-grit sandpaper before applying a second one down. Allow any sealer to dry for a full 48 hours before walking on the floor.