
Mounting your pictures
Now that you have your wooden frames ready, it's time to gather the materials for mounting. You can buy what you need at any well-stocked art supply store.
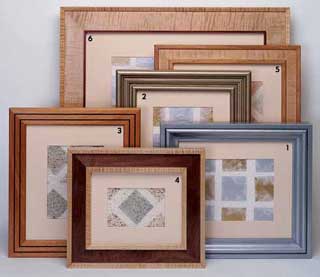
Photos and prints are typically mounted within a broad mat-board window that highlights the artwork. Mat board is available in a variety of colours and a few textures as well. Make sure to get acidfree, or archival, mat board to protect the artwork from deterioration. This same material can be used as the mounting board behind the artwork. You'll also need archival mounting tape. This tape is made of linen cloth and is activated by wetting its glued surface.
Backing board, installed behind the mounting board to keep it flat, can be either stiff corrugated cardboard or foam core stock. After the backing board, you'll need wax paper to act as a dust cover over the back of the frame - a glue stick is a convenient way to attach the paper to the frame.
Most artwork requires a pane of glass to protect it from dirt and changes in humidity. In most cases, normal window glass will work, although a special uv-protective glass is available to help prevent fading. Nonglare glass is also used for framing. However, this type has a slightly dull appearance. As for special tools, you'll need a straightedge and a mat cutter.
Mounting
Measure and mark the size of your mat and mounting boards. It's best to work from the back of the boards to prevent soiling the face. Place the boards on a piece of scrap cardboard and use a utility knife and straightedge to cut both pieces to size. Position the artwork on the mounting board and mark the corners with light pencil marks. Rip two 30mm-long pieces of linen mounting tape and moisten about 5mm of each piece. Adhere the tape to the back side of the artwork, along the top edge so that about 25mm extends beyond the top.
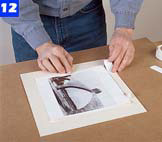
When the glue dries, turn the piece face side up and position it on the mounting board. Rip two more strips of tape, each about 70mm long, and moisten them. Apply them across the extending tape strips so the artwork is hinged to the mounting board (Photo 12). This system allows the print to expand and contract with changes in humidity, without wrinkling.
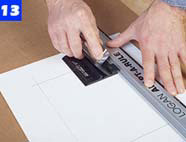
Mark the cutlines for the opening, or window, on the back side of the mat board. Typically, a mat extends over the image by no more than 5mm on each edge. Use the straightedge and mat cutter to make the cuts (Photo 13). It's a good idea to practice on scrap board to learn how to start and stop the cuts exactly at the corners.

Place the cut mat over the mounted print (Photo 14). It's not necessary to attach the mat since the whole assembly will be sandwiched in the frame.
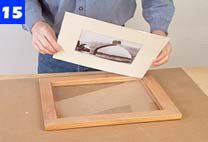
Turn the frame upside down and install the glass. Then place the matted print into the frame (Photo 15).
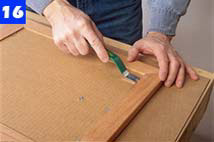
Cut the backing board to size and place it over the mounting board. Use framer's points to hold the back in place (Photo 16).

You can use a special driving tool or a flat-blade screwdriver to install the points. On hardwood frames, the driving tool is worthwhile since the points are a bit harder to install.
Cut a piece of wax paper slightly larger than the overall frame size. Rub a glue stick on the back side of the frame and apply the paper, letting it overhang on all edges.
Press the paper to the frame to get a good bond and use a straightedge and utility knife to trim it 2mm in from each edge. The simplest method of hanging a frame is to use a sawtooth-type hanger. Centre the hanger on the back of the top rail of the frame and drive brads to hold it in place (Photo 17). On a hardwood frame, use an awl or bore small pilot holes for the brads.
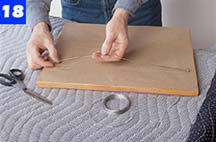
Large or heavy frames are best hung with picture wire. Bore pilot holes, and install screw eyes or D-ring hangers in the side frame rails about 80mm from the top edge of the frame. String a length of picture wire between the hangers, leaving slack. Twist the wire together to lock it to the hangers (Photo 18).
neal barrett popular mechanic - sep 2003