
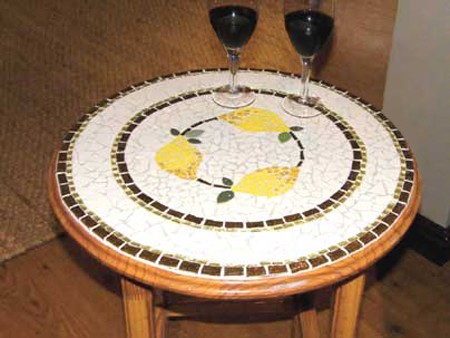
Create a table full of lemons
Create a wonderful mosaic tabletop with a selection of mosaics laid out to make a colourful lemon design.
YOU WILL NEED:
Wooden side table
Two-wheeled tile cutter
Sandpaper
Wood glue
Oatmeal grout
Spatula and mixing tub
Rubber squeegee
Pencil and carbon paper
Tile:
4 packs of glass mosaics
2 packs of metallic gold mosaics
5 sunflower glass mosaics
(1 bag of 250g or 130g pre-nipped is sufficient)
1 yellow ceramic tile
5 beige ceramic tiles
3 large ceramic leaf inserts
4 small ceramic leaf inserts
CONTINUES BELOW
HERE'S HOW:
1. Our old pine table was in serious need of a revamp. As the coats of varnish that had been painted over the table were starting to peel off, we used sandpaper to remove the varnish and give the table top a slightly rough surface onto which to work. Clean the surface of the table with a damp sponge to remove excess powder before you start to mosaic. Use the carbon paper to trace the design onto the table (use the above image as a guideline).

2. To create the outer brown border of the table, cut the brown 'V Range' glass mosaics in half and then glue them to the surface of the table by placing them closely together and right against the edge of the table, leaving a millimetre or two between each tile. The metallic gold border on the inside of the brown border is created by cutting the metallic gold mosaic into eighths.
3. Once you have completed both inner and outer border of the table, you are going to cut your beige ceramic tiles into relatively large, randomly shaped pieces. By jigsaw puzzling the pieces together, you will complete the section between the two borders. Try not to leave too many gaps between the ceramic tiles that require small pieces to fill in.
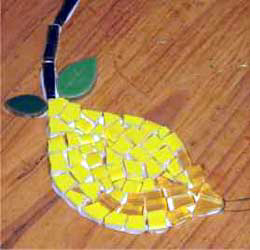
4. Using the tile cutter, you will now shape the sunflower yellow glass mosaics to create the bottom of the lemon and you'll also cut a about three mosaics into eighths as that you can blend them in with the yellow ceramic tile that is going to be cut into small, irregular shapes to create the form of the lemon. Once you have completed all three lemons, you'll cut 3 x brown 'V Range' glass mosaics into long, skinny bits.
Remember to cut the mosaic into half and then half again to create the slender pieces. Now place the long bits between the top and the bottoms of the lemons to connect them and then finally glue the ceramic leaf inserts into place.
5. To complete the inner section of the background of the table, you once again cut the beige ceramic tiles into irregular shapes and sizes and jig-saw puzzle the pieces together. Leave the project for 24 hours to dry.

6. As this table is only for inside use, you are going to mix a little bit of water to about 400g of oatmeal grout until you get the consistency of icing sugar or toothpaste. Once all of the powder granules are mixed into the grout paste, use your rubber squeegee to smooth the grout evenly over the surface of the entire mosaic, working the paste into the nooks and crannies between the tiles.
emove the excess grout and leave the grout to set for about 2 hours before wiping the piece clean with a slightly damp sponge.
7. After another few hours you can use a clean, dry cloth to polish your masterpiece.
Remember that you need to take special precautions to seal your table if it's for outside use.