
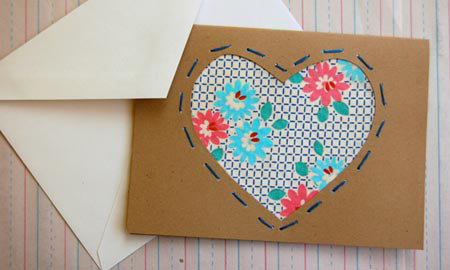
Heartfelt greetings
In this day and age, receiving a handwritten note is a special and all-too-rare treat. If the card itself is handmade, that's even better! Here's a project that uses blank note cards from the craft store and fabric scraps from your stash to create one-of-a-kind embellished greetings that are sure to perk up anyone's day.
sewdarncute.typepad.com
YOU WILL NEED:
Blank note cards
Cardstock
Assorted fabric scraps
Embroidery thread and needle
Craft knife
Scissors
Mini-hole punch
Glue stick
Ruler
Sellotape
Pencil
CONTINUES BELOW
HERE'S HOW:
1. Start by drawing a simple shape on the front of the note card — I drew a heart. Then draw a slightly larger outline of this shape as a guide for where to place your hole punches. (I made my line about 10mm larger than the first shape I drew.) Cut out the centre shape using a craft knife.
2. Next, use a mini-hole punch to create a dotted outline all around the shape you cut. I punched my holes about 10mm apart. Then cut a piece of fabric that will cover both the cutout shape and the holes you just punched. Use the glue stick to coat the inside of the card's front and place the card glue-side down on top of the fabric. Smooth the layers down and allow to dry.
3. Thread your needle with some embroidery thread — I chose to use 3 strands rather than 6 so the card would have less bulk, but it's up to you. Starting in the back (inside) of the card, begin stitching through the holes you punched. Instead of knotting the thread at the end, though, use a bit of sellotape to hold it in place.
4. When you're inserting the needle from inside the card (where the holes aren't visible), you can hold it up to the light to see exactly where to place your stitches. Once you've gone all the way around, end your stitching inside the card and remove the sellotape. Tie the thread in a small knot and snip the ends. If your ending stitch happens to end up at the front of the card, just push the needle through the card and fabric layers towards the back — no big deal.
5. Now cut a piece of cardstock (or other opaque paper) using the ruler and craft knife. The paper should be slightly smaller than the card itself, and it's nice to choose a contrasting colour. If you like, you could round the corners using a corner punch, as I did. You could also cut the edges of the paper with decorative scissors if you like.
6. Cover the back of the cardstock with glue and adhere it, glue-side down, to the inside of the note card to cover the wrong side of your fabric and stitching. It also helps everything lay flat if you place the card under a stack of books to dry. Once it's dry, it's ready to send and enjoy!