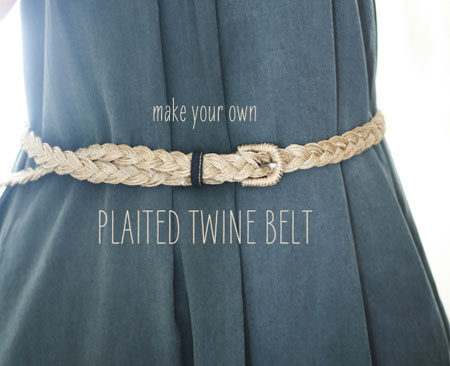
How to make a plaited twine belt
I like this project that uses twine to make a plaited twine belt, and what's nice is that you can always dye it if you want to add some colour. I would use food colouring to dye a plaited twine belt.
sayyestohoboken.com
YOU WILL NEED:
Twine (best if it’s not too ‘furry’)
Scissors
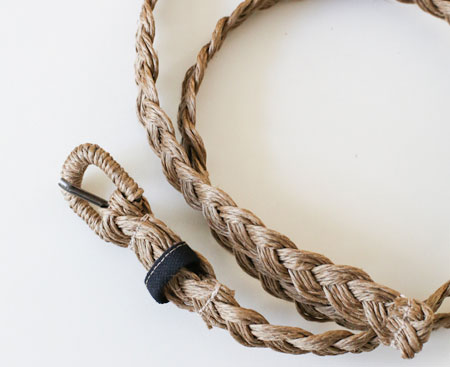
Belt buckle (see tip)
2 large clamps (or a large clamp and clips)
Two boards (plastic or heavy card)
Heavy thread
Needles
Cotton tape
Thread (optional)
Sewing machine (optional)
Tips:
- When choosing a belt buckle be mindful of the size. The inside width of your buckle will be the width your belt needs to be. I took my buckle off an old belt I no longer wear, and it had an inside width of about 2cm. Any wider than that and you may have trouble keeping the twine in a nice flat plait.
- I put down sewing machine as optional because I found that I couldn’t fit the belt into my machine (I hand sewed everything except the belt loop). If, however, you’re able to fit the belt through your machine, that will make things a bit easier
- Because I wasn’t sure of size, I cut the twine quite long to make sure I would have enough to play with in the end. If you’re also unsure about size, it’s best to cut the twine longer.. it’s easier to cut off the extra than to add more later! I cut my twine at 2m and ended up with a belt of about 1m long (but there was plenty of length left if I’d needed it).
CONTINUES BELOW
HERE'S HOW:
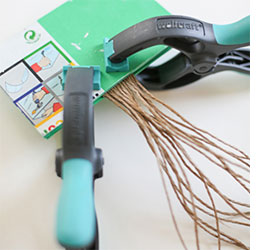
1. Measure out 15 strands of twine, 2m each (see tip above). At one end, bring all the ends together and arrange them so they’re all side-by-side (none overlapping). Sandwich the twine between the two boards and clamp to hold them in place.
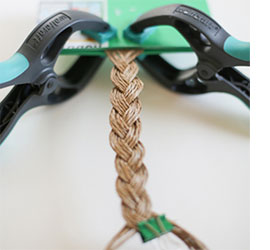
2. Separate the strands into 3 groups of 5 and start to plait, trying to keep all strands flat and in order. The idea is to have a flat plait, not a raised plait. Keep plaiting until you’ve reached the end. Clamp both ends to stop them unraveling.
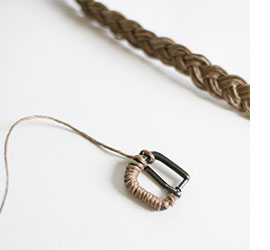
3. Cut off a new piece of twine (approx. 50cm to be safe) and, beginning at the bottom, start winding the twine around the buckle. I used a small dab of glue to attach the beginning of the twine to the buckle but you could also just tie it on (it will eventually be hidden under the belt). Keep winding until it’s covered. I finished the end off with another dab of glue to hold it in place.

4. Take the plaited section again. Carefully un-clamp one end and slip the belt through the buckle, then re-clamp the end. Take the buckle about 10cm in from the end, and push the loose prong up through the middle of the plait. Fold the belt over on itself, holding the buckle in the middle. Clamp.
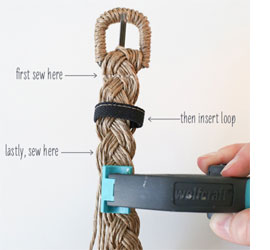
5. Sew (either with machine, or by hand using the heavy thread) across the width of the belt, just below the buckle. This will secure the two sides together and hold the buckle in.
6. Now you want to make the belt loop. Cut a 8cm piece of the cotton tape, fold it in half vertically and sew down the open side. Using the width of your belt as a gauge, make a loop with your cotton tape and adjust the size. You don’t want the loop to be too tight against the belt, but not too loose either. Once you’ve determined the best size, sew the loop together and cut off any excess.
7. Slip the loop onto the belt and position it close to the buckle (make sure it’s secured between the top layer of belt, and the back part that’s folded over).
8. Now sew (either with machine, or by hand using the heavy thread) across the width of the belt just below the loop.
9. Cut off the ends remaining on the back.
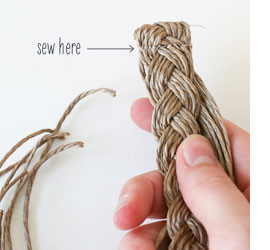
10. Put the belt loosely around you to get an idea of how long you’d like it. Mark where you’d like the end to be. Go to the unfinished end of the belt and fold it over on itself at the point you’d like to make the end (make sure you’ve folded it so the raw edge will face the back of the belt). Sew (either with machine, or by hand with heavy thread) across the width of the belt to secure the end in place. Cut the loose ends off.