
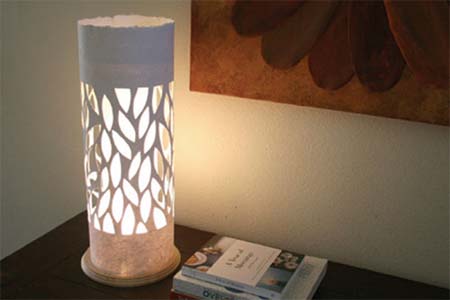
Lamp with paper lampshade
Light and paper are always a good combination, and indirect lighting can be such a nice way to soften the feeling in a room. The translucency of vellum and the texture of the handmade paper is what makes this project really stand out. Add a little bit of a three-dimensional design and the impact of this simple project will be self-evident.
patriciazapata.com
This project specifically requires the use of a large sheet of vellum and handmade paper for added texture. If neither of these are available to you be creative with the materials that you use. For added colour and interest, a large poster can be used for the outer tube. The inner vellum tube can be replaced with something like a double layer of newsprint. Keep in mind that the translucent nature of the vellum will provide more light than other materials. If in doubt, hold up your paper against a light source to see if it will offer the look you are after.
YOU WILL NEED:
Sheet of handmade textured paper
Ruler and pencil
Craft knife and cutting mat
Sheet of double-ply vellum
Foam core
Compass
Stapler
Sellotape and double-sided tape
PVC glue
Scissors
Light fitting
Pine base, raw and unsealed, 200mm in diameter
HERE'S HOW:
1. Draw a 300 x 550mm rectangle lengthwise in the centre of the handmade sheet of paper. Some handmade papers have a front side and a back side (where the texture is less prominent), so make sure to draw this rectangle on the back side of your paper.
2. Using a pencil, lightly draw random vertical leaves inside of this rectangle. The leaves should vary in size and width, so that the whole design is more dynamic. Draw some leaves that are cropped off around the borders of the rectangle.
3. Using the craft knife, cut out all of the leaves. Carefully erase any stray pencil markings.
4. Trim off the raw edge of one of the long sides of the sheet. Set the sheet aside.
5. Use the compass to draw a circle on a piece of foam core that is 180mm in diameter.. Draw another circle that is centred in the first circle and is 115mm in diameter. With the craft knife cut along the lines of the inner and outer circles.
6. Repeat to make another foam core ring.
7. Fold the vellum sheet in half. Form a roll (lengthwise) and slide it into the centre of the 2 foam core rings. This will give you the perfect diameter for the tube that you need to create with the vellum. Place one staple 10mm from the each end of the vellum tube.
8. Place short strips of double-sided tape along the overlapping edges of the tube made of vellum paper. Add a very thin line of PVC glue around one end of the vellum tube 50mm from the edge of the tube. Slide the foam core ring closest to this side and place it over the glue. Slide your hand into the tube and press the vellum against the ring. Wait for it to dry.
9. With scissors, cut 2 vertical slits that are 25mm tall and 25mm away from each other. The cuts should be made to one side of the overlapping vellum. Push and fold the paper or tab created between the cuts towards the inside of the vellum tube. This will be the space needed for the puck light cable to go through.
10. Add a very thin line of PVC glue along the outer edge of the end of the tube where the cuts were made. Place the vellum tube inside the second ring and make sure it is touching your work surface.
11. With the craft knife make 2 cuts on the ring that are 25mm apart; cut all the way across the ring and match up with the cutout space in the vellum tube. Remove the excess piece of foam core.
12. Cut out a 12mm square out of 2 of the corners of one of the long sides of the handmade paper sheet. Starting where the 25mm gap is located, add a thin line of PVC glue around the outer rim of both foam core rings.
13. Wrap the white sheet around the 2 foam core rings. The straight long edge of the sheet should be touching the work surface and the outer edge of the bottom ring. The short sides of the sheet should overlap over the 25mm gap in the vellum tube and bottom foam core ring. Using PVC glue attach the short ends of the white handmade paper where they overlap.
14. Attach the light fitting to the wooden base per the manufacturer's instructions.
15. Add several strips of double-sided tape to the bottom of the foam core ring that has the 25mm gap and attach it centred on the wooden base and over the light fitting. The cable of the light should be placed through the gap on the bottom of the paper structure.
Tips and Variations:
If you find a paper that you prefer for the outer portion of the lamp but it is too thin, glue a sturdier card stock paper to the back side of it. This will allow the thinner paper to stand in a vertical position and be strong enough to be used for this project.
The height and diameter of this lamp can be reduced. For safety precautions, I would not recommend making the inner diameter of the foam core rings any smaller. The light fitting should have enough ventilation and it is best that it not touch the paper.